Installing ceiling beams comes down to four decisions: solid or hollow beams, where they sit relative to your joists, how they attach, and whether the structure above can carry them. Hollow (faux) beams are mounted on blocks or cleats fastened to the framing. Solid timber beams are heavy, so they need a structural check before anyone lifts one. Get the layout right on paper and the installation itself is a methodical day or two of work per room.
This guide walks through each decision the way a carpenter would, including what to ask before you cut a single board.
TL;DR
- Decide first between solid wood and hollow beams. Hollow beams are light and mount over blocks; solid beams need structural review.
- Find your ceiling joists before you plan the layout, because every beam or mounting cleat must tie into framing.
- Start with beam depth of about one inch per foot of ceiling height, and keep spacing even.
- Shut off power, check for wiring and use a deadman support so you are never holding a beam overhead.
- Solid wood, vaulted ceilings, coffered grids and historic homes are the jobs most worth handing to a carpenter.
Table of Contents
- Solid wood or hollow beams: the choice that shapes everything
- Plan the layout before you buy anything
- Styles and ideas that fit real houses
- Before you start: safety and structure
- Tools and materials
- How hollow beams go up, step by step
- Common mistakes
- Our perspective
- Hiring a carpenter for ceiling beams
- Work with Wood Made Illinois
- FAQ
- Sources
Solid wood or hollow beams: the choice that shapes everything
Every installation method follows from this first choice. This Old House notes that wood beam ceilings are commonly made from pine, oak or cedar, and that homeowners can choose solid wood or lighter faux beams made from polyurethane foam.
Hollow or box beams are three-sided or four-sided shells built from boards or molded material. The sides are typically 1×3, 1×4 or 1×6 lumber depending on the depth you want, and the bottom can be solid wood or plywood because the sides hide its edges, according to the same This Old House guide. Because they are light, they go up with blocking and screws.

Molded faux beams in fiberglass or high-density polyurethane are lighter still. Bob Vila reports that these can be installed without an engineer’s approval, by mounting blocks to the ceiling and fitting the beams over them with screws. Even so, he cautions that decorative beams can add substantial weight and recommends an engineer assess the existing structure first.
Solid wood beams are the real thing: heavy, characterful and demanding. Solid beams are not a casual weekend job. They need correct fastening into framing, two or more people to lift, and a plan for how the load is carried. If you are searching for solid wood ceiling beams, expect the work to belong to a carpenter, not a rental ladder and a screw gun.
If you are also weighing how material choice changes a project’s price, our piece on how material choice shapes your renovation cost covers the trade-offs.
| Hollow or box beam | Molded faux beam | Solid wood beam | |
|---|---|---|---|
| Weight | Light | Lightest | Heavy |
| Attachment | Blocks or cleats into joists | Mounting blocks, screws | Brackets or structural fastening into framing |
| Cutting | Miter or circular saw | Hand or reciprocating saw | Miter or table saw |
| Typical finish | Stain or paint | Pre-finished or painted | Stain, oil, or leave natural |
| Best for | Custom sizes and wood species you choose | Quick, uniform look | Authentic character, structural-looking trusses |
Plan the layout before you buy anything
A beam layout that looks accidental took planning. Four things drive it: ceiling shape, joist direction, sizing and spacing.
Read the ceiling first
On a flat ceiling, parallel rows, a grid, or a single statement beam all work. Centennial Woods suggests a single beam across the center of a living room as a low-effort first project that draws the eye upward. Tray ceilings take beams that frame the recessed center. On vaulted ceilings, The Spruce recommends setting beams tight against the slope rather than horizontally beneath it, which accents the shape and makes the room feel bigger.
If you want a ridge-style look, Bob Vila explains that a single beam running the length of the ceiling at its highest point, called a ridge beam, can be paired with horizontal and sloped members to suggest massive roof trusses.
Size and spacing rules of thumb
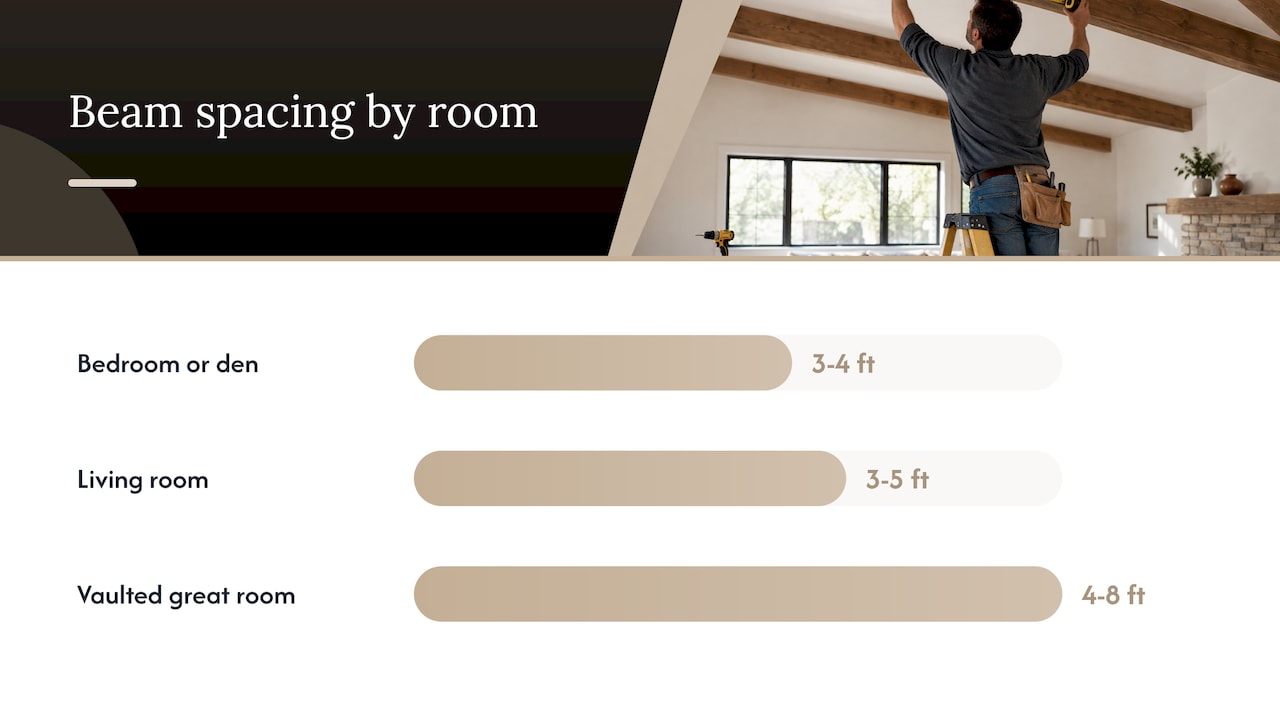
The most repeated guideline is to scale beam depth to ceiling height at about one inch per foot. Hardwood Design Company says ceilings of 8 to 9 feet generally call for shallower beams, often 4 to 6 inches deep, while vaulted or cathedral ceilings can carry beams 8 to 12 inches deep without feeling heavy. The same guide puts spacing typically between 24 and 48 inches on center, with beams usually running in the direction of the joists.
Other sources allow wider rhythms. Volterra Products calls 4 to 8 feet common for parallel beams and warns that too many beams make a ceiling feel heavy, while too few look sparse and disconnected. Pick a spacing, then adjust until the beams divide the room evenly instead of leaving a narrow strip against one wall.
| Room type | Starting beam depth | Starting spacing |
|---|---|---|
| Bedroom or small den, 8-foot ceiling | 4 to 5 inches | 3 to 4 feet |
| Living room, 9-foot ceiling | 5 to 6 inches | 3 to 5 feet |
| Great room, vaulted | 8 to 12 inches | 4 to 8 feet |
These are starting points that combine the guidance above, not codes. Your room’s windows, lights and doors will adjust them.
Map terminations and fixtures
Hardwood Design Company also points out that beams ending awkwardly mid-span or crashing into a window header look unresolved. Mark door heads, windows, recessed lights and fans on a floor plan before cutting. That extra hour saves a ceiling.
Keep the room bright
A common worry: will beams make the room smaller or darker? Not if you plan for it. A home and garden guide on beams and room size suggests painting the ceiling between the beams white or a light color, which makes the real ceiling seem farther away, and notes that beams running the length of a short room make it feel longer. Where ceilings are low, painting the beams to match the ceiling keeps the architectural line without the visual weight. Save dark, hand-hewn timber for rooms with height, such as farm-style or cabin rooms, where Bob Vila says reclaimed solid beams give a strong Old Country look.
Styles and ideas that fit real houses
Beam ideas are easier to choose by house style than by photo.
- Farmhouse and rustic: parallel runs in stained pine, oak or cedar. Rough-sawn faces suit older Central Illinois farmhouses.
- Traditional: a grid or coffered pattern. Build-Construct observes that coffering is the most formal and labor-intensive option because every intersection needs a clean joint.
- Modern farmhouse and contemporary: V-beam layouts or painted beams, and Bob Vila notes that painted beams can look striking in a contemporary home.
- Single statement beam: over a dining table, kitchen island or the center of a living room.
For the wider picture of how wood overhead fits other surfaces, see our guide to wood ceiling accent styles and costs and our ideas for adding architectural character indoors.
Before you start: safety and structure
The pretty part is the last part. The first part is making sure the ceiling can take it and the room is safe to work in.
- Check the structure. Bob Vila recommends an engineer’s assessment of the existing structure for any beam installation that adds meaningful weight. Solid beams change the load, and spacing affects the tributary load each beam carries, as noted by Tar River Timber Works.
- Cut the power. This Old House advises turning off the room’s power before drilling or cutting into the ceiling.
- Locate wiring. Manufacturer installation guidance for urethane beams says to check for and relocate all electrical wiring in the installation area (Fypon installation guidelines).
- Wear protection. Safety goggles, work gloves and a dust mask, a sturdy ladder on a flat surface, and proper lifting technique for heavy pieces, per This Old House.
- Plan for wiring you want to add. Beams are the ideal moment to hide cable for speakers, lighting or networking above the ceiling plane. If that is on your list, read up on running low voltage cabling in ceilings before anything is closed up.
- Check local requirements. Permit rules differ by city and county, and structural work may need one. Ask your local building department before you start, especially for solid beams or any change to framing.
Older homes add one more step. Plaster-and-lath ceilings and uneven joists make fastening trickier, and an historic house deserves a careful approach. Our team’s view on that is below.
Tools and materials
Lists vary by method. For a faux beam installation, AZ Faux Beams lists these essentials:
- Caulk gun, and construction adhesive
- Chalk line or laser level
- Deck screws, plus toggle or lag bolts for drywall-only spots
- Stud finder
- Wood blocking in 2×4 or 2×6
- Screw gun or drill driver
- A hand saw with a finish blade, or a wood-cutting saw
- Two ladders and safety glasses
For trim-built coffered ceilings, This Old House adds a miter saw, 16-gauge and 18-gauge pneumatic nailers, a rafter square and a drill with an 18-inch bit.
How hollow beams go up, step by step
This is the standard method for faux or box beams. Follow your beam manufacturer’s instructions if you bought a kit.
- Locate the joists. Find and mark joist positions around the room’s edges, then mark beam positions so they avoid fixtures and stay evenly spaced, as Family Handyman instructs. Each beam should attach to a joist.
- Snap lines. Use a chalk line or laser to mark where each beam sits.
- Size the blocks. AZ Faux says to measure the beam’s inside dimension and subtract 1/8 inch, so the beam slides over the block.
- Count the blocks. One at each end, one at least every 3 feet, and one at each joint where two beams meet in one run.
- Fasten the blocks. Pre-drill at least two holes per block, and screw into joists or use toggle or lag bolts into drywall where there is no framing. Family Handyman’s build uses 2×6 cleats screwed into the joists.
- Cut the beams. Cut to length with a miter or table saw for solid-faced pieces. Cut slightly long and trim to fit; walls are rarely square.
- Support the beam. This Old House suggests a T-shaped deadman made from scrap, cut 3/4 inch shorter than the ceiling height, to hold one end up while you fasten the other.
- Glue and slide. Apply adhesive to the block edges, slide the beam into place and countersink at least two screws per side at each block.
- Fill and finish. Fill screw holes and seams, caulk to the ceiling, then stain or paint. If you use fillers, sealants or paint on urethane, they must be compatible with the material.
For solid wood beams, This Old House describes attaching L-brackets to the joists with wood screws and confirming they are level and secure before the beam is lifted. The beam weight is the issue, so this is where we recommend experienced hands.
Common mistakes
- Planning beams around the look and finding the joists run the wrong way afterward.
- Skipping blocking at joints, which leaves visible gaps.
- Choosing deep beams for an 8-foot ceiling.
- Staining after installation and dripping on the ceiling. Finish beams on sawhorses first and touch up after.
- Ignoring lights and vents until the beams are up.
Our perspective
Most people who call us about beams have already priced a kit and discovered that what they want is not quite a kit. The ceiling is 8 feet 4 inches, the joists run the awkward way, or the room has a chimney chase in the way of the best line. That is where custom carpentry earns its keep.
We build beams to fit the room in front of us: box beams from the wood species you pick, pallet wood or reclaimed boards for texture, or solid timber where the structure supports it. With more than 100 years of combined carpentry experience on our team, we are used to older Central Illinois homes where nothing is square and the plaster has opinions. A beam is not decoration laid over a house. Done properly, it becomes part of the house.
Our advice is to treat a ceiling like a marathon, not a sprint. Plan the layout, locate the framing, finish the wood before it goes up, and then let the installation be the quiet part of the job.
Wood
Hiring a carpenter for ceiling beams
DIY is realistic for a single light box beam in a standard room. Call a professional when:
- You want solid timber or beams over 8 inches deep.
- The ceiling is vaulted, or needs a coffered grid with tight joints.
- The house is historic, with plaster ceilings or irregular framing.
- You want lighting, speakers or cabling built in.
- A structural question is unresolved.
When you get quotes, ask what is included: material, finishing, hole patching, paint, and whether framing review is part of the job. If you are planning several updates at once, our guide to budget carpentry renovation and our custom carpentry project ideas for every budget help sequence the work.
Work with Wood Made Illinois
We design and install custom carpentry for homes and small businesses in Central Illinois, from accent and pallet wood walls to built-ins, home offices and historic window restoration. We offer personalized design consultations, so we can look at your ceiling, your lighting and your budget, and tell you what will look right.

Pallet Wall Accents start from $500. Beam work is quoted per project, since no two ceilings are alike. See our services at Wood Made Illinois and tell us about your room.
FAQ
Do I need an engineer to install ceiling beams?
For lightweight faux beams, Bob Vila reports no engineer’s approval is needed, but he still recommends an assessment of the structure because even decorative beams add weight. For solid wood beams, treat a structural review as part of the plan. Your local building department can tell you what permits apply.
How far apart should ceiling beams be?
Common guidance runs from 24 to 48 inches on center for a denser look, up to 4 to 8 feet for a more open one. Keep spacing even and align each beam with a joist or cleat. Adjust so the pattern lands symmetrically against walls.
Can I install ceiling beams on a vaulted ceiling?
Yes. Setting beams tight against the slope accents the shape and makes the room feel taller, while horizontal beams below the slope can fight the roofline. Vaulted work usually means higher ladders and heavier beams, so it is often a job for a carpenter.
Will ceiling beams make my room look smaller?
Not when planned well. Painting the ceiling between the beams a light color, running beams along the longest wall and keeping beam depth modest on low ceilings all keep a room feeling open.
Sources
- How To Build a Wood Beam Ceiling, This Old House
- Everything You Need to Know to Build a Coffered Ceiling, This Old House
- Exposed Ceiling Beams 101, Bob Vila
- How to Build Beautiful Faux Ceiling Beams, Family Handyman
- 35 Decorative Ceiling Beam Ideas, The Spruce
- Wood Ceiling Beam Ideas, Centennial Woods
- Decorative Wood Beams for Ceiling, Hardwood Design Company
- How to Plan Your Ceiling Beam Layout, Volterra Products
- Wood Ceiling Beam Ideas, Tar River Timber Works
- Decorative Ceiling Beam Ideas, Build-Construct
- How to Install Faux Wood Beams, AZ Faux Beams
- Fypon urethane beam installation guidelines
- Will Ceiling Beams Make a Space Look Smaller?