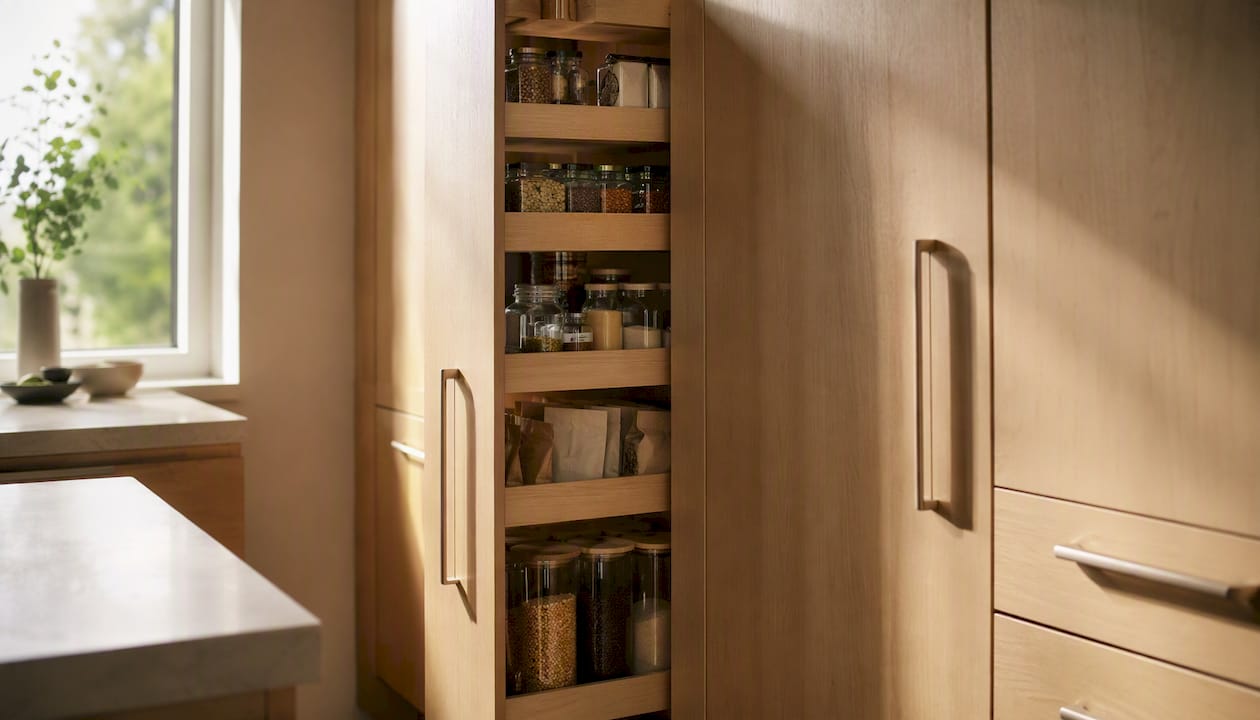
A pull-out pantry cabinet is a tall or retrofit cabinet fitted with sliding shelves, a full-height drawer frame, or tiered baskets that glide forward on tracks, bringing every stored item within easy reach. No more crouching to dig past canned goods stacked three rows deep. The unit slides out, you see everything at once, and you put it back with one hand.
Homeowners choose pull-out pantry systems for three practical reasons:
- Accessibility. Contents come to you rather than requiring you to reach into dark corners.
- Visibility and organization. Every shelf is exposed at once, so nothing gets lost or forgotten.
- Space recovery. Pull-out shelves recover wasted cabinet depth and reduce duplicate purchases caused by items hidden at the back.
These systems come in two broad forms: retrofit kits that attach to existing cabinets and integrated full-height pull-out frames built into new or renovated cabinetry. The rest of this guide walks through both, plus hardware, sizing, costs, and when to call a carpenter.
Key Takeaways
A pull-out pantry cabinet is one of the most practical storage upgrades a homeowner can make, but the right outcome depends on choosing the correct type, measuring accurately, and specifying hardware that matches the actual load.
| Point | Details |
|---|---|
| Definition and core benefit | A pull-out pantry slides stored items forward for full visibility, recovering wasted cabinet depth. |
| Retrofit vs. custom | Use a kit for square, standard cabinets; hire a carpenter for non-square openings or finish-matched builds. |
| Measurement priority | Always measure width at top, middle, and bottom; build to the narrowest point minus 1/2 inch per side for slide clearance. |
| Hardware matters | Ball-bearing, full-extension slides with soft-close outperform roller slides for heavy or daily-use pantries. |
| Woodmadeillinois | Provides on-site measurement, custom fabrication, and finish-matched installation for Central Illinois homeowners. |
Table of Contents
- What types of pull-out pantry cabinets are there?
- How do pull-out pantry systems actually work?
- What sizes fit where, and how do you measure?
- What are the real pros and cons of a pull-out pantry?
- Should you DIY, use a retrofit kit, or hire a carpenter?
- How to measure and choose the right system, step by step
- What does a pull-out pantry cost, and how long does it take?
- How to maintain your pull-out pantry and fix common problems
- What a skilled carpenter brings to a pull-out pantry install
- A carpenter’s honest perspective on pull-out pantry mistakes
- Woodmadeillinois builds pull-out pantries that fit your kitchen exactly
- Sources
What types of pull-out pantry cabinets are there?
Understanding the five main types lets you match the right solution to your kitchen layout, budget, and skill level before you spend a dollar.
Retrofit kits are pre-built sliding shelf assemblies that mount inside an existing cabinet opening. They are the most popular choice for upgrades and rental kitchens because they require no permanent structural changes. Most arrive with all hardware included and install in a few hours.
Integrated full-height pull-outs are floor-to-ceiling drawer frames built into the cabinet carcass during a new build or major renovation. The entire interior, shelves and all, rolls forward as a single unit. They offer the cleanest look and the highest load capacity, but they require precise carpentry and are rarely a quick weekend project.
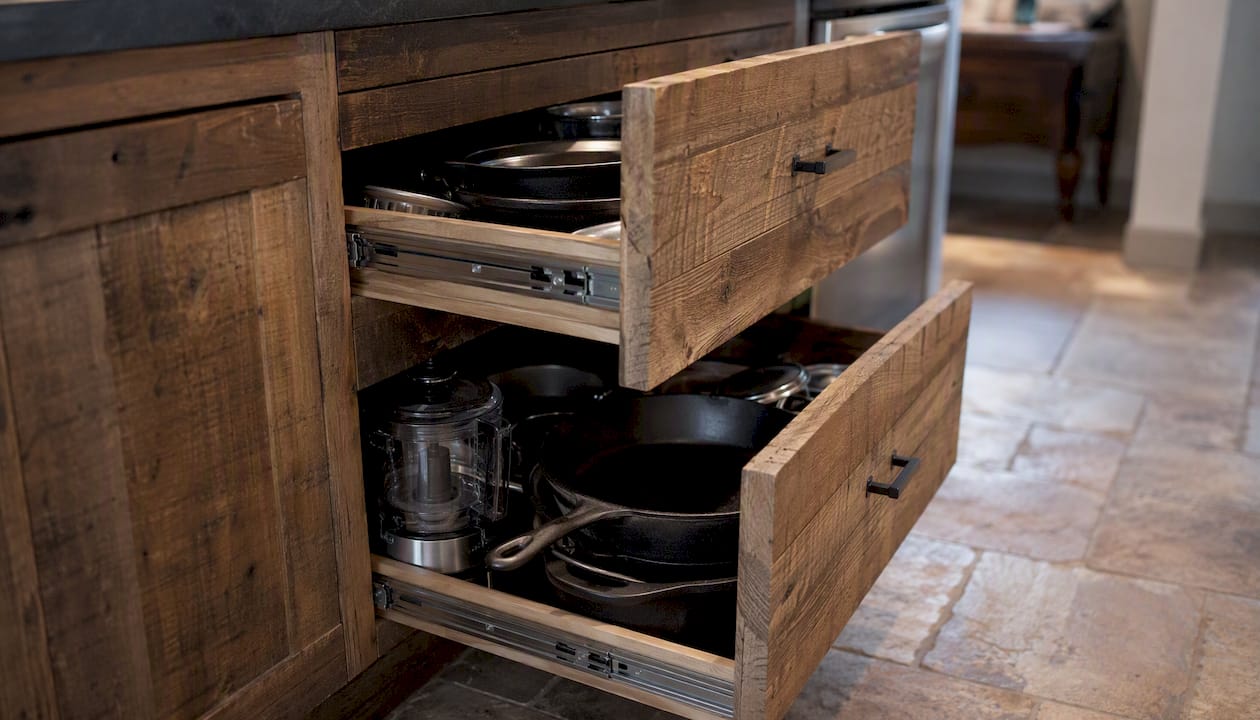
Roll-out drawers are individual shelf boxes that slide on their own tracks inside a base cabinet. They work especially well for heavy pots, cast-iron pans, and small appliances because each drawer carries its own load independently.
Wire-basket systems are lightweight, open-frame baskets on slides. They are renter-friendly because they install and remove without damaging the cabinet. Check the slide type and weight rating before loading them with heavy pots; wire-basket kits suit lighter pantry goods better than cast-iron cookware.
Spice and narrow pull-outs fit into gaps as slim as 6 inches, including the space beside a refrigerator. They typically hold spice jars, oils, and condiments on tiered shelves and are among the easiest retrofits to install.
Pro Tip: Match slide choice to intended load and frequency of use before you buy. A spice pull-out used twice a day with light jars can run on a basic roller slide; a pantry holding canned goods and small appliances deserves ball-bearing, full-extension hardware from the start.
| Type | Ease of install | Relative cost | Durability | Best use-case |
|---|---|---|---|---|
| Retrofit kit | Easy | Low | Moderate | Existing cabinet upgrades, rentals |
| Full-height integrated | Requires a pro | High | High | New builds, major renovations |
| Roll-out drawer | Moderate | Low–moderate | High | Heavy pots, base cabinets |
| Wire-basket system | Very easy | Low | Moderate | Light pantry goods, renters |
| Narrow/spice pull-out | Easy | Low | Moderate | Fridge-gap spaces, spice storage |
How do pull-out pantry systems actually work?
Slide type and mounting method determine how long a pull-out pantry lasts and how much weight it can carry. Get those two decisions right and the rest of the build follows naturally.
Slide types:
- Ball-bearing full-extension slides allow the shelf to travel its full depth so you can reach the back of the cabinet. They are smooth, quiet, and durable under repeated daily use. For heavy-use pantry storage, ball-bearing full-extension slides with soft-close are the recommended choice because roller slides generally lack the durability and damped closing that a loaded pantry demands.
- Soft-close variants add a hydraulic damper that slows the shelf in the last inch of travel, preventing slamming and reducing wear on the frame.
- Roller slides are lighter-duty and less expensive. They suit low-frequency applications like a spice pull-out but tend to wear faster under heavy loads.
Mounting options:
- Side-mount slides attach to the left and right walls of the cabinet interior. They are the most common choice for retrofit kits and DIY builds.
- Undermount slides attach beneath the shelf and are nearly invisible when the drawer is open. They require more precise installation but deliver a cleaner look.
- Floor-mounted runners distribute load across the cabinet floor and are used on tall, heavy full-height units. High-quality commercial systems like the Kesseböhmer DISPENSA use floor-mounted runners and integrated soft-close damping to handle loads up to 265 pounds with consistent opening stability.
Weight capacity follows directly from slide selection. A standard ball-bearing side-mount slide rated at 75–100 pounds per pair handles most household pantry loads. For a full-height unit carrying canned goods across multiple shelves, full-extension slides on a well-built frame can support well over 100 pounds and adapt to many cabinet sizes.
What sizes fit where, and how do you measure?
Narrow retrofit units typically run 6–12 inches wide; full-height integrated pull-outs match the cabinet opening, commonly 12–24 inches or wider. Those are typical ranges, not fixed rules. Your actual opening governs everything.
Measurement checklist:
- Remove the cabinet door or prop it fully open before measuring.
- Measure the interior width at three heights: top, middle, and bottom. Record the narrowest of the three.
- Measure the interior depth from the face frame to the back wall.
- Measure the height from the toe-kick to the underside of the countertop or upper cabinet.
- Check hinge clearance: open the door as far as it travels and note whether it clears the adjacent wall or appliance.
- Check for obstructions: center posts, plumbing, or electrical runs inside the cabinet.
- Subtract approximately 1/2 inch per side from the narrowest width measurement to allow for slide clearance and prevent racking.
Sizing guidelines by location:
- Fridge-gap narrow units: measure the gap width at top, middle, and bottom; most gaps taper slightly, so use the smallest reading.
- Tall pantry cabinets: record full interior height and confirm the door opens at least 90 degrees for full pull-out travel.
- Deep base cabinets: depth matters most here; choose full-extension slides so the back of the shelf reaches you, not the other way around.
Non-square openings are common in older homes. Always measure the narrowest point and build or order to that dimension. A unit sized to the widest point will bind or rack within weeks.
What are the real pros and cons of a pull-out pantry?
For most homeowners, the benefits outweigh the trade-offs, but the calculus shifts depending on how the kitchen is used and who uses it.
Pros:
- Ergonomics: contents come forward, reducing bending and reaching, which matters most for seniors and anyone with limited mobility.
- Full visibility: every item on every shelf is visible at once, which cuts down on expired goods and duplicate purchases.
- Space recovery: pull-out shelves make deep cabinets genuinely usable rather than a place where things disappear.
- Adaptability: retrofit kits fit most standard cabinets without structural changes.
Cons:
- Upfront cost: quality hardware and a professional install cost more than fixed shelving.
- Reduced adjustable shelf space: a full-height pull-out replaces fixed shelves, so you lose the ability to reconfigure shelf heights independently.
- Slide wear over time: overloaded or poorly specified slides sag and stick; correct hardware selection prevents most of this.
- Weight limits: every system has a rated capacity; exceeding it causes premature failure.
Who benefits most: busy cooks who use the pantry multiple times a day, seniors or anyone with joint pain, and small-kitchen owners who need every cubic inch of storage to work harder. Homeowners with light storage needs and well-organized fixed shelving may find the investment hard to justify.
Material and finish choices affect both longevity and style compatibility. Solid wood frames hold fasteners better than particleboard and resist moisture more reliably. Painted MDF suits contemporary kitchens; stained or natural wood suits traditional or country-chic interiors. Matching the pull-out face to existing cabinet doors is the detail that separates a professional result from a visible afterthought.
Should you DIY, use a retrofit kit, or hire a carpenter?
Choose a retrofit kit for a straightforward upgrade in a square, standard-depth cabinet. Hire a carpenter when the opening is non-square, the door needs hinge modification, or you want a finish-matched custom build.
Decision checklist:
- Is the cabinet interior square and free of obstructions? If yes, a kit is likely sufficient.
- Do you have a drill, level, measuring tape, and a free weekend? Basic tools cover most kit installs.
- Does the door open at least 90 degrees without hitting anything? If not, hinge work is needed before the pull-out goes in.
- Do you want the pull-out face to match existing cabinet doors exactly? That usually requires a carpenter.
- Is the cabinet face frame damaged, warped, or non-standard? A pro should assess before any hardware goes in.
Basic tools for a DIY retrofit:
- Measuring tape and combination square
- Drill with bits and a screwdriver bit set
- Level (24-inch minimum)
- Pencil and marking gauge
- Optional: 2×4 shims for leveling the slide mounting surface
Retail how-to guides provide detailed tool lists and step sequences that cover most standard retrofit scenarios. The steps follow a consistent pattern: measure, build or assemble the frame, mount slides, test travel, then attach the door.
Hire vs. DIY at a glance:
- Cabinet is flat, square, and standard-depth: DIY with a kit.
- Door hinges prevent full opening: hire a carpenter to re-mount hinges or attach the door to the pull-out face.
- Opening requires face-frame modification or toe-kick work: hire a pro.
- You want a custom finish, solid-wood construction, or integrated lighting: hire a pro.
Pro Tip: Check hinge clearance before ordering any hardware. Door-hinge clearance is a frequent, non-obvious blocker: if the door can’t swing far enough, the installer removes the original hinges and mounts the door directly to the pull-out face for a flush look and full travel.
How to measure and choose the right system, step by step
Measure the narrowest interior width first, recording top, middle, and bottom to the nearest 1/8 inch. That single number drives every other decision.
- Open or remove the cabinet door completely.
- Measure interior width at three heights (top, middle, bottom). Note the smallest reading.
- Measure interior depth from the face frame to the back wall.
- Measure interior height from the toe-kick to the underside of the shelf above or countertop.
- Check for a center post, plumbing stack, or electrical box inside the cabinet.
- Test door swing: open fully and confirm it clears adjacent walls and appliances.
- Subtract 1/2 inch per side from the narrowest width for slide clearance.
- Match slide length to cabinet depth; choose full-extension slides to access the back of the shelf.
- Choose soft-close hardware for pantries used daily or loaded with heavy goods.
- Write dimensions on paper or photograph the measurements and share them with a carpenter or kit vendor.
Experienced installers always measure at three heights and subtract slide clearance from the narrowest point to avoid friction and racking during operation. Skipping that step is the single most common cause of a pull-out that binds after the first week.
What does a pull-out pantry cost, and how long does it take?
Costs range from a modest kit purchase to a full custom build, depending on hardware quality, finish, and whether structural modifications are needed.
| Scope | Relative cost | Typical timeline |
|---|---|---|
| Basic wire-basket or roller-slide kit | Low | Weekend install |
| Mid-range ball-bearing retrofit kit | Moderate | One to two days |
| Full custom pull-out with finish matching | Higher | Several days to two weeks |
What drives cost up:
- Matching an existing painted or stained cabinet finish requires extra prep and finishing time.
- Solid-wood construction costs more than MDF or plywood but holds fasteners better and lasts longer.
- Heavy-duty slide systems with soft-close and high load ratings carry a premium over basic hardware.
- Integrated lighting inside the pull-out adds both material and labor cost.
Cabinetry work of this type does not typically require a building permit in most U.S. jurisdictions, so permitting rarely adds to the timeline. A custom full-height build that includes finish work, face-frame modification, and a matched door can run several days of shop and site time. A simple retrofit kit is genuinely a weekend project for a careful DIYer.
How to maintain your pull-out pantry and fix common problems
Most pull-out pantry problems trace back to three causes: slide wear, misalignment, or overloading. Routine checks and correct hardware choices prevent the majority of failures before they start.
Troubleshooting steps:
- Check for loose screws at the slide mounting points; tighten any that have worked free.
- Open the pull-out fully and look for racking (the unit twisting side to side). Racking usually means one slide is mounted higher than the other.
- Clean debris and food particles from the slide tracks with a dry brush or compressed air.
- Lubricate ball-bearing slides with a dry silicone spray, not oil, which attracts dust.
- Check whether the shelf is overloaded; redistribute weight or remove items if the slide feels stiff.
- Inspect the shelf boards for sagging; add a center support or replace the shelf if it has deflected noticeably.
Annual maintenance checklist:
- Inspect all slide mounting screws and tighten as needed.
- Confirm load limits are not being exceeded on any shelf.
- Clean tracks and re-lubricate slides.
- Check the door attachment for looseness if the door is mounted to the pull-out face.
Call a carpenter when the face frame itself has racked or split, when floor-mounted runners need replacement, or when the cabinet carcass has shifted enough that no amount of slide adjustment corrects the problem.
What a skilled carpenter brings to a pull-out pantry install
A professional provides precise measuring, stable framing, finish-matching, and hardware selection that avoids the retrofit pitfalls a homeowner may not anticipate until the unit is already installed.
What to expect from a professional install:
- On-site measurement at all three heights, with obstruction and hinge-clearance checks included.
- Material options presented with samples: solid wood species, MDF, plywood, and finish choices.
- Hardware selection matched to load requirements, with a clear explanation of slide type and weight rating.
- Estimated timeline with milestones for fabrication, finishing, and installation.
- Warranty on workmanship and hardware.
Trade tasks a pro handles well:
- Correcting non-square openings by shimming or rebuilding the interior frame.
- Re-mounting hinges or attaching the original door to the pull-out face for a seamless look.
- Modifying the toe-kick to accommodate a floor-mounted runner on a heavy full-height unit.
- Installing heavy-duty slide systems rated for the actual load, not a generic estimate.
- Matching the pull-out face to existing kitchen cabinet services finishes so the new unit disappears into the kitchen rather than announcing itself.
Pro Tip: During an estimate, ask the carpenter to name the slide brand and weight rating they plan to use, show a sample of the matching finish, and confirm whether the warranty covers the slides as well as the frame. Those three questions separate a thorough professional from someone guessing at the spec.
A carpenter’s honest perspective on pull-out pantry mistakes
The three mistakes that show up most often on a pull-out pantry job are poor measuring, ignored hinge clearance, and underspecified slides. Any one of them turns a weekend project into a callback.
Measuring to the widest point instead of the narrowest is the most common error. A unit built to the wide dimension will bind the moment the cabinet flexes slightly with temperature change. Always measure at top, middle, and bottom, and build to the smallest number.
Hinge clearance gets skipped because it seems obvious until the unit is installed and the door won’t open past 60 degrees. Test the door swing before ordering anything. On one Central Illinois project, a homeowner had a beautiful 84-inch pantry opening beside the refrigerator, but the refrigerator handle blocked the door at 70 degrees. The solution was to remove the original hinges entirely and mount the door directly to the pull-out face, which also gave the unit a cleaner, furniture-grade appearance. The homeowner preferred the result to what they had originally planned.
Underspecified slides are the slow failure. A roller slide rated for 50 pounds feels fine on installation day. Six months later, with canned goods and a stand mixer on the shelves, it sags and sticks. Specify ball-bearing, full-extension slides from the start for any pantry that will carry real kitchen weight.
Woodmadeillinois builds pull-out pantries that fit your kitchen exactly
Woodmadeillinois brings over 100 years of combined carpentry experience to custom pull-out pantry builds across Central Illinois. The difference between a kit and a custom build is the difference between a shelf that fits the opening and one that fits the kitchen.

Services include on-site measurement, custom frame fabrication, finish matching to existing cabinetry, and full installation. Whether you need a narrow fridge-gap spice pull-out or a full-height integrated pantry with matched doors, the team handles the measuring, the hardware selection, and the finish work so the result looks like it was always there. Homeowners who want to see custom carpentry project ideas before committing can browse examples across a range of budgets. When you are ready to move forward, contact Woodmadeillinois’s trusted local carpentry experts to schedule a site measurement and get a quote.
Sources
The following resources offer detailed how-to instructions, hardware specifications, and installation guidance for pull-out pantry projects.
- 5 Simple Steps to DIY Pull-Out Pantry Shelves – RowHouseBlog
- How to Install Cabinet Pull-Out Drawers—the Key to More Kitchen Storage
- How to organize deep cabinets with pull-out sliding shelves — Hunker
- How to install a pull-out shelf — This Old House
- How to Make a Pull Out Pantry – I Like To Make Stuff
- Kesseböhmer – DISPENSA Pantry