An eave is the roof edge that overhangs a wall, and roofline detailing is everything built into that edge, from rafter tails to cornice brackets, that gives a house its period character. The preservation-first rule is simple: document what exists before you touch it, and repair in-kind rather than replace whenever the original fabric can be saved. If you’re looking at rot, missing brackets, or failing flashing right now, the first move is a camera and a careful eye, not a demolition crew.
TL;DR:
- Most historic eave repairs should prioritize in-kind replacement and detailed documentation, avoiding unnecessary full tear-offs of intact components.
- Matching original profile proportions, material exposure, and ornament details is crucial for authentic restoration and often requires custom fabrication and mock-ups.
- The type of roofing material historically used—wood shingles, slate, metal, or clay tile—dictates specific eave construction and maintenance practices.
- Proper inspection from multiple vantage points, including attic and ground, helps identify hidden rot and document measurements essential for accurate repair matching.
- Skilled professionals are necessary for structural rot or uncertain original details, as well as for complex or sensitive repairs that preserve the house’s historic character.
Table of Contents
- Recognizing Historic Eave and Roofline Styles
- Historic Roofing Materials and How They Shaped Eave Details
- Anatomy of a Historic Cornice: Fascia, Soffit, and Ornament
- The Preservation-First Repair Workflow for Historic Eaves
- Building a Field Record Before You Touch Anything
- Getting Reproductions and Substitutes to Read as Authentic
- Trade Judgment in Real-World Eave Repairs
- How Wood Made Illinois Helps With Historic Eave and Roofline Work
- Where This Guidance Comes From
- Sources
- FAQ
Recognizing Historic Eave and Roofline Styles
Every old house tells you what it is through its eaves, often before you notice the windows or the porch. Roofline detailing isn’t a decorative afterthought. Its structural logic dressed up in regional taste, and once you know what you’re looking at, you can date a house from the curb.
Open eaves expose the rafter tails, the ends of the roof framing members, without any covering. You’ll see this most on Craftsman bungalows and rustic farmhouses, where the exposed rafter tail became a design statement rather than something to hide. The rafters are often shaped, notched, or given a decorative cut at the tip.
Boxed or closed eaves enclose the rafter ends completely with a soffit, giving a cleaner, more formal underside. Colonial and Colonial Revival homes lean heavily on boxed eaves because the style prizes symmetry and restraint over rustic exposure.
Bracketed cornices add carved or milled wooden brackets beneath the eave, sometimes purely ornamental, sometimes doing real structural work supporting a wide overhang. Italianate houses are famous for this, with brackets so elaborate they practically function as a second cornice line. Queen Anne homes borrow the bracket vocabulary too, but mix it with turned spindles and other millwork for a busier, more layered look.
Flared or bellcast eaves curve slightly upward at the bottom edge, a detail borrowed from Asian and Dutch Colonial precedents that shows up on gambrel roofs and some Shingle Style homes. The curve isn’t just visual flair. It also helps shed water further from the foundation.
Gable returns are the small horizontal moldings that wrap the raking (sloped) eave back into the wall at the gable end, common on Greek Revival and Colonial Revival homes. Skip this detail during a repair and the whole gable end reads wrong, even if everything else matches.
A quick site survey checklist:
- Is the rafter tail exposed, boxed, or hidden behind a fascia board?
- Are there brackets, and are they structural or purely decorative?
- Does the eave line curve (bellcast) or run straight?
- Is there a gable return at the raking eave, and is it intact?
- How deep is the overhang relative to the wall height, a proportion that shifts by region and climate?
That last point matters more than people assume. In the humid Southeast, eaves tend to project further to throw rain and sun off the walls. In colder, snow heavy regions, tighter eaves with reinforced rafter tails resist snow load and ice damming better. Local roof guidelines that define eave forms and materials by region exist precisely because climate, not just style, drove these choices for over a century.
Historic Roofing Materials and How They Shaped Eave Details
The material a roof was covered in didn’t just protect the house. It dictated how the eave itself had to be built, and that relationship is where a lot of modern repairs go wrong.
Wood shingles dominated much of the country from the colonial period through the early twentieth century, especially on Shingle Style, Craftsman, and vernacular farmhouses. Historic wood-shingle roofs typically used a three-layer laying pattern with roughly one-third of each shingle exposed to weather, spaced 1/8 to 1/2 inch apart to allow for swelling, and doubled or tripled starter courses right at the eave for extra water resistance where runoff concentrates. Get those dimensions wrong on a replacement and the roof will look subtly off even with the correct wood species, according to Preservation Brief 19.
Slate was the material of choice for high-status Victorian and Gothic Revival homes, prized for longevity and often laid in graduated courses, larger and thicker slates near the eave, tapering to smaller ones toward the ridge. That graduation, along with color banding and texture patterns, is considered character-defining, and state slate preservation guidance recommends documenting exact coursing and exposure before any slate is pulled.
Metal roofing, particularly terne-coated steel and standing-seam varieties, showed up on commercial buildings, farmhouses, and later Victorian additions. Metal eaves often integrated drip edges and built-in gutters directly into the panel work, which means the eave detail and the roof covering were really one continuous system rather than separate trades.
Clay tile appears mainly on Mediterranean Revival and Mission style homes, where a heavy, deeply projecting eave was structurally necessary to support the tile’s weight and roll profile at the edge.
A few numbers worth knowing when you’re assessing condition:
- Wood shingle exposure of roughly one-third the shingle length is the historic standard worth matching on replacement.
- Professional slate inspections at regular multi-year intervals are recommended for steep-slope slate roofs, according to Historic New England.
- Annual inspections, plus a check after any major storm, catch small problems before they become structural ones.
Failure modes vary by material. Wood shingles curl, split, and grow moss where moisture sits too long. Slate delaminates and slips when the nails corrode faster than the stone itself. Metal fails at the seams and fasteners long before the sheet itself wears out. Tile cracks under foot traffic or freeze-thaw cycling at the edges. Modern equivalents, architectural asphalt, coated steel, fiber cement shingles, can approximate the look, but each carries its own compatibility risk with historic flashing details and eave projections built for a heavier or lighter original material.
Anatomy of a Historic Cornice: Fascia, Soffit, and Ornament
The parts of an eave have names, and knowing them changes how you talk to a contractor and how carefully you inspect what’s already there.
- Fascia is the vertical board running along the eave edge, usually where the gutter attaches. It takes the brunt of weather exposure and is often the first piece to rot.
- Soffit is the underside surface of a boxed eave, running horizontal beneath the rafter tails. On many historic homes it includes small vents for attic airflow that are easy to overlook during repainting.
- Rafter tails are the exposed or boxed ends of the roof rafters themselves, sometimes decoratively shaped on open-eave designs.
- Cornice refers to the full decorative assembly at the roofline, brackets, moldings, and trim combined, and it’s the element that carries the most stylistic weight on Italianate and Victorian homes.
- Crown molding and dentil trim (a row of small, tooth-like blocks) often run along the top of the cornice on formal Colonial Revival and Federal style houses.
- Gutter attachment points are frequently integrated directly into the fascia or built into a wood box gutter on the oldest homes, rather than hung as a separate aluminum system.
Historic ornament was carved by hand in wood on the earliest homes, pressed from sheet tin or zinc during the mass-production boom of the late 1800s, or cast in terra cotta on masonry commercial buildings. You can often tell which method was used by the attachment evidence: hand-carved wood shows tool marks and irregular joinery, pressed metal shows seam lines and stamped repetition, and terra cotta is anchored with mortar and metal ties rather than nails.
Deterioration shows up predictably. Watch for peeling paint at the fascia (paint is the skin protecting the wood bones underneath, and once it fails, water gets in fast), soft or spongy soffit boards, rust bleeding from old cut nails, and gutter straps pulling away from rotted attachment points. None of this is cosmetic. A failing fastener or a gapped flashing seam is what turns a small paint problem into a structural repair within a few seasons, which is exactly why anchors and flashing integration deserve as much attention as the visible trim itself.
The Preservation-First Repair Workflow for Historic Eaves
Repairing a historic eave isn’t a single decision. It’s a sequence, and skipping steps is how good intentions turn into lost character.
- Document first. Photograph the eave from overall, medium, and close-up distances before anything is disturbed, and note measurements like bracket spacing and shingle exposure.
- Investigate. Get into the attic or under the eave and probe gently for hidden rot, reused timbers, or earlier roofing layers. Preservation Brief 4 notes that earlier roof fabric often survives beneath later layers, which can change your whole repair plan once uncovered.
- Stabilize. If there’s active water intrusion, get a temporary fix in place, tarping, emergency flashing, before doing any permanent work.
- Repair in-kind where possible. A rotted rafter tail end can often be saved with an epoxy consolidant or a scarfed-in wood scab rather than cutting out the whole member.
- Replace in-kind only when necessary. If a component is too far gone to save, match the original material, dimension, and profile rather than defaulting to whatever the lumber yard stocks.
Pro Tip: Keep the failed piece. A rotted bracket or shingle fragment is the best template a fabricator will ever have, and it beats trying to describe a profile from memory.
Modern flashing, snow guards, and gutter systems can usually be worked in without sacrificing appearance, as long as they’re detailed to sit behind or beneath visible trim rather than on top of it. Building codes sometimes require fire-retardant treated wood shingles or Class A roofing assemblies in certain jurisdictions, which is a real constraint. Preservation Brief 19 notes that treated substitutes can be acceptable when they’re detailed to match the historic appearance closely, so code compliance and character don’t have to be opposing goals. Where trim needs to be scarfed in or a joint rebuilt to match, a trim repair specialist familiar with historic profiles can save far more original material than a straight tear-off ever would.
Building a Field Record Before You Touch Anything
A proper survey isn’t optional paperwork. It’s the reference document your contractor, your fabricator, and possibly your future self will need years from now when a matching piece needs replacing.
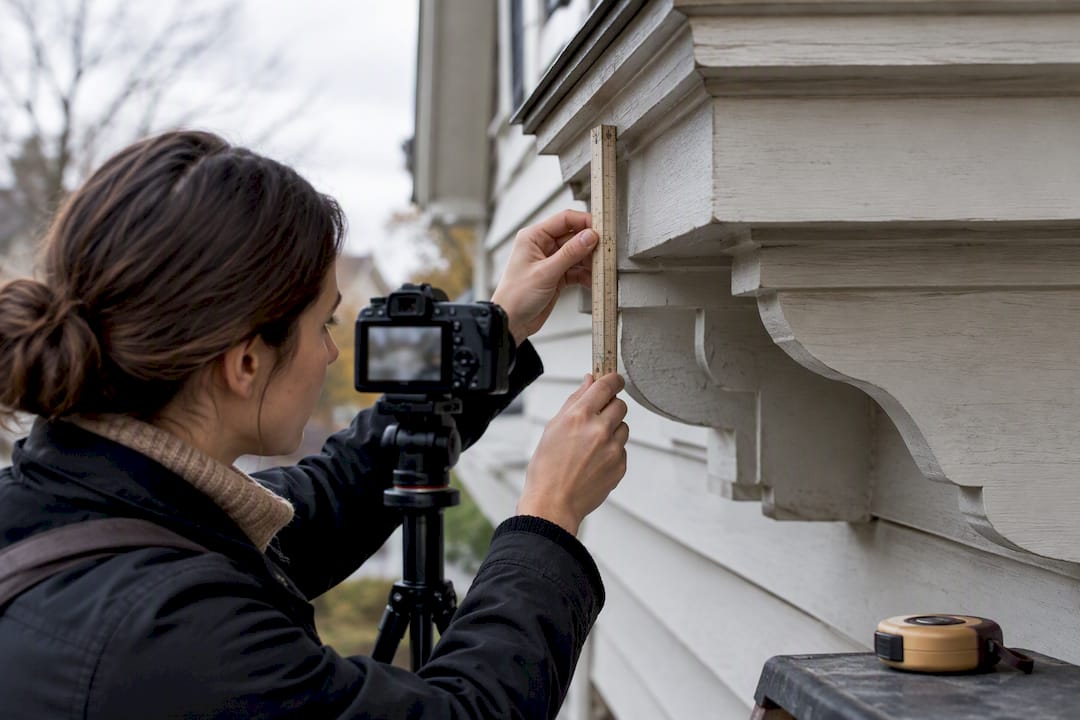
Photograph in three tiers: an overall shot of the full elevation, a medium shot of the eave run, and a close-up of each distinct detail, bracket, joint, flashing seam, with a scale reference like a tape measure in frame. Label every image with location and date. Historic New England’s guidance treats the roof as a sacrificial layer by design, meaning it’s meant to wear and be maintained, which is exactly why a dated photo log matters more here than on almost any other part of the house.
Inspect from three vantage points: the ground with binoculars for an overview, the attic for sheathing shadows and reused framing, and a lift or ladder for close fastener and flashing inspection. Nail type alone can date a repair. Cut nails point to pre-1890s work, wire nails to later.
| Measurement | Why it matters |
|---|---|
| Shingle size and exposure | Determines authentic replacement pattern and weather resistance |
| Cornice projection depth | Affects both appearance and how well water clears the wall |
| Bracket spacing | Irregular spacing usually signals a later, non-original addition |
| Fascia board width | Common size shifts by decade and helps date the original build |
Keep an indexed logbook alongside the photos, cross-referencing each image number to its location and any measurements taken. That record is what lets a fabricator years later match a broken bracket without guessing.
Getting Reproductions and Substitutes to Read as Authentic
A replacement eave detail can be technically correct and still look wrong if the proportions are off. Matching the material name isn’t enough. Color, texture, coursing, shingle exposure, and eave projection all have to line up with what was originally there.
- Confirm exposure and coursing dimensions against your documentation, not against a generic supplier chart.
- Commission a drawing or a physical mock-up before full production, especially for custom brackets or cornice profiles.
- Specify the fabrication details directly in the repair contract so there’s no ambiguity for the crew doing the work.
- Reserve modern substitutes like fiber cement shingles or coated steel for situations where code, insurance, or budget genuinely require them, and detail the substitute to mimic the original exposure and profile as closely as possible.
Pro Tip: Ask any fabricator to cut one full-scale sample piece before committing to a production run. A drawing can look right and still miss the proportions once it’s actually hanging on the house.
As practitioners who study historic eave work often put it, the goal is to copy surviving details from period precedent rather than invent a new bracket profile that merely looks old, because proportion is what determines whether a roofline sits correctly on the building. Readers tackling adjacent restoration challenges, matching a dormer head to a window casing, for instance, will find similar logic in historic window restoration work, and more complex historic building projects sometimes benefit from the kind of detailed renovation planning that keeps mock-ups and specifications front and center from day one.
Trade Judgment in Real-World Eave Repairs
We’ve seen homeowners ready to replace an entire cornice run because one bracket had rotted through, when the other eleven brackets on that elevation were structurally sound and simply needed cleaning and repainting. The instinct to tear out and start fresh is understandable. It’s also usually the wrong call.
The harder, better choice is almost always the smaller one: save the sound material, match the failed piece exactly, and let the rest of the run keep its history intact. On one bracketed cornice repair, matching a single carved scroll detail took longer than replacing the whole board would have, but the alternative would have made one bracket look conspicuously new against eleven that had weathered together for a century.
Know when to call a specialist. If you’re finding structural rot in rafter tails themselves, not just surface trim, or if you’re unsure whether a detail is original fabric or a later alteration, that’s a job for someone who’s spent real time in historic roof framing. A fair restoration quote should include a site visit, photographic documentation, and a written breakdown of what gets saved versus what needs replacement, not just a flat number for a full tear-off.
— Wood
How Wood Made Illinois Helps With Historic Eave and Roofline Work
This company handles small, character-preserving carpentry suitable for historic trim matching, built-in restoration, and custom millwork that features like bracketed cornices or gable returns demand.

An initial consultation includes a site visit to document the eave condition, a review of what fabric can realistically be saved, and a set of repair options ranging from in-kind trim replacement to full custom reproduction, priced to fit your budget rather than a generic tear-off estimate. This falls under our broader historic home maintenance services, alongside related work like custom built-ins and finish trim carpentry for homeowners across Central Illinois who want their roofline repaired without losing what made it historic in the first place. If a bracket, fascia run, or cornice detail on your home needs an honest assessment, reach out through our main service page to schedule that first site visit.
Where This Guidance Comes From
The technical detail in this guide draws on the federal government’s primary preservation references, along with regional guidance built specifically around roofing and eave conditions.
- Preservation Brief 4: Roofing for Historic Buildings
- Preservation Brief 19: The Repair and Replacement of Historic Wooden Shingle Roofs
- Washington DC roof guidelines: roofs, eaves, and detail guidance
- Historic New England: Roofing guidance
Sources
- Preservation Brief 4: Roofing for Historic Buildings
- Preservation Brief 19: The Repair and Replacement of Historic Wooden Shingle Roofs
- Washington DC roof guidelines: roofs, eaves, and detail guidance
- Historic New England – Roofing guidance
FAQ
What Is the 25 Percent Rule in Roofing?
Some jurisdictions have building code triggers requiring a full roof replacement to meet current code if a significant portion of the roofing surface is being repaired or replaced at once. It varies significantly by local code, so check with your local building department before assuming it applies, especially on a historic structure where full replacement may conflict with preservation goals.
What Materials Were Used for Roofing in the 1800s?
Wood shingles were the most common covering through much of the 1800s, especially on vernacular and Shingle Style homes, while slate became popular for higher-status Victorian houses later in the century. Metal roofing, including terne-coated steel, also appeared on farmhouses and commercial buildings, each material driving different eave and flashing details as described in Preservation Brief 19.
Do Roof Eaves Add Value to a Historic Home?
Intact, well-maintained historic eaves and cornice detailing support a home’s architectural integrity, which buyers and preservation-minded appraisers in historic districts often weigh heavily. Beyond value, a properly maintained eave protects the wall structure below it from water damage, making it a functional asset as much as a visual one.
How Long Does Ridge Capping Last?
Ridge capping lifespan depends heavily on material, wood shingle ridges typically need attention within the same cycle as the field shingles, while slate and metal ridge details can last decades longer if fasteners and flashing stay sound. Regular inspection matters more than any fixed number, since Historic New England recommends treating roofing generally as a sacrificial layer that needs consistent monitoring rather than a one-time installation.
When Should I Call a Professional Instead of Doing My Own Repair?
Call a specialist when you find structural rot in rafter tails or framing, not just surface trim, or when you’re unsure whether a detail is original fabric worth saving. Site-visit consultations that include documentation and a written breakdown of repair options before any work begins can be requested by homeowners.