Turn that wasted triangle under your stairs into pull-out drawers, a mudroom bench, a hidden pantry, or a reading nook. The right choice depends on your stair type, your household’s daily traffic, and how much access you need. Simple shelving or baskets suit a weekend DIY project, while cabinetry built into the cavity itself, or anything touching wiring and plumbing, calls for a professional. Below, you will find both: the ideas, and the measurements and steps to build them.
TL;DR:
- Most under-stairs spaces offer 30 to 60 square feet of usable volume, sufficient for pantry, bench, or drawer conversions, depending on stair location and type.
- DIY projects like cubby walls, boot drawers, and display shelving can be completed in a weekend, while more involved builds like full drawers or closets require one to two weekends.
- Proper measurement of the triangular space, including obstacles and clearance, is crucial to avoid misfitting built-in storage solutions.
- Ventilation, lighting, and permits are essential considerations to prevent mold, odors, and comply with local building codes in enclosed under-stairs spaces.
- Using CAD modeling and professional consultation helps ensure accessibility, durability, and a functional fit for custom cabinetry, especially on irregular or load-bearing cavities.
Table of Contents
- Under Stairs Storage Ideas Worth Building
- Build-Ready Plans: Drawers, a Closet, and a Bench
- Materials, Hardware, and Finishes That Hold Up
- Measuring Your Space Before You Build Anything
- Ventilation, Lighting, and Code Checks You Cannot Skip
- What a Carpenter Sees That DIYers Often Miss
- Keeping Under-Stairs Storage Clean and Functional Long Term
- A Carpenter’s Honest Take on What Actually Matters
- How Wood Made Illinois Turns This Space Into Real Storage
- Keep Planning: Resources Worth Bookmarking
- Sources
Under Stairs Storage Ideas Worth Building
Most homes waste one of their best square footage opportunities on a triangle of dead air. A typical staircase cavity holds 30 to 60 square feet of usable volume, which is roughly the size of a walk-in closet lying on its side. That is enough room for a pantry, a bench, or a full run of drawers, not just a spot to shove the vacuum.
The right idea depends on where your stairs sit in the house and what kind of stair structure you are working with. A straight run against a hallway wall behaves differently than an L-shaped staircase with a landing, and open riser stairs change your options entirely because there is no solid stringer wall to build against.
Entry and mudroom solutions
Cubby and hook wall. If your stairs land near the front door, this is often the highest-value conversion in the house. Open cubbies sized for shoes, with hooks above for coats and bags, work on straight and L-shaped stairs alike. DIY weekend project if you are working with a flat wall; intermediate if the stair skirt needs new trim.
Built-in bench with lift lid. Pairs naturally with the cubby wall. A bench seat over a hinged storage box handles seasonal gear, sports equipment, or extra linens. Works best on staircases with at least 24 inches of headroom at the low end. Intermediate DIY.
Boot and umbrella drawer. A shallow pull-out drawer near the tallest part of the cavity, close to the door, keeps wet gear contained instead of dripping on hardwood. Works on any stair type. DIY weekend project.
Kitchen and pantry conversions
Slide-out pantry shelving. If your stairs back up to the kitchen, narrow pull-out shelves (think spice-rack depth) turn dead space into canned goods and bulk storage. Straight stairs work best here because you get consistent depth along the whole run. Intermediate DIY, pro install if you’re cutting into drywall shared with kitchen cabinetry.
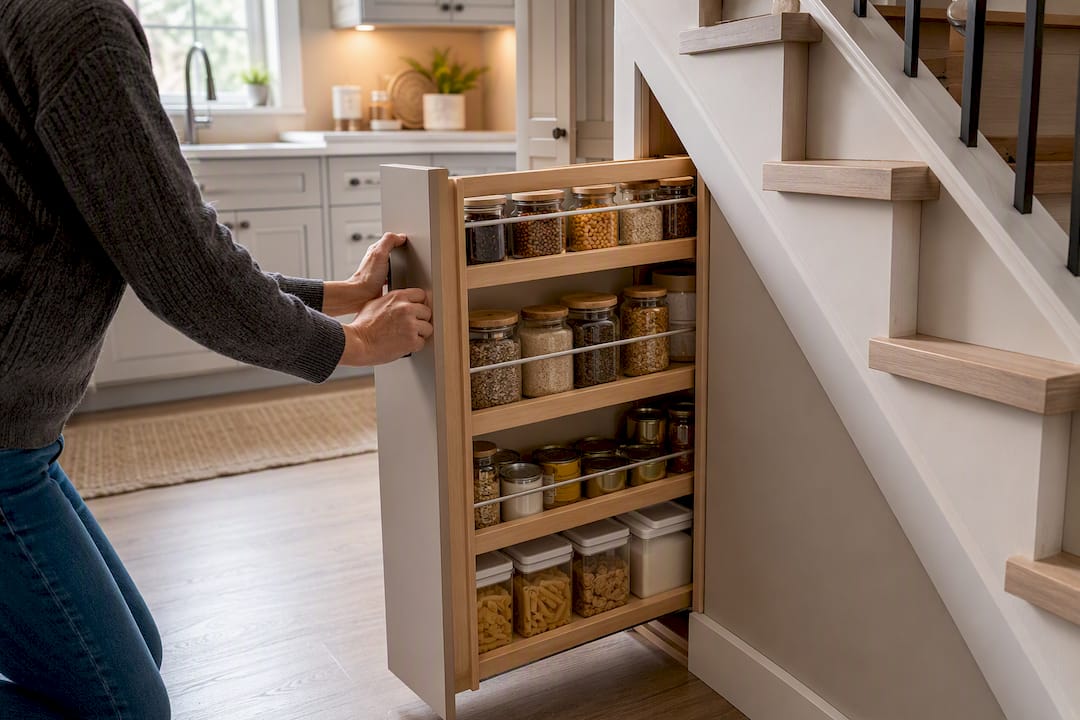
Hidden appliance nook. Small appliances that only come out occasionally, a stand mixer, a slow cooker, a griddle, fit into the tallest end of the cavity behind a discreet door. Pro install recommended for a clean, flush finish.
Wine and beverage storage. Angled wine racks follow the slope of the stringer naturally, since the diagonal ceiling line already suggests the rack angle. Works well on L-shaped stairs with a deep landing. Intermediate DIY.
Living space and display ideas
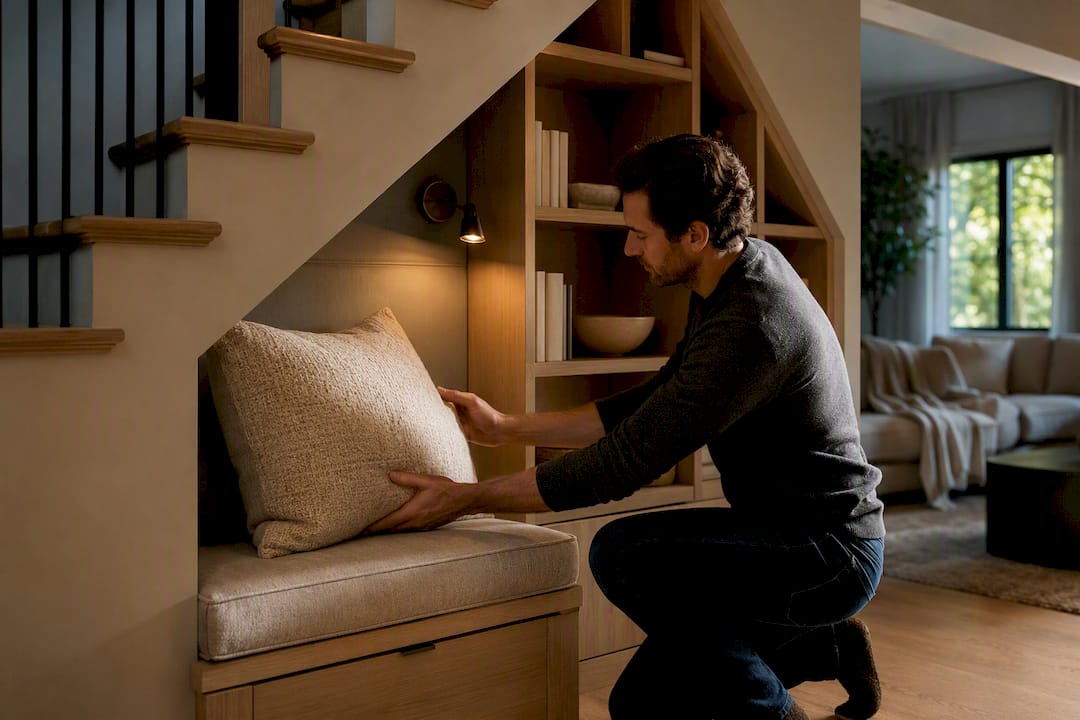
Built-in bookshelf and reading nook. This is the idea homeowners request most, and for good reason: a bench at least 24 inches deep creates a genuinely comfortable seat, not just a display shelf. Add a cushion, a reading light, and shelving that steps down with the stair angle. Straight stairs give you the most usable width. Pro install for a built-in look; DIY weekend project if you are fine with a simpler freestanding version.
Home office nook. If you work remotely and need a spot for a laptop and files rather than a full room, the tall end of the cavity can fit a compact desk. A custom desk built to the exact cavity dimensions makes far better use of the space than a standard desk pushed against the slope. Pro install.
Display shelving. Open shelves for books, plants, or collectibles along the low end of the triangle. Works on any stair type, including open riser stairs where you can see through to the shelving from the room beyond. DIY weekend project.
Utility and hidden closet uses
Enclosed coat or linen closet. A full-height door at the tall end of the cavity, with adjustable shelving inside, is one of the most requested conversions for basement or hallway staircases. Intermediate to pro install depending on framing needs.
Vacuum and cleaning supply closet. Narrow, tall, and often overlooked. The shallow end of many staircases fits a vacuum, mop, and broom perfectly, but almost nobody builds storage for it because the space looks too awkward until you measure it. DIY weekend project with basic shelving.

Laundry sorting station. Works well for basement stairs near a laundry room. Add ventilated bins so damp items do not sit in a sealed box. Intermediate DIY.
Kids, play, and pet areas
Pet nook. A carved-out spot for a dog bed or crate at the low end of the triangle keeps pet gear out of the main walkway. Works on any stair type. DIY weekend project.
Kids’ play cubby. Slightly larger children love a hideaway spot, and the sloped ceiling that frustrates adults reads as a fort to a five-year-old. Add a small door or curtain. DIY weekend project.
Toy storage bins. Pull-out bins sized for blocks, board games, or sports gear. Works well combined with a bench seat above. Intermediate DIY.
Bike and gear storage
Vertical bike storage. Tall staircases, especially over a basement run, can fit a bike hung by its wheel at the tallest end. Works only where headroom exceeds about 6 feet. DIY weekend project with the right wall anchors.
Sports gear locker. Skis, golf bags, and camping equipment need vertical space more than depth, which makes them a natural fit for the same tall zone as bike storage. Intermediate DIY.
Freestanding modular units. If you are renting or not ready to build, modular boxes, baskets, and hooks fill the space with zero construction and can move with you later.
Rolling cart storage. A slim rolling cart tucked into the shallow end works for cleaning supplies, craft materials, or pantry overflow, and slides out fully for access. DIY weekend project.
Build-Ready Plans: Drawers, a Closet, and a Bench
Once you know which idea fits your stairs, the next question is whether you can build it yourself. These three projects cover the most requested conversions, from simplest to most involved.
1. Full-width pull-out drawers
This is the project most homeowners picture when they think of under-stairs storage, and it rewards careful measuring more than any other build on this list.
- Measure the cavity in sections every 12 inches along the stringer, recording height and depth at each point, since the slope changes your usable drawer depth at every position.
- Build drawer boxes from plywood, sized shortest at the low end and tallest at the high end, so each drawer face steps down with the stairs above it.
- Install full-extension drawer slides. Heavier drawers, especially ones meant for bulk pantry goods or tools, need slides rated for 100 pounds or more, like commercial-grade Accuride or King Slide hardware.
- Offset the drawer faces slightly to clear the tread nosing above, a detail experienced fitters rely on to keep the front panel flush and the drawer sliding freely.
- Attach drawer fronts, sand, prime, and paint or seal.
Pro Tip: Build a cardboard mockup of your tallest and shortest drawer before cutting any plywood. It costs you twenty minutes and saves you a wasted sheet of material.
Time: two to three weekends for an experienced DIYer. Difficulty: intermediate to advanced. No permit typically needed unless you are altering the stair structure itself.
2. Enclosed closet with adjustable shelving
- Frame a simple door opening at the tallest end of the cavity, sized to standard door hardware if possible to save money.
- Choose a bifold or pocket door if floor space outside the closet is tight; a standard hinged door works fine with more clearance.
- Install adjustable shelf brackets or a track system so shelf height can shift as storage needs change.
- Add a passive vent or small louvered panel if the closet will hold shoes, laundry, or anything with moisture.
- Finish interior surfaces with a wipeable paint if the closet will store cleaning supplies or damp gear.
Time: one to two weekends. Difficulty: intermediate. Framing a new door opening in a load-bearing wall assembly should get a second opinion from a professional before you cut anything.
3. Mudroom bench with cubbies and hooks
- Build the bench seat at 17 to 19 inches high for comfortable sitting, with a depth of at least 16 inches.
- Frame open cubbies below or beside the bench, sized to fit standard bins (roughly 12 by 12 inches) for easy swapping later.
- Mount hooks 48 to 60 inches high for adults, with a lower row around 30 inches if kids will use them too.
- Add a lift-up seat lid over a hinged storage box for boots or seasonal items.
- Finish with a durable painted surface or a bench cushion in a wipeable fabric, since mudroom benches take the most daily abuse of any surface in the house.
Time: one weekend. Difficulty: beginner to intermediate. No permit needed for a standard bench and cubby build.
Materials, Hardware, and Finishes That Hold Up
The materials you choose determine whether this storage looks good for two years or twenty. Paint-grade MDF is the standard choice for cabinet doors and face panels that get painted, since it machines cleanly and does not show grain through paint. Plywood should carry the structural load: drawer boxes, shelving, and anything that gets stress from weight or repeated sliding. Save solid wood for visible trim, like a bench top or a door edge, where the grain shows and the extra cost is worth it.
Hardware makes or breaks daily usability. Standard drawer slides handle light loads fine, but anything storing books, canned goods, or tools needs full-extension, heavy-duty slides rated for 100 pounds or more. Soft-close hinges and slides cost more upfront but matter enormously in a household with kids, since they eliminate the slammed-drawer noise that comes from a space right off the main hallway.
- Use ventilation grilles or louvered panels on any door enclosing shoes, laundry, or damp gear.
- Choose moisture-resistant finishes (marine-grade polyurethane or exterior-rated paint) for mudroom and laundry-adjacent builds.
- Source plywood and hardwood trim from a local lumber yard rather than a big-box store when you need consistent grain matching across several panels.
- Ready-made organizers, bins, and modular shelving units work fine as a temporary fix while you plan a permanent build.
Local lumber yards typically carry better sheet goods than big-box retailers, and staff there can often point you toward the right plywood grade for a drawer box versus a visible panel.
Measuring Your Space Before You Build Anything
Every under-stairs project lives or dies on accurate measurements, and the shape you are measuring is not a rectangle. It is a triangle, and getting that triangle right is the single most important step in the whole process.
- Measure height at the tallest point (where the stairs meet the floor or wall), and record it.
- Measure height again every 12 inches along the run, tracking how quickly the ceiling drops. This full record is what tradespeople call the “usable triangle,” and it is what determines which ideas from earlier in this article will actually fit.
- Measure depth at the same intervals, since depth often shrinks near obstructions before the slope even becomes the limiting factor.
- Note every obstacle: electrical panels, HVAC ducts, plumbing cleanouts, or support posts. Mark their exact location and required clearance, since code minimums for panel access typically demand 36 inches of clear floor space in front.
- Sketch a simple elevation (side view) and plan view (top view) using your measurements. A free tool like SketchUp Web lets you mock up drawer sizes and shelf placement digitally before you buy a single board.
Stair type changes what fits. Straight stairs give consistent depth along the whole run, making drawers and shelving straightforward. L-shaped stairs offer a deeper landing zone that suits benches or closets. Open riser and floating stairs have no solid stringer wall, which usually rules out built-in cabinetry entirely and pushes you toward freestanding or under-tread solutions instead.
Ventilation, Lighting, and Code Checks You Cannot Skip
Enclosed under-stairs spaces trap heat, moisture, and odor faster than open rooms, and skipping this step is the fastest way to turn a nice build into a smell problem six months later.
- Any project touching electrical wiring, plumbing, or structural framing typically requires a permit and a licensed contractor. Do not run new circuits yourself.
- Fully enclosed closets storing shoes, laundry, or gear benefit from fire-rated drywall lining if the space is under a stairway that also serves as an egress route, since some jurisdictions treat under-stair closets differently than open shelving.
- Add passive louvered vents or a small quiet fan for moisture and odor control in shoe or laundry storage.
- Choose LED fixtures for interior lighting. They run cool, which matters in an enclosed cavity with limited airflow.
- Leave hardwired lighting to a licensed electrician, especially when tying into an existing circuit near stairs.
- Check your local building code office before finalizing plans that involve a new door opening in a load-bearing wall.
What a Carpenter Sees That DIYers Often Miss
A trained eye catches problems before they become expensive mistakes, and under-stair cavities hide more of them than most homeowners expect.
Frameless cabinet construction, where the cabinet box has no center face frame blocking the opening, recovers meaningfully more usable interior depth than traditional face-frame cabinetry. In a shallow or awkward cavity, the difference between a drawer that pulls out cleanly and one that catches on a frame lip is the whole ballgame.
Professionals also check things a DIY plan set rarely mentions:
- Hidden utilities behind the stair skirt board, found with a stud finder and sometimes a borescope camera.
- Full clearance for drawer or door swing at maximum extension, not just at rest.
- Weight loading on drawer slides and shelf brackets, especially for pantry or tool storage.
- Whether the stringer itself can carry a mounted bench or shelf load without added blocking.
Cost bands vary with materials, hidden framing work, and custom trim detail, and a custom cabinet solution built to the exact cavity typically outperforms a stock unit forced into the space.
Keeping Under-Stairs Storage Clean and Functional Long Term
Under-stairs storage collects dust faster than open shelving because airflow through the cavity is usually limited, so a quick wipe-down every couple of weeks keeps buildup from turning into a chore. Vacuum interior corners and drawer tracks monthly, since dust and pet hair jam slides faster than almost anything else in the house.
Check hinges and drawer slides twice a year. A drop of lubricant on metal slides keeps them running smoothly, and tightening loose screws on hinges before they fail prevents a sagging door that never quite closes right again.
Pull everything out of enclosed closets once or twice a year and inspect for moisture signs, especially if the space sits near an exterior wall or a laundry area. Musty smell or dark spotting on interior surfaces means your ventilation is not keeping up, and it is worth adding a passive vent or small fan before mold becomes a bigger problem.
Wipe painted surfaces with a damp cloth rather than harsh cleaners, which can dull paint-grade MDF finishes over time. For bench cushions and fabric, a removable cover you can machine wash saves you from replacing the whole cushion when the mudroom bench inevitably takes a muddy hit.
A Carpenter’s Honest Take on What Actually Matters
Measure twice, then measure a third time before you cut anything. The single biggest mistake I see in under-stairs projects is a homeowner who plans a beautiful drawer system, then discovers halfway through that the slides do not clear the tread nosing.
Plan for full access before you plan for looks. A drawer you cannot fully open is worse than no drawer at all, because it wastes the material cost and still leaves you with unusable space.
Three priorities, in order: accessibility first, durability second, finish last. A mudroom bench that looks stunning but cracks under daily boot traffic within a year was never worth building. Pick materials that survive real use, then make them look good.
If your project involves anything beyond basic shelving, cutting into a load-bearing wall, adding wiring, or fitting cabinetry to a tricky slope, it is worth a conversation with a working carpenter before you commit to lumber.
— Wood
How Wood Made Illinois Turns This Space Into Real Storage
Reading a build guide gets you halfway there. Getting the drawer offsets right, fitting cabinetry to a slope that shifts inch by inch, and making sure the finish survives a Central Illinois mudroom in February takes hands that do this daily. Some carpentry professionals handle exactly that gap for homeowners who would rather have it done once, done right, and done without three weekends of trial and error.

A typical under-stairs project starts with a site measure to capture the actual usable triangle, followed by a CAD sketch so you approve the layout before any wood gets cut. From there, cabinetry is built sized to your cavity, hardware is fitted rated for the load you actually need, and finishing applied to match the rest of your home. Most projects run a few weeks from consultation to install, with cost driven mainly by cabinetry complexity and finish choice rather than square footage alone. If you have been eyeing that dead triangle under your stairs, request a consultation with Wood Made Illinois and get a plan built for your exact space, not a generic one pulled from a catalog. You can also browse custom carpentry project ideas for a sense of scope and style before your first call.
Keep Planning: Resources Worth Bookmarking
- Instructables’ pull-out drawer plan walks through a full build with tools and materials listed.
- Block Renovation’s under-stairs guide covers measuring the usable triangle and permit triggers.
- SketchUp Web lets you model your cavity for free before buying materials.
- One Day Doors & Closets covers modular closet systems worth comparing against a custom build.
Sources
- Under Stairs Hidden Storage Drawers | Instructables
- Under Stairs Storage Ideas to Build Into Your Remodel | Block Renovation
- Maximizing Under-Stair Storage: Custom Cabinet Solutions | Liberty Hill Cabinets
- Awkward no more: that space under the stairs | IKEA ideas
- SketchUp Web help | SketchUp