If you suspect lead paint on your windows, treat it as a hazard until proven otherwise: don’t disturb the paint, keep children, pregnant people, and pets away from the area, and arrange testing or hire a certified renovator before any window work begins, since window replacement carries its own strict rules.
TL;DR:
- Windows built before 1978 are highly likely to contain lead-based paint, especially on friction surfaces and areas with chipped or cracked layers.
- Immediate safety measures include avoiding paint disturbance, sealing the area, and removing children and pets until testing confirms safety.
- Repair, enclosure, or full replacement options depend on budget, window preservation value, and the extent of contamination, with repairs often preserving historical features.
- Any window work in homes built before 1978 must follow EPA’s lead-safe renovation rules, including certified contractors, containment practices, and post-work clearance testing.
- Regular maintenance like wet-wiping and installing dust-reducing features help prevent lead dust buildup and prolong safety indoors.
Table of Contents
- 1. How to tell if window paint may contain lead
- 2. Immediate safety steps if you suspect lead paint on windows
- 3. Options for addressing leaded windows: repair, enclosure, or replacement
- 4. When to hire professionals and which regulations apply
- 5. Cleaning and clearance: what the numbers actually mean
- 6. DIY precautions and prohibited methods for window work
- 7. Prevention and maintenance to stop lead dust before it starts
- 8. A carpenter’s perspective on lead-safe window repair
- 10. Considering a window fix that respects both safety and history
- Sources
- FAQ
1. How to tell if window paint may contain lead
Windows are among the highest-risk surfaces in any older home, and there’s a simple reason for that: they move. Every time a sash slides up or down, painted wood grinds against painted wood, grinding old paint into fine dust that settles in the sill and trough below. If your home was built before 1978, the year lead-based residential paint was banned, you should assume the paint on your original windows contains lead until a test says otherwise.
A few visual clues raise the odds further. Paint that has alligatored into a pattern of small cracks, paint applied in many thick layers, or paint on a surface a child could gnaw on (a sill low enough to reach, for instance) all deserve extra caution. Friction surfaces, meaning anywhere two painted parts rub together, are where dust generates fastest and where testing should start.
You have three practical routes to an answer:
- DIY test kits recognized by the EPA can confirm the presence of lead in a paint layer within minutes, though they’re better at ruling lead in than ruling it out on multilayered surfaces.
- Certified lead inspectors using X-ray fluorescence (XRF) devices give a fast, non-destructive reading directly on the window, often the most reliable option for older homes with many paint layers.
- Paint-chip lab analysis involves sending a small sample to a laboratory, typically the most precise method, though it takes several days to get results.
Some situations don’t leave time to wait on results. If a child under six lives in or regularly visits the home, if the paint is visibly chipping or peeling near a window, or if you’re about to start any renovation that will disturb the sash or trim, skip straight to treating the area as contaminated. Follow the immediate safety steps below while you arrange testing.
2. Immediate safety steps if you suspect lead paint on windows
The first hour after you notice deteriorating paint matters more than any long-term fix you plan later. Dust from lead paint is invisible, and once it’s airborne or ground into carpet fibers, it’s far harder to control.
- Move children, pregnant occupants, and pets out of the room, and keep them out until the area is contained.
- Close the door to the space and post a simple written warning so nobody wanders in.
- Leave the paint alone. Do not scrape, sand, or scrub it dry. Skip anything involving an open flame or a heat gun.
- Tape plastic sheeting over the sill, trough, and floor beneath the window to catch loose chips and dust.
- Seal any nearby HVAC vents so dust doesn’t travel through the ductwork into other rooms.
- Wipe surfaces with a damp cloth or mop rather than a dry rag, which only redistributes dust into the air.
Repeat the wet-wiping routine daily, or whenever you notice new debris, until a professional evaluates the window or you complete a certified cleanup. A HEPA vacuum, if you have access to one, is worth running over the sill and trough between wipe-downs since ordinary vacuums push fine lead dust right back into the room.
Pro Tip: Keep a dedicated set of cleaning cloths for the affected room and wash them separately from your regular laundry to avoid cross-contaminating other fabrics in the house.
3. Options for addressing leaded windows: repair, enclosure, or replacement
Once you know lead paint is present, you’re choosing between four broad strategies, and the right one depends on your budget, your timeline, and whether the window has historic value worth preserving.
Interim controls buy you time without committing to permanent work. This means stabilizing loose paint, smoothing rough edges so they’re easier to wipe clean, and committing to a regular cleaning schedule. It’s the least expensive route, but it’s not a fix. Interim controls require ongoing vigilance, and they do nothing to stop the friction that generates dust in the first place.
Enclosure and encapsulation cover the hazard rather than removing it. Metal coil stock over a trough, fitted track covers, or vinyl liners along the jamb can seal old paint away from hands and friction points. HUD guidance on abatement notes that porous surfaces like window troughs are especially hard to clean to acceptable standards, which is why enclosure with a smooth, cleanable material is often recommended over repeated scrubbing. Done well, encapsulation can last many years, though it depends on the covering staying intact and undamaged.
Repair without full replacement targets the friction itself. A carpenter can plane down a sticking sash so it glides without grinding against the jamb, or install compression jamb liners that let the window move smoothly on a cushioned track instead of bare wood on bare wood. This approach:
- Preserves original sash, glass, and trim, which matters for historic homes.
- Costs less than full replacement in most cases.
- Still requires lead-safe containment during the work itself, since planing and sanding generate dust.
Full replacement removes the hazard permanently rather than managing it. It’s the most decisive option, but it’s also the most heavily regulated, a point worth understanding before you schedule the work. On homes with preservation restrictions, whether from a historic district designation or a landmark commission, replacement may not be an option at all, and enclosure or careful repair becomes the only compliant path. A skilled hand at stile repair or window glass repair can often restore function to an old sash without triggering the same disturbance a full teardown would.
4. When to hire professionals and which regulations apply
Here’s a detail many homeowners miss: minor paint touch-ups on a wall are often exempt from federal lead rules, but windows are not. The EPA has explicitly excluded window replacement from the minor repair exemption, which means any contractor replacing a window in a pre-1978 home must follow the full Renovation, Repair, and Painting (RRP) Rule, not the lighter touch-up standard.
Under RRP, a certified renovator is required to:
- Contain the work area, typically 6 feet of interior space or 10 feet outside the building, according to EPA’s lead-safe work steps.
- Avoid prohibited practices such as open-flame burning, high-temperature heat guns, and power sanding without a HEPA shroud.
- Run a HEPA vacuum and wet-wash cleaning sequence after the work, verified with a cleaning card before the area is reopened.
- Arrange laboratory clearance testing when the job falls under a program or jurisdiction that requires it, confirming dust levels are below the applicable thresholds.
When you’re vetting a contractor for this kind of work, ask directly for their EPA certification number, proof of individual renovator training, and, if clearance testing was performed on a past job, a copy of the results. A checklist of questions to ask before hiring a repair technician is a useful starting point for framing those questions, even outside the window-specific context. References from recent lead-safe jobs, not just general carpentry work, tell you whether the contractor has actually run this process before.
Cost and timeline differ sharply between the two paths. Certified abatement work, with containment, cleaning verification, and possible lab testing, typically runs longer and costs more upfront than DIY interim measures like taping off a sill and wet-wiping weekly. But interim measures are, by definition, temporary. They lower risk without resolving the underlying hazard, while certified work aims to close the issue out for good.
5. Cleaning and clearance: what the numbers actually mean
Cleaning up after lead paint work follows a specific order, not a general tidy-up. EPA’s lead-safe steps guidance recommends a HEPA vacuum pass, followed by wet-washing, followed by a second HEPA pass, moving from ceiling to walls to windows to floors so dust from higher surfaces doesn’t recontaminate areas already cleaned.
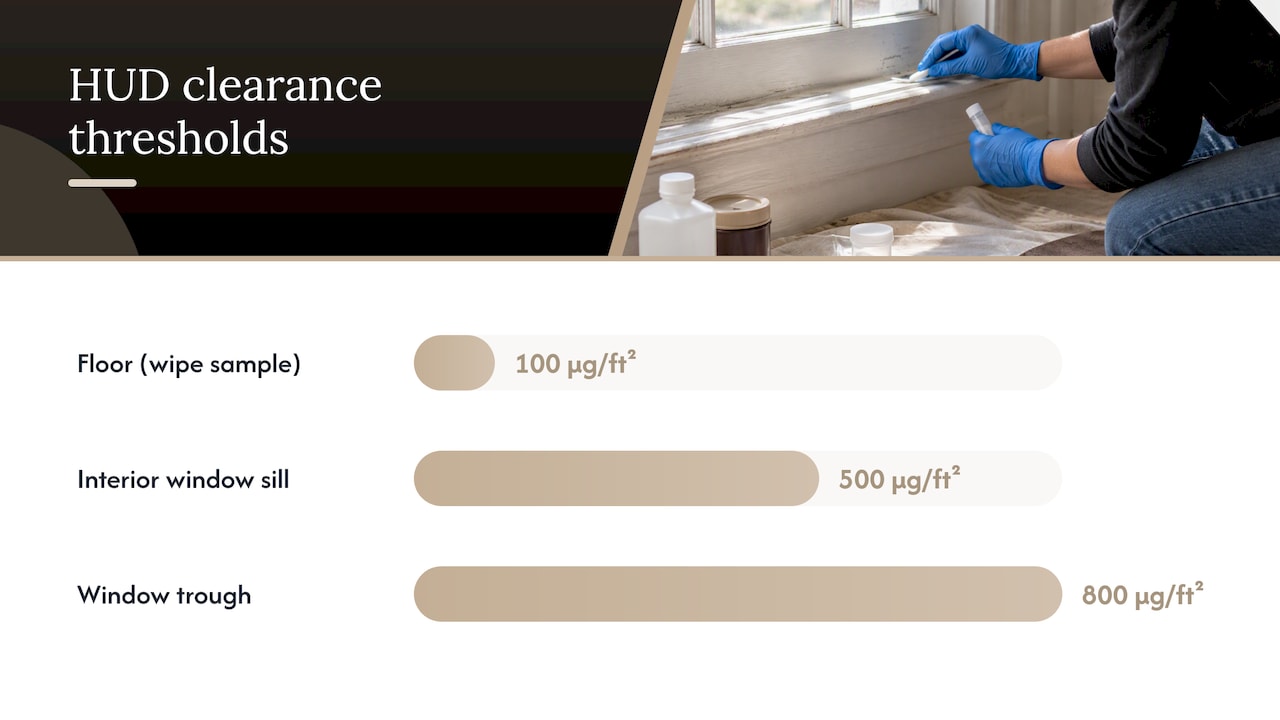
HUD sets numeric limits for how much lead dust can remain after a cleanup, and windows carry some of the strictest thresholds in the guidelines: wipe-sample clearance standards allow no more than 100 µg/ft² on floors, 500 µg/ft² on interior window sills, and 800 µg/ft² in window troughs. Troughs get a higher allowance because they’re harder to clean completely, not because the risk there is lower.
- A visual or cleaning-card check confirms no visible dust or debris remains and is often the first pass after work.
- A laboratory wipe sample measures actual lead content against the HUD thresholds and is the only method that gives a pass or fail number.
- If a wipe sample fails, the area must be recleaned and retested before anyone reoccupies the space.
Don’t move furniture back in or let children back into the room until clearance testing confirms the numbers are below threshold. Coordinating that final test with your contractor, rather than assuming the visible cleanup was enough, is the step that actually protects your household.
6. DIY precautions and prohibited methods for window work
If you’re tackling minor work yourself rather than hiring a certified renovator, some methods are off the table entirely, no matter how tempting the shortcut looks.
- Never dry-sand painted wood suspected of containing lead. It’s the fastest way to fill a room with fine dust.
- Never use an open flame or a heat gun that reaches above 1,100 degrees Fahrenheit to strip old paint; both vaporize lead into fumes.
- Never run a power sander or abrasive blaster without a HEPA shroud attached and running.
- Never skip containment because the job “looks small.” Dust from even a short sanding session settles far beyond the immediate work area.
Safer approaches exist if you choose to do limited work yourself: wet-scraping instead of dry-sanding, using tools fitted with HEPA attachments, taping down plastic sheeting even for a quick job, and wearing a respirator rated for lead dust rather than a basic dust mask. The EPA generally allows homeowners to do this kind of limited work on their own primary residence without hiring a certified renovator, but it still recommends following the same containment and cleaning practices certified firms use, because the dust doesn’t know the difference between a professional job and a weekend project.
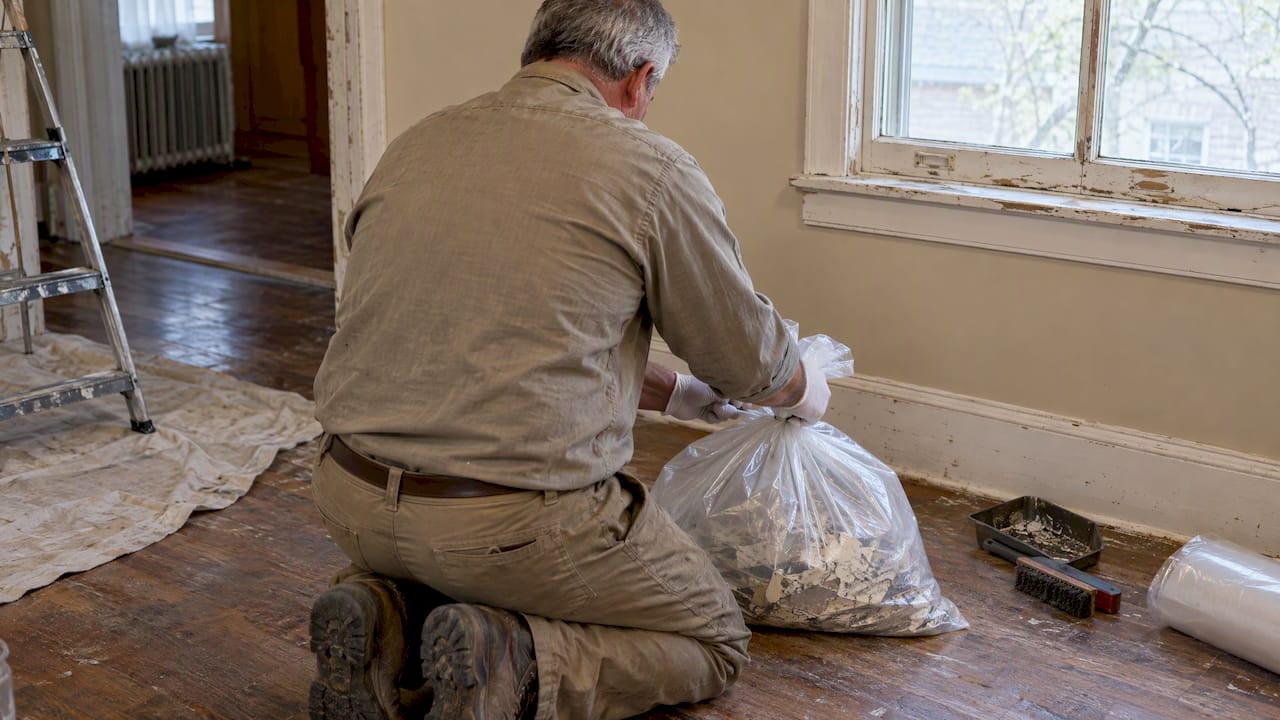
Whatever you scrape or remove needs to be sealed in heavy plastic before it leaves the house, never swept loose into a trash bag. Wash your hands, face, and clothing before eating, drinking, or leaving the work area, and shower as soon as the job is done for the day.
Pro Tip: Keep your work clothes separate from the rest of your laundry, and run them through their own wash cycle to avoid spreading lead dust to other fabrics.
7. Prevention and maintenance to stop lead dust before it starts
The best long-term fix addresses the root cause, not just the paint. If a window is rotting or holding moisture, stabilizing the paint on top of that damage won’t last. Fix the wood problem first, then address the coating.
- Inspect friction points and impact surfaces (sash tracks, sills, troughs) every few months for new chips or dust.
- Keep a simple wet-wiping routine going on window sills as part of regular cleaning, not just during a crisis.
- Install compression jamb liners or track covers to eliminate the wood-on-wood grinding that generates dust in the first place.
- Add storm windows where practical, which reduce how often the primary sash needs to move and cuts down on friction over time.
- Plan for full component replacement when energy efficiency losses or the scale of the hazard make interim fixes impractical long-term.
Think of these steps as maintenance, not a one-time project. A window that’s been treated for lead paint still needs the same attention six months later that it needed on day one.
8. A carpenter’s perspective on lead-safe window repair
Old windows deserve to be understood before they’re touched, and that understanding comes from having repaired hundreds of sashes, not from reading a regulation. With more than 100 years of combined carpentry experience on our team, we’ve learned that lead-safe containment and historic preservation aren’t competing goals: a well-executed repair protects both the occupants and the woodwork.
Stile repair, sash glazing, and muntin restoration all let a skilled hand address rot, glazing failure, and friction without the wholesale disturbance a teardown creates. A carpenter who plans the cut lines, tapes off the work zone, and wets the surface before touching a scraper generates a fraction of the dust an untrained attempt would. That’s not a shortcut around lead safety rules; it’s what following them actually looks like in practice on a piece of trim someone’s grandparents might have painted.
— Wood
10. Considering a window fix that respects both safety and history
If you’re weighing whether to repair or fully replace a leaded window, the right answer often depends on how much of the original woodwork is worth saving. Full-scale window replacement services solve the hazard outright but can be a heavier lift than many homes actually need. Professional carpenters can plane a sticking sash, reglaze a cracked pane, or rebuild a damaged muntin while containing dust the same way a certified renovator would, preserving the character of an older home instead of erasing it. For homes where the woodwork still has years of life left in it, that’s often a faster and less disruptive path than a full teardown. If you’re in Central Illinois and want a hands-on look at what your windows actually need, reach out through our services page to talk through your options.
Sources
For readers who want the underlying regulations and health guidance directly from the agencies that publish them:
FAQ
How bad is lead paint on windows?
Lead paint on windows is a higher-risk exposure source than lead paint on most other surfaces because window friction constantly grinds paint into fine dust that settles in sills and troughs. There is no known safe blood lead level in children, so any ongoing dust source deserves prompt attention.
Is a little bit of lead exposure okay?
No amount of lead exposure has been established as safe, particularly for young children. The CDC’s blood lead reference value for children aged 1 to 5 is 3.5 µg/dL, a threshold used to identify children with higher exposure than most, not a level considered harmless.
What if I accidentally sanded lead paint?
Stop immediately, leave the room, and avoid dry-sweeping the area, which only spreads settled dust back into the air. Ventilate if possible, wet-wipe surfaces once dust has settled, and consider arranging clearance testing to confirm the space is safe before regular use resumes.
Is it okay to live in a house with lead paint?
Intact, well-maintained lead paint on non-friction surfaces is generally lower risk than paint on windows, doors, and other moving parts. Because many children with elevated exposure show no obvious symptoms, blood testing remains the reliable way to catch a problem early, especially in homes with visible paint deterioration.