Repair historic porch posts and pillars whenever the original material can still be stabilized; replace them in-kind only when structural failure or safety makes repair impossible. That standard comes straight from the Secretary of the Interior’s Standards for the Treatment of Historic Properties, which favor repair over replacement and require any new work to match the original in design, material, color, and texture. Before you touch a post with a saw, get the evidence in hand: photos, measurements, and a clear picture of what’s rotted and why.
TL;DR:
- Repair is preferred over replacement unless the post has failed structurally or poses a safety risk, with in-kind replacement only when repair is impossible.
- Inspection, documentation, and targeted repairs such as epoxy consolidation or splicing are key to preserving original material and avoiding unnecessary full replacements.
- Full in-kind replacement should be based on existing evidence like profiles, fragments, or photographs and must be approved by SHPO if the property is listed or within a historic district.
- Timelines for repairs range from one to three days for minor fixes up to four weeks for custom millwork, with costs influenced by material choice, project scope, and review requirements.
- Regular maintenance, including gutter cleaning and moisture management, significantly extends the life of historic porch posts and reduces future repair costs.
Table of Contents
- What Is the Right Approach to Historic Post and Pillar Replacement?
- How Do You Inspect and Document a Historic Post or Pillar?
- Which Repair Techniques Preserve Original Historic Material?
- When Should You Fully Replace a Historic Column?
- Do You Need SHPO Approval for Post Repairs?
- What Should You Expect for Timeline and Cost?
- How Can You Prevent Future Rot in Historic Posts?
- Wood Made Illinois’s Approach to Historic Post and Pillar Projects
- Why Preservation-Minded Choices Matter More Than They Get Credit For
- Getting Professional Help for Your Historic Porch
- Sources
- FAQ
What Is the Right Approach to Historic Post and Pillar Replacement?
Historic post and pillar replacement is not a single decision. It’s a sequence of smaller judgment calls, each one narrowing your options until you land on repair, partial replacement, or a full rebuild. Get the sequence wrong and you either spend money replacing wood that could have been saved, or you patch a post that’s one storm away from collapsing.
Here’s the decision flow preservation carpenters actually use in the field:
- Determine the post’s job. Is it structural, holding up a roof or porch load, or is it decorative trim wrapped around a hidden steel or concrete support? Decorative pillars tolerate cosmetic repair that a load-bearing post cannot.
- Map the decay. Rot rarely announces itself politely. Tap the shaft with a mallet, listen for the hollow give of punky wood, and note whether the damage is confined to the base or has climbed the shaft.
- Trace the cause. Nearly every rotted post traces back to trapped moisture, usually a failed flashing detail, a base sitting flush on a wet slab, or gutters dumping water at the foundation.
- Decide on urgency. If a post is visibly leaning, cracked through, or the porch roof has sagged, that’s a safety issue, not a maintenance issue.
A few field basics matter more than most homeowners expect:
- Never remove a load-bearing post without shoring the structure it supports first.
- A moisture meter reading above 20% in solid wood signals active decay risk, not just old staining.
- If more than a third of a post’s cross-section is compromised at any single point, plan for at least a partial replacement.
Photograph everything before you cut, pry, or patch. Those images become your evidence file if you later need SHPO sign-off or a tax credit review.
How Do You Inspect and Document a Historic Post or Pillar?
Start with a slow visual pass, moving from base to capital. Preservation Brief 45 directs owners to check porch framing and footings first, since decay in a post almost always mirrors decay in what’s underneath it. Look for fungal growth (white or brown fuzzy patches, mushroom-like conks near the base), paint that’s blistering or peeling in sheets rather than flaking, and any visible movement when you push against the shaft.
A few checks require care rather than force:
- Probe softly with an awl or screwdriver at the base and any joints, but stop the moment the tool sinks in easily. That’s confirmed rot, not a guess.
- Skip aggressive probing on turned or fluted shafts with thin decorative material; you can crack century-old millwork trying to test it.
- Check for sagging or bounce in the porch framing above the post; a healthy post under a compromised beam is still a safety problem.
- Note any prior repairs. Old bondo patches, mismatched wood grafts, or hidden nails often hide the real extent of damage.
If a post shows structural movement, sags visibly, or you’re unsure whether the framing above it can bear weight, bring in a structural engineer or preservation carpenter before doing anything else. This is also the point to think about lead paint. Older porches were almost always painted with lead-based coatings, and any scraping, sanding, or demolition on those surfaces falls under the EPA’s Renovation, Repair and Painting rule, which sets specific containment and cleanup requirements.
Photograph the post from all four sides, close up on any moldings or capital details, and include a tape measure in the frame for scale. Record the base diameter, shaft profile, and any decorative turning pattern. These records will matter later, whether you’re matching new millwork or filing for SHPO review.
Pro Tip: Keep a simple folder, digital or physical, labeled by post location. Future owners, and future contractors, will thank you for a paper trail that shows exactly what was original and what was repaired.
Which Repair Techniques Preserve Original Historic Material?
Most rotted posts don’t need to come down entirely. They need targeted intervention at the point of failure, which is exactly what the Secretary of the Interior’s Standards call for: repair the deteriorated feature rather than replace the whole thing.
Epoxy consolidation works well on shafts with surface punkiness or shallow rot pockets that haven’t compromised the wood’s core strength. A consolidant, a thin, penetrating epoxy, soaks into softened fibers and hardens them back into a workable structural mass. Once cured, you fill remaining voids with a structural epoxy filler, sand to profile, and the repair becomes essentially invisible under paint.
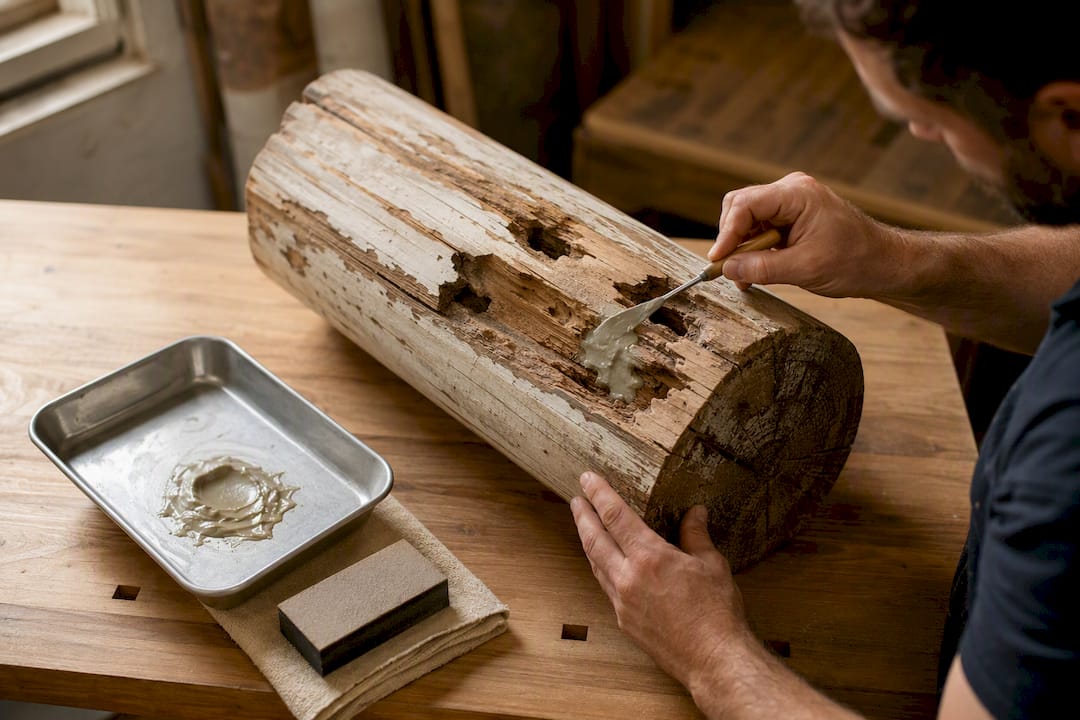
Splicing and scarfing address rot that’s eaten through a discrete section, usually the base, where the post meets a wet sill or slab. A preservation carpenter cuts out the compromised section and grafts in new wood milled to match the original species and profile. NPS technical guidance describes a practical fastening method here: drilling fiberglass rebar into both the original and replacement wood and bonding the connection with structural epoxy, creating a three-point joint that resists both tension and lateral stress.
Replacing just the plinth or base is often possible without touching the shaft at all. Since bases and plinths frequently deteriorate faster than the shaft above them, a local millworker can turn a new base to match the existing profile while the original shaft stays in place. Shore the porch load carefully before cutting the old base free; a jack pad and temporary post beside the work area keeps the roof line stable.
A few practical notes for any of these methods:
- Let epoxy repairs cure fully before priming; rushing this step causes premature paint failure.
- Prime bare wood and epoxy fill with an oil-based or epoxy-compatible primer before topcoating.
- Match sheen and color to adjacent original paint layers so the repair doesn’t read as a patch from the sidewalk.
Pro Tip: The best column repairs are the ones nobody notices. If a visitor has to ask which part is original and which part is new, the work has done its job.
When Should You Fully Replace a Historic Column?
At that point, in-kind replacement isn’t cutting corners. It’s the standard itself telling you repair is no longer feasible, and matching the original becomes the priority.
Matching by evidence means working from whatever proof survives: a sound matching post elsewhere on the same porch, salvaged fragments of the damaged one, historic photographs, or measured drawings taken before removal. The Secretary of the Interior’s Standards require that documentation, not guesswork, drive the design of the replacement.
A few practical steps that keep a full replacement defensible:
- Pull a profile template from any surviving section, even a few inches of intact molding, using a contour gauge or by tracing a cross-section onto cardboard.
- Match species where possible. Old-growth heart pine and cypress resist rot differently than modern fast-growth lumber, so a substitute species should be disclosed and documented, not passed off as identical.
- When wood substitutes (like cellular PVC or fiberglass) are under consideration, document the reasoning in writing before installing them, especially on a designated property.
- Bring a millworker actual fragments, not just photos, whenever possible; a hand-held sample lets a shop match profile depth and bead spacing far more accurately than a picture ever will.
Working with a millworker on a job like this means providing measured drawings, a sample fragment if you have one, and clear tolerances for how closely the new piece needs to track the old profile. Ask to see a test cutting before the full run gets made. A quarter inch of drift in a bead profile is invisible on paper and glaring on a finished porch.
Do You Need SHPO Approval for Post Repairs?
Not every porch repair triggers a review, but plenty do. If your property carries a local historic district designation, sits on the National Register, or is part of a certified rehabilitation project claiming historic tax credits, replacing a post likely requires a look from your State Historic Preservation Office before work starts.
SHPO reviewers typically want to see the same documentation you should already be gathering: clear photos of existing conditions, measured drawings or profiles of the replacement, and a short written scope of work explaining why repair wasn’t feasible. Consulting SHPO early saves you from the worst outcome on a certified project: installing a replacement, only to learn afterward that the material choice disqualifies the work from the tax credit you were counting on.
Material substitution is where this goes wrong most often. Swapping solid wood for fiberglass or PVC composite might solve a maintenance headache, but on a certified rehab project it can jeopardize eligibility for financial incentives entirely, since reviewers weigh material authenticity heavily against the Standards. If you’re navigating a landmark district’s approval process on top of SHPO review, local review boards often have their own submission requirements that run parallel to state review.
Practical steps before you pick up a hammer:
- Call SHPO or your local preservation commission before finalizing material decisions, not after.
- Prepare a one-page scope of work: what’s failing, what you propose, and what evidence supports the match.
- Keep every photo and measurement from your inspection; reviewers will ask for it.
What Should You Expect for Timeline and Cost?
Minor repairs, epoxy consolidation, a base replacement, a spliced section, typically run one to three days of on-site carpentry once materials are ready. Full column replacement runs longer, often two to four weeks from the first measurement to the finished paint job, because custom millwork has to be ordered, shaped, and finished before installation even begins.
Several factors drive the cost up or down on a project like this:
- Custom millwork costs more than off-the-shelf columns because a shop has to set up tooling to match a historic profile, sometimes for a single post.
- Shoring and temporary structural support add labor time, especially on porches with multiple posts sharing one roof line.
- SHPO or landmark review can add weeks to a timeline even when the actual repair work is straightforward.
- Hidden structural repairs, rotted framing discovered once a post comes down, are the most common source of budget surprises.
When you’re vetting a contractor, ask direct questions: Have they worked on designated historic properties before? Can they produce photos of past column repairs, not just replacements? Do they understand SHPO documentation requirements, or will you be managing that paperwork yourself? A red flag worth taking seriously: any contractor who proposes full replacement before doing a hands-on inspection of the existing post.
Getting two or three documented assessments before committing to a scope of work isn’t overkill. It’s often the difference between a $1,500 repair and an unnecessary $8,000 replacement, and a second opinion frequently catches root causes (bad flashing, poor drainage) the first estimate missed entirely.
How Can You Prevent Future Rot in Historic Posts?
Every repair you make is a bet against moisture winning again. Stack the odds in your favor with a short list of maintenance habits that cost far less than another round of column surgery.
- Clean gutters and downspouts twice a year; a clogged gutter dumping water straight onto a post base is the single most common cause of repeat rot.
- Confirm the porch deck slopes away from the house, not toward it, so standing water doesn’t pool at the post foundation.
- Seal exposed end grain at the base of any post with a quality wood sealer; end grain absorbs water many times faster than the face grain.
- Walk the porch once a year and press-test each post base with your hand or a mallet; catching soft wood early keeps a repair small.
- Fix flashing gaps where a porch roof meets the house before they cause hidden rot in framing you can’t see from below.
Compatible finishes matter as much as the wood itself. An oil-based or high-quality acrylic primer built for exterior wood, paired with a breathable topcoat, keeps moisture from getting trapped under the paint film in the first place.
Pro Tip: Set a phone reminder for the first dry week each spring to walk your porch posts. Fifteen minutes of looking now beats fifteen hours of repair later.
Wood Made Illinois’s Approach to Historic Post and Pillar Projects
An experienced carpentry team brings extensive expertise to historic home maintenance work, shaping a consistent workflow: inspect first, document thoroughly, repair in place whenever the wood allows it, and reserve custom millwork for the posts that genuinely need it.
That sequence, inspection, documentation, repair-in-kind, then fabrication when necessary, mirrors what the Standards call for, but it also reflects a practical reality: repair almost always costs less and takes less time than a full custom rebuild. The firm’s wood repair and historic home renovation experience means the recommendation you get reflects what the post actually needs, not a default toward the most expensive option. Finishing work, priming, painting, and matching sheen to surrounding trim, closes out every job so the repair reads as original.
Why Preservation-Minded Choices Matter More Than They Get Credit For
Most homeowners treat a rotted post as a binary problem: fix it or replace it. The Standards frame it differently, and rightly so. Every original board you retain carries information a replacement can’t: the actual growth rings of old-growth lumber, the hand-cut joinery of a builder working without modern tools, physical evidence a future researcher or restorer might need.
Cost, authenticity, and longevity rarely align neatly. Sometimes the cheapest short-term fix is the one that costs you historical value you can’t buy back. Sometimes full replacement really is the responsible choice, and pretending otherwise just delays an inevitable failure.
Document what you do either way. The maintenance record you keep today becomes the evidence the next owner, or the next contractor, relies on. That’s not paperwork for its own sake. It’s how a building keeps its own history legible.
— Wood
Getting Professional Help for Your Historic Porch
Some carpentry services offer a repair-first alternative to contractors who default straight to full column replacement, often at two to three times the cost of a targeted repair. The team’s historic home maintenance work starts with an honest on-site assessment, not a sales pitch for the most expensive fix available.

A typical engagement includes a detailed inspection report identifying exactly which posts need repair versus replacement, photographic documentation you can keep for your own records or SHPO submission, an itemized estimate broken out by task, and a realistic project schedule. If your porch needs structural work beyond the posts themselves, the team’s deck and porch construction experience covers framing and footing repairs too.
To get started, reach out through Wood Made Illinois’s site and have your photos, any measurements you’ve already taken, and a rough description of what you’re seeing (leaning, soft wood, visible rot) ready for the initial conversation. That head start lets the team scope your visit accurately before anyone sets foot on the porch.
Sources
- The Secretary of the Interior’s Standards for the Treatment of Historic Properties – Technical Preservation Services (U.S. National Park Service)
- EPA: Renovation, Repair and Painting (RRP) Program
FAQ
How Much Does It Cost to Replace the Pillars on a Porch?
Cost depends heavily on whether the job is a partial repair or a full custom replacement, since custom millwork to match a historic profile costs far more than off-the-shelf stock. Wood Made Illinois provides itemized estimates after an on-site assessment rather than flat pricing, since every historic porch’s damage and profile differ; current project pricing is available directly through the company’s site.
How Do You Replace Old Columns on a Front Porch?
Start by determining whether the column is load-bearing or decorative, then inspect for the extent and location of decay before deciding on repair versus replacement. If replacement is necessary, match the original in design, material, and profile, shore the porch load before removing the old column, and document the process with photos throughout.
How Do You Fix a Rotted Wood Pillar?
Shallow surface rot often responds well to epoxy consolidation, where a penetrating consolidant hardens softened wood fibers before a structural filler restores the shape. Deeper rot at the base or a discrete section usually calls for splicing in new matching wood, sometimes reinforced with epoxy-bonded fiberglass rebar for a strong, nearly invisible joint.
What Are the Pillars on a Porch Called?
Porch supports are most commonly called columns or posts, and the terms are largely interchangeable in residential preservation work, though “column” often implies a more formal, classically detailed support while “post” describes a simpler structural upright. Either term covers the shaft, base or plinth, and capital that make up the full assembly.
Do I Need SHPO Approval to Replace a Historic Post?
Approval is typically required only if your property is designated, sits in a historic district, or is part of a certified rehabilitation claiming tax credits. Consulting your State Historic Preservation Office early, before choosing materials, prevents wasted expense on the wrong materials and protects eligibility for any financial incentives tied to the project.