For most garages, a modular slatwall or rail system paired with open shelving gives you the best mix of flexibility and load capacity, outperforming pegboard for heavier tools and beating cabinets on cost. Pegboard, cabinets, and hooks still earn a place depending on your budget and the finish you want. Whatever you choose, your wall type and anchoring method decide whether the system holds, and a heavy load on masonry or a long continuous run is where we recommend bringing in a professional installer.
TL;DR:
- Rail systems keep long handled tools such as rakes and shovels accessible, while open shelves suit bulky seasonal items and cabinets conceal chemicals.
- Pegboard is economical for small hand tools, but heavy items require plywood backing or direct stud reinforcement; drywall alone cannot support the load.
- Keep frequently used tools 48 to 66 inches high; with an 8 foot ceiling, set the top track at 78 inches, leaving 18 inches overhead.
- On concrete or block, fasten wood furring strips with masonry anchors before attaching panels; this prevents bowing and creates level mounting points.
- DIY suits small pegboard sections or light shelves on exposed studs; hire a professional for masonry, full wall systems, or heavy tool loads.
Table of Contents
- Comparing Wall-Mounted Storage Systems: Slatwall, Pegboard, Rails, and More
- Where to Place Things: Sizing, Layout, and Storage Hierarchy
- Mounting and Wall Types: What a Secure Installation Requires
- DIY or Hire a Pro: What Each Path Involves
- What Garage Storage Walls Cost and Where to Spend More
- Customizing a Garage Storage Wall With Pallet Wood and Other Materials
- Maintenance and Longevity for a Pallet Wood Storage Wall
- Designing for Comfort: Ergonomic Layouts for Remote Workers and Families
- What to Expect: Consultation, Design, and Installation Timeline
- Why Carpentry-First Design Changes How a Garage Works
- How We Help: Custom Garage Storage Walls Built Around Your Space
- FAQ
- Sources
- Installation Manuals and Professional Reference
Comparing Wall-Mounted Storage Systems: Slatwall, Pegboard, Rails, and More
Each wall-mounted system solves a different storage problem, and most garages end up using two or three in combination.
- Slatwall panels offer a modular track system with a wide accessory ecosystem of hooks, baskets, and bins; when anchored into studs or furring strips, they handle loads suitable for power tools and sports gear.
- Pegboard is the most economical option and endlessly flexible for small hand tools, but it needs plywood backing or direct stud reinforcement before it can carry anything heavy.
- Rail or hang-rail systems mount a single horizontal track that accepts modular hooks and shelf brackets, giving fast access to long-handled tools like rakes, shovels, and brooms without digging through a bin.
- Open shelves and wire baskets work best for bulky, irregular items such as seasonal totes or sports equipment you grab often and don’t need to hide.
- Wall cabinets cost more but deliver a finished look and secure doors, which matters for hazardous chemicals, fasteners, or valuable equipment you want out of sight and out of reach of kids.
Accessories tie the system together. Magnetic strips corral loose metal parts, specialty holders secure bikes and ladders at odd angles, and baskets catch the small stuff that would otherwise slide off a shelf. The right combination depends less on brand and more on what you’re actually storing and how often you touch it.
Where to Place Things: Sizing, Layout, and Storage Hierarchy
Garage storage works best when it follows a simple hierarchy: the tools you touch weekly sit at eye-to-chest height, and everything else moves up or down from there. Manufacturer installation guidance recommends mounting frequently used items at roughly 48 to 66 inches off the floor, which lands squarely in the reach zone for most adults without bending or stretching.
Ceiling height sets your upper limit. On a standard 8-foot ceiling, a top track installed at 78 inches leaves about 18 inches of clearance above the system, enough room to avoid crowding the ceiling while still maximizing vertical storage.
Before you buy anything, walk the wall with a tape measure and work through this checklist:
- Measure total ceiling height and confirm it meets the system’s minimum clearance, since some kits require roughly 70 lineal inches of wall space and at least 7.5 feet of ceiling height to install correctly.
- Mark stud locations across the full run so your mounting points are consistent, not guessed.
- Note every door swing, garage door track, and light switch that could interfere with panels or long accessories.
- Measure vehicle clearance with the car parked in its normal spot, especially if you’re hanging anything that extends off the wall.
- Plan continuous runs rather than scattered sections, since a single level track distributes weight more evenly than several short, mismatched ones.
Mount frequently used tools at roughly 48 to 66 inches off the floor, and on an 8-foot ceiling, set the top track at 78 inches to leave about 18 inches of clearance above the system. That range keeps your most-used gear within easy reach while respecting the ceiling you actually have.
Mounting and Wall Types: What a Secure Installation Requires
Anchoring is where most garage storage walls succeed or fail, and the wall material behind your drywall determines the method.
Studs are the preferred anchor point whenever you can find them, since screwing directly into solid framing gives you the highest load capacity with the simplest hardware. A stud finder or a few test holes along the baseboard will locate framing reliably before you commit to a layout.
Concrete or block walls need a different approach. Professional installers first attach wood furring strips to the masonry using masonry anchors, then mount the storage panels to those strips rather than the wall itself. That extra layer prevents panel bowing and gives you a consistent, level anchor point across the whole run.
- Use toggle bolts on hollow drywall where no stud is available, and masonry anchors on concrete or block.
- Match drill bit and anchor sizing to your manufacturer’s installation manual, since undersized holes strip out under load and oversized ones lose grip.
- Keep slot heights matched on both rails of a multi-track run to prevent binding when you slide accessories into place.
- Check level across the entire run before final tightening, not just at the first bracket.
Pro Tip: Drive a single pilot screw at each end of a rail first, check level with a four-foot level, then fill in the remaining fasteners, so you catch a sloped wall before it becomes a crooked storage wall.
DIY or Hire a Pro: What Each Path Involves
A single pegboard section or a few light shelf brackets on an open stud wall is a reasonable DIY weekend project. Full-wall slatwall installs, anything on masonry, or a run meant to carry heavy power tools calls for a professional, since the margin for error on anchoring shrinks as the load goes up.
A professional workflow typically moves through site evaluation, layout planning, anchoring into bearing points, accessory setup, and a final inspection, which catches problems like hidden wiring or uneven studs before they become a hung shelf full of tools on the floor.
If you’re tackling it yourself, you’ll need a stud finder, a level, a drill with the correct bit sizes, and a torque-appropriate driver setting. The most common pitfalls are:
- Ignoring stud alignment and anchoring into drywall alone.
- Using too few fasteners across a long panel run.
- Skipping the furring strip step on masonry, which leads to bowing.
After installation, load-test every section by hand, check accessories slide without binding, and recheck fastener torque after a week of use.
What Garage Storage Walls Cost and Where to Spend More
Budget kits with basic pegboard or a short rail section sit at the low end of the spectrum, mid-range modular slatwall systems cost more but add accessory variety and higher load ratings, and custom carpentry installs sit at the top because they combine built-in design with finish work.
Labor and material choices drive most of the price difference. Masonry walls add cost because of the furring strip step, long continuous runs need more anchors and panels, and cabinets or finished trim add both material and labor hours that open shelving skips entirely.
A few ways to keep costs reasonable without cutting corners on safety:
- Combine a professionally installed track or rail with DIY-mounted accessories once the anchoring is done.
- Choose composite or painted panels instead of premium finishes if you plan to paint anyway.
- Prioritize anchor quality and stud placement over decorative trim, since that’s what actually holds the weight.
Spending more makes sense when the wall sees daily use, carries genuinely heavy loads, or when a clean, finished garage adds to your home’s resale appeal.
Customizing a Garage Storage Wall With Pallet Wood and Other Materials
Standard slatwall and rail kits solve the function problem, but they rarely solve the look problem. We build garage storage walls from reclaimed pallet wood, blending open shelving, hook rails, and built-in cubbies into a single finished surface rather than a row of bolted-on panels.
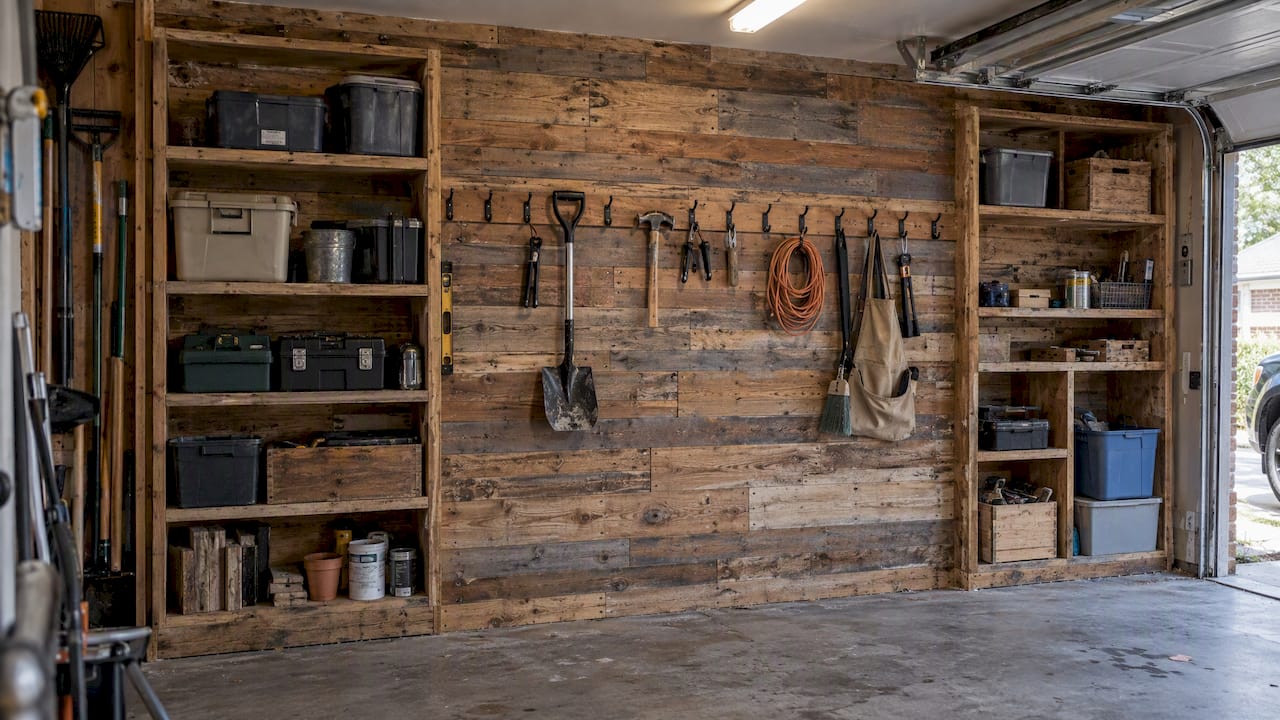
Pallet wood brings texture and warmth that composite panels can’t match, and because each board is sized and placed by hand, we can design around your garage’s actual quirks, a water heater in the corner, an uneven stud bay, a window that breaks up the wall. Beyond pallet wood, we also work with standard dimensional lumber for a cleaner, more uniform look, or a mix of both where part of the wall needs heavier-duty cabinetry and part just needs open hook space.
Finish options matter too. A clear coat keeps the reclaimed character visible, while paint or stain can match trim elsewhere in your home if the garage doubles as a workshop or hobby space you actually spend time in. Because the structure is custom-built rather than kit-assembled, we can integrate pegboard sections, cabinet doors, and open shelving into one continuous design instead of three separate systems competing for wall space.
The tradeoff is time: a custom pallet wood wall takes longer to design and build than ordering a slatwall kit, but it gives you a storage wall built around your tools and your garage, not a generic footprint.
Maintenance and Longevity for a Pallet Wood Storage Wall
Pallet wood is tougher than it looks once it’s properly prepared, but it still needs a bit more attention than powder-coated steel panels.
Check the finish once or twice a year, especially near garage doors where temperature swings and moisture are more common. A worn clear coat or faded stain is easy to touch up before the wood underneath starts to dry out or crack.
Watch fastener points the same way you would on any wall-mounted system: a loaded shelf or hook rail that sees daily use should get a quick torque check periodically, since wood can compress slightly around screws over time in a way drywall anchors don’t. Dust and wipe down open shelves regularly, since pallet wood’s texture catches more debris than a smooth panel.
Humidity control helps more than almost anything else. A garage that stays dry protects both the wood and the anchors behind it, so if your garage runs damp, a dehumidifier extends the life of a pallet wood wall considerably. With reasonable upkeep, a well-built pallet wood storage wall holds up for years and ages with a character that manufactured panels never develop.
Designing for Comfort: Ergonomic Layouts for Remote Workers and Families
A garage storage wall isn’t just about fitting more in less space, it’s about reducing the bending, reaching, and searching that make a garage frustrating to use.
For remote workers using a corner of the garage as a workspace, storage layouts that keep reference materials, supplies, and equipment at seated or standing reach, not stacked floor to ceiling, help the space function as an office first and storage second. The same eye-to-chest placement principle that governs tool storage applies here: the things you use most should never require a step stool.
For families, ergonomic design often means layering heights by user. Hooks for kids’ bikes and sports gear sit lower, while hazardous items like chemicals or power tools move higher or behind cabinet doors. A mudroom-style bench or cubby section near the entry door gives everyone a drop spot for shoes and bags before they track through the house, which turns the garage into a functional transition space rather than just overflow storage.
Comfort and safety end up pointing in the same direction: a wall designed around how your household actually moves through the space reduces strain and keeps the heaviest or most dangerous items out of casual reach.
What to Expect: Consultation, Design, and Installation Timeline
A custom garage storage wall moves through a few clear stages, and knowing the rough timeline helps you plan around it.
The design consultation typically comes first: we walk the garage with you, measure the wall, note stud locations and any obstacles, and talk through how you actually use the space. This is where layout decisions, like how much open shelving versus closed cabinetry, get made.
From there, customization and material sourcing take the most time, particularly for pallet wood projects, since reclaimed boards need sorting, cleaning, and sometimes treating before they’re ready to build with. A straightforward accent section moves faster than a full-wall built-in with integrated cabinetry.
Installation itself is usually the shortest phase. Once materials are ready and the layout is finalized, anchoring, leveling, and finish work happen efficiently because the planning was done upfront. The exact timeline varies by project scope and how much custom carpentry is involved, but the consultation-to-installation flow keeps surprises to a minimum and lets you see the design before a single board goes on the wall.
Why Carpentry-First Design Changes How a Garage Works
A kit-built slatwall solves storage. Custom built-ins solve storage and the room at the same time, with cleaner lines, no visible seams between sections, and materials chosen to last rather than to ship flat in a box.
The real tradeoff is visibility. Open shelving keeps tools accessible but on display, while finished cabinetry hides clutter at the cost of a little reach time. In our experience, homeowners see the most value where those two approaches meet, open rails for daily tools, closed storage for everything else, built as one continuous wall instead of two competing systems.
— Wood
How We Help: Custom Garage Storage Walls Built Around Your Space
Garage storage walls can be designed and installed around how you actually use the space, not a generic kit footprint. That can include custom shelving, pallet wall accents, and full garage makeovers with finish work built in, backed by careful anchoring on stud, drywall, or masonry walls.

A homeowner with a masonry garage wall, a tight layout, or a project that needs to move fast benefits most from bringing in a pro, since furring strips, load distribution, and finish carpentry are easier to get right the first time than to fix later.
| What you get | Why it matters |
|---|---|
| Custom shelving and pallet wall accents | Built around your wall and your tools, not a fixed kit size |
| Garage makeover installations | Combines storage, finish work, and layout in one project |
| Design consultation included | Catches stud locations and obstacles before anything is built |
If you’re planning a garage wall built to last, start with a design consultation and we’ll walk you through layout, materials, and timeline before any wood goes on the wall. For organization-system ideas beyond the garage, One Day Doors & Closets offers a useful look at modular closet installations as well.
FAQ
What is the best height to mount garage storage?
Mount items you use often at roughly 48 to 66 inches off the floor, which keeps them at easy reach without bending or climbing. Less frequently used items can go higher toward the ceiling or lower near the floor.
How do I install garage storage on a concrete wall?
Concrete and block walls need wood furring strips installed with masonry anchors first, and the storage panels then attach to those strips rather than directly to the masonry. Professional installers use this method to prevent panel bowing and keep anchor points level.
When should I hire a professional instead of a DIY install?
A small pegboard section or light shelving on an open stud wall is reasonable to DIY, but full-wall systems, masonry walls, and heavy tool storage call for a professional who can evaluate the site, anchor into bearing points, and inspect the finished install. Getting anchoring wrong on a heavy load is the most common and costly mistake.
How much wall space do I need for a garage storage system?
Requirements vary by system, but some kits call for roughly 70 lineal inches of wall space and a minimum ceiling height of 7.5 feet for proper clearance. Measure your wall and ceiling before choosing a system to confirm it fits.
Can pallet wood handle heavy garage tools?
Pallet wood can support heavy tools when it’s properly anchored into studs or furring strips, since the strength comes from the mounting method as much as the material itself. We build pallet wood storage walls with the same anchoring standards as any other wall-mounted system, so load capacity isn’t a tradeoff for the finished look.
Sources
- Installation & Assembly Instructions — Storability® 66"L x 63"H Garage Storage System (Northern Tool)
- Wall-Mounted Storage Systems Installation | All Pros Assemble
Installation Manuals and Professional Reference
These two sources back the measurement, anchoring, and masonry-installation guidance throughout this article.
- A manufacturer manual with drill-bit sizing, anchor recommendations, and mounting-height guidance for hollow, concrete, and stud walls.
- A professional installer resource explaining furring strips and masonry anchoring for concrete or block garage walls.