For most interior accent walls, the sturdiest method combines construction adhesive with finish nails driven into studs, starting from a leveled first row and leaving expansion gaps between boards. This approach suits homeowners installing solid or engineered wood planks who want a wall that holds up for decades rather than years. With the right tools and a careful layout plan, it’s a project most capable DIYers can finish in a weekend.
TL;DR:
- Calculate wall area in square feet by multiplying width by height in inches, dividing by 144, subtracting openings, then adding extra material for cuts.
- Acclimate solid wood planks in the room for 48 to 72 hours before installation; prefinish faces and exposed edges for cleaner seams.
- Pair construction adhesive with finish nails driven into every stud the board crosses; leave 1/8 to 1/4 inch gaps at floors, ceilings, and between courses.
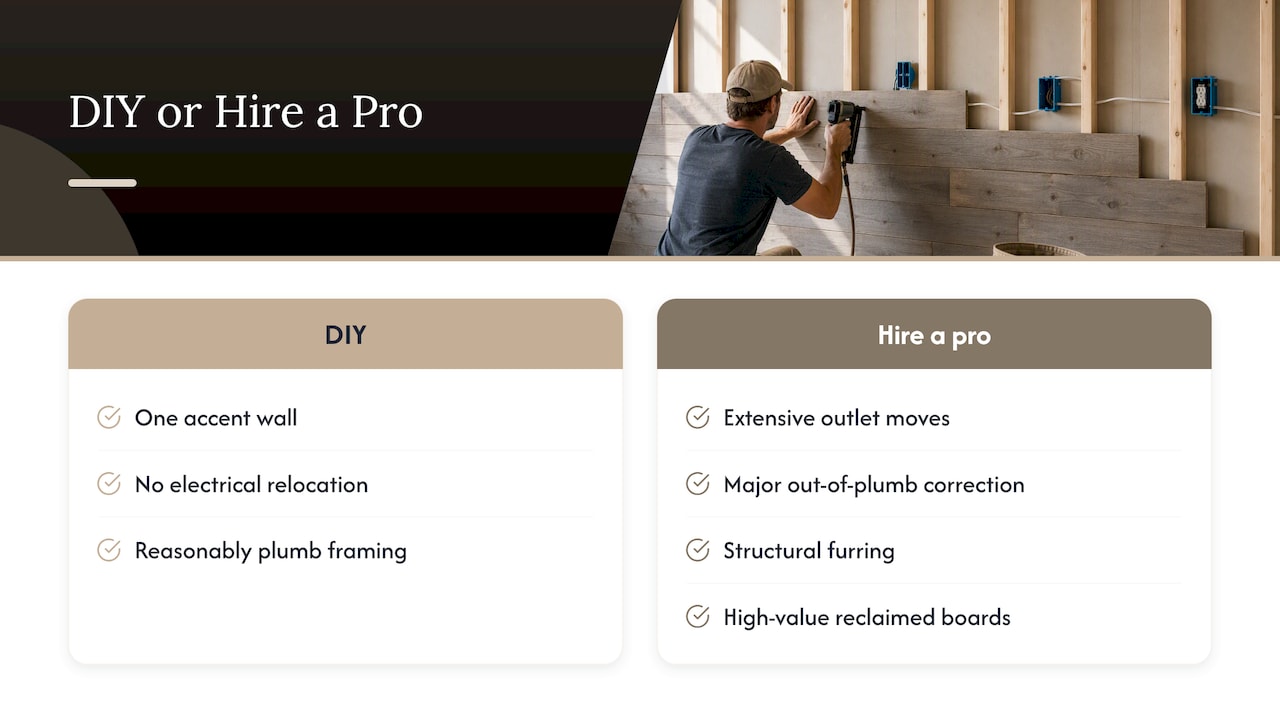
- A single wall with no electrical relocation and reasonably plumb framing suits a capable DIYer; hire a professional for major corrections or complex outlet changes.
Table of Contents
- Gather the right tools and pick the best plank type for your project
- Measure the wall, plan layout, mark studs, and choose your start point
- Acclimate planks and prepare the wall surface
- Setting the first board, fastening, spacing, and sequencing
- How to cut and fit planks around outlets, switches, and corners
- Finish the surface and handle common problems after installation
- Practitioner tips and credibility from Wood Made Illinois
- When DIY makes sense and when hiring a pro is the smarter choice
- How Wood Made Illinois can help with custom plank walls
- FAQ
- Sources
Gather the right tools and pick the best plank type for your project
Before you buy a single board, assemble the gear that makes cuts clean and fastening secure. A tool list that converges across installation guides includes a compound miter saw, a jigsaw for cutouts, a stud finder, an 18-gauge finish nailer, a four-foot level, a tape measure, a chalk line, and a drill.
- Consumables to have on hand: construction adhesive, 1 3/4 inch finish or brad nails, wood filler, paintable caulk, outlet box extenders, sandpaper, and your chosen paint or stain.
- Solid wood planks offer the richest grain and the longest lifespan but demand full acclimation and careful fastening.
- Tongue-and-groove or shiplap boards lock together for tight, even seams and are the easiest profile for a first-time installer.
- Engineered or peel-and-stick planks work well for light accent areas or rental-friendly projects, though they’re not built for full, heavy walls.
Buy slightly more material than your calculated square footage to cover cutting waste and extra margin for diagonal layouts or irregular reclaimed boards. For design direction before you shop, our wood accent wall ideas page is worth a look.
Measure the wall, plan layout, mark studs, and choose your start point
Calculate square footage by multiplying width by height in inches and dividing by 144, then subtract the area of any windows or doors. Add your waste percentage to that final number before ordering boards.
- Decide on board direction: horizontal reads as the standard accent-wall choice, while vertical can make a low ceiling feel taller.
- Plan staggered end joints across rows so seams don’t line up and draw the eye.
- Locate studs with a stud finder, typically spaced 16 or 24 inches on center, and mark each one top to bottom with painter’s tape.
- Snap a level reference line for your first row rather than trusting the floor, which is rarely perfectly flat.
Most installers start at the bottom and work up, since gravity helps hold each board in place while the adhesive sets.
Acclimate planks and prepare the wall surface
Unpack your boards and spread them flat in the room where they’ll be installed for 48 to 72 hours before fastening, which gives solid wood time to reach the room’s moisture level and reduces movement after the wall is closed up, according to Lowe’s installation guidance. Peel-and-stick panels need far less time to settle.
Decide now whether to paint or stain before installation. Pre-finishing exposed edges and faces, especially on shiplap or tongue-and-groove profiles, tends to produce cleaner seams and less touch-up work later.
- Check the wall for plumb and level, and repair any major dips, cracks, or soft spots first.
- On an uneven wall, install vertical furring strips to create a flat, consistent nailing surface.
- Snap your baseline chalk line and double-check it with a long level before placing the first board.
Pro Tip: Lay your planks out on the floor in the pattern you intend to install, mixing boards from several boxes so color and grain variation blend evenly across the wall.
Setting the first board, fastening, spacing, and sequencing
Getting the first board right matters more than any other step, since small errors in that initial placement multiply as you work up the wall; for detailed steps, see how to install an interior door guidance that covers precise measurement and fitting techniques. Set it on your chalk line, check it for level and plumb, and don’t move forward until it’s correct.
- Apply a bead of construction adhesive to the back of the board, then press it against the studs along your marked baseline.
- Drive finish nails through the board and into each stud the board crosses, aiming for roughly 1 to 1.5 inches of embedment into solid wood.
- Place a nickel or a thin cut-off shim at the floor and between courses to hold a consistent 1/8 to 1/4 inch expansion gap, a technique backed by multiple installation guides.
- Stagger the next row’s end joints so they fall at least one stud bay away from the joints below.
- Measure, mark, and cut pieces with the miter saw as you go, checking fit before every nail.
- Continue up the wall, rechecking level every few rows since small drifts can creep in even with careful marking.
Adhesive paired with nails into studs gives the strongest, most durable hold for most plank weights, and it’s the combination recommended by installer guides for full accent walls. Adhesive alone is fine for light engineered or peel-and-stick panels, while very heavy solid boards sometimes do better with mechanical fastening carrying most of the load. Leave the same 1/8 to 1/4 inch gap at the ceiling that you left at the floor.
Pro Tip: On long boards, brace the far end with a temporary cleat or a helper’s hand while the adhesive grabs, so the board doesn’t sag away from the wall before the nails are set.
How to cut and fit planks around outlets, switches, and corners
Measure each outlet or switch location carefully, transferring the measurements to your board before cutting. Drill a starter hole inside the marked outline, then finish the cutout with a jigsaw, checking fit against the box before you fasten the board permanently.
- Use outlet extenders so the receptacle sits flush with the new wall surface once the planks are in place.
- Call an electrician if boxes need to be moved or extended beyond what a standard extender ring can handle.
- At inside corners, butt boards together with a small gap, or finish the seam with inside corner molding for a cleaner line.
- At outside corners, use corner trim or miter the board ends for a tight, wrapped look.
- For the final row, measure at several points along its length since walls rarely stay perfectly parallel, then rip the last board to fit and face-nail it if the tongue is no longer accessible, covering the nail line with trim or molding.
Finish the surface and handle common problems after installation
Fill every nail hole with wood filler that matches your finish, sand lightly once it’s dry, and touch up paint or stain so the repairs disappear. Run a thin bead of paintable caulk along the perimeter where the wall meets the floor, ceiling, and trim.
- If you notice buckling or a board pulling away from the wall, check whether an expansion gap was skipped or whether enough studs were engaged; add a finish nail at the nearest stud if adhesive alone isn’t holding.
- Before calling the project finished, confirm that courses stayed level across the full wall, that reveal spacing looks consistent, that every fastener is secure, and that corner and edge trim sit tight.
Practitioner tips and credibility from Wood Made Illinois
I’m Wood, and our team brings extensive carpentry experience to projects across Central Illinois, much of it spent fitting reclaimed and pallet wood into homes with walls that are rarely as square as the plans suggest. Pre-finishing saves sanding time later but makes small gaps more visible, so weigh that trade-off against your wall’s condition. Reclaimed and pallet boards vary more in thickness and moisture content than milled lumber, so plan extra time for sorting and test-fitting before you commit to a final layout. If a wall needs more than a weekend’s attention, a consultation can save you from costly rework.
— Wood
When DIY makes sense and when hiring a pro is the smarter choice
A straightforward, single accent wall with no electrical relocation and reasonably plumb framing is well within reach for a patient homeowner with the right tools. Walls that need extensive outlet moves, significant out-of-plumb correction, structural furring, or that use high-value reclaimed boards tend to reward professional hands. If your project falls into that second group, our pallet wood wall projects show the kind of work we take on.
How Wood Made Illinois can help with custom plank walls
We build custom plank and pallet wood walls for homes and small businesses and handle everything from the first design consultation through final trim. Whether you’re picturing a reclaimed pallet accent wall, a full built-in feature, or a smaller office upgrade, we measure your space, talk through timeline and rough costs, and turn projects around quickly without sacrificing fit and finish.

- Our pallet wall accents start from $500 for a one-off installation.
- A basic pallet wood accent wall installed in the Peoria area comes with a published price for easy planning.
- Design consultations help you settle on plank style, direction, and finish before any boards get cut.
If you’d rather hand the project to carpenters who’ve fitted hundreds of walls, reach out through Wood Made Illinois to get started.
FAQ
What do you call the wood planks you put on a wall?
They’re generally called wall planks, plank paneling, or shiplap and tongue-and-groove boards, depending on the edge profile. The terms describe how the boards’ edges interlock or butt together rather than a single universal product name.
How do you install a wall plank correctly?
The most reliable method is to acclimate the boards in the room for 48 to 72 hours, set a level first row on a snapped chalk line, and fasten with construction adhesive plus finish nails into studs spaced roughly 16 inches apart, as outlined in installer guidance. Leave a 1/8 to 1/4 inch expansion gap at the floor, ceiling, and between courses to allow for seasonal movement.
How do you cover a wall with wood planks?
Start by marking studs and snapping a level baseline, then work row by row from the bottom up, stacking boards with staggered end joints and fastening each one into the studs it crosses. Cut around outlets and switches with a jigsaw after transferring exact measurements, and finish the top and final rows by ripping boards to fit the remaining space.
Are wall planks a good choice for interior walls?
Wall planks hold up well as an accent feature when installed with proper expansion gaps and solid fastening into studs, and they add texture that flat drywall can’t match. They do require more upfront planning, including acclimation time and stud layout, than a simple paint job.
Sources
- Plank paneling installation instructions (Lowe’s installation PDF)
- How to Put Wood on Walls: Step-by-Step Guide
- How to Install a Wood Accent Wall: Step-by-Step Guide – Tar River Timber Works