For most homeowners, a semi-custom modular system hits the sweet spot between cost and finish, while a full custom build earns its price when door widths, ceiling angles, or heavy daily use make a standard kit fall short. Either way, the first move is the same: pull everything out of the closet, count what you own, and measure the opening before you order or call a carpenter.
TL;DR:
- Modular kits are the most budget-friendly and quickest to install but are limited by standard sizes and may leave gaps in irregular closets.
- Semi-custom systems offer better size fit and adaptable layouts at mid-range costs, making them suitable for most homeowners.
- Full custom built-ins are ideal for irregular spaces or matching existing millwork but come with higher costs and longer lead times.
- Drawer faces should be matched to storage contents with heights of 5, 8, and 12 inches, and depths should range from 18 to 24 inches for folded items.
- Using reinforced plywood and quality slides with proper anchoring prevents sagging and failure in loaded drawers over time.
Table of Contents
- What Are the Main Types of Closet Built-In Drawers?
- How Big Should Closet Drawers Be?
- Which Materials Hold Up Best in a Closet?
- DIY, Modular, or Custom: What Will It Actually Cost?
- How Do You Plan and Measure for New Drawers?
- What Installation Rules Keep Built-In Drawers From Failing?
- What Hardware and Joinery Details Matter Most?
- What Mistakes Should You Avoid With Built-In Drawers?
- What Do Professional Carpenters Do Differently on Built-In Drawer Projects?
- What’s the Real Lesson Behind All This Drawer Math?
- Ready to Build Your Custom Closet Drawers?
- Where to Learn More About Closet Drawer Planning
- Sources
What Are the Main Types of Closet Built-In Drawers?
Four approaches cover nearly every project, and the right one depends less on taste than on your walls, your budget, and how much sanding you’re willing to do on a Saturday.
Modular kits are the pre-cut, pre-finished melamine panels sold at home centers and through online configurators. You measure your space, order components sized to fit, and assemble them with cam locks or included hardware. They’re the fastest route to a finished closet and the cheapest per drawer, but they’re built to standard depths and widths, so an odd-shaped closet or a sloped ceiling can leave gaps you have to fill with trim or filler panels.
Semi-custom modular systems split the difference. You still choose from a catalog of panel sizes and finishes, but a designer or installer configures the layout to your exact opening, often trimming panels on-site. This is where a lot of homeowners land, because it delivers a built-in look without full custom pricing.
Full custom built-ins are designed and constructed for one closet and one closet only. A carpenter measures your space, accounts for out-of-square walls, and builds drawer boxes and faces to fit precisely, matching existing trim or cabinetry elsewhere in the house. This is the only path that handles genuinely irregular spaces, mismatched ceiling heights, or a request to match century-old millwork.
Freestanding retrofit towers are self-contained drawer units you build or buy separately and simply slide into an existing closet without touching the walls. They’re a strong option for renters or anyone testing a layout before committing to anything permanent.
- Modular kits: lowest cost, fastest install, limited to standard sizes and fixed depths.
- Semi-custom modular: mid-range cost, better fit than stock kits, moderate lead time for custom-cut panels.
- Full custom: highest cost and longest lead time, but the only option for irregular openings or matched finishes.
- Freestanding towers: no wall modification, easiest to remove or resell the house with, but limited in scale and load capacity.
A kit or freestanding tower is plenty for a standard reach-in closet with square walls and a straightforward wardrobe. Custom work earns its premium in walk-ins with dormer ceilings, in closets you want to match to existing millwork, or in any space where the drawers need to carry real weight for decades, not just survive a rental lease.
How Big Should Closet Drawers Be?
Drawer sizing follows a small set of rules that professional closet designers repeat for good reason: they’re based on what actually fits inside a drawer box, not just what looks good on paper.
Face heights come in three standard sizes, and each one is matched to what you’re actually storing. A 5 inch face suits socks, underwear, and small folded accessories. An 8 inch face handles folded T-shirts and casual layers. A 12 inch face is built for jeans, sweaters, and bulkier folded items. Mixing all three in one drawer bank, rather than defaulting to uniform sizes, is what makes a built-in feel genuinely purpose-built instead of just a row of boxes.
Depth matters just as much as height. A comfortable closet depth for drawer banks runs around 24 inches, and drawers intended for folded clothing should be at least 18 inches deep to hold a stack without items sliding forward every time you open them. Push past 18 inches toward the full 24 when you want two rows of folded items instead of one, which matters if you’re consolidating storage from a dresser you’re removing.
Quick reference: Standard face heights run 5", 8", and 12"; recommended depths run 18" to 24" for folded clothing; expect to lose roughly 1.5 to 2 inches of usable internal height and width once slides and box construction are accounted for.
That last point trips up a lot of first-time planners. A drawer with a large face doesn’t provide the same size internal clearance as the face height suggests. Slide hardware, the drawer bottom, and the box sides all reduce usable space, so plan for somewhat less internal clearance than the face height. It’s a small gap, but it can affect how neatly folded items fit inside.
Placement follows what designers call the golden zone: keep frequently used drawers within comfortable reach, put shallow drawers holding small items near eye level, and reserve the bottom rows for your heaviest, least-accessed items. Avoid stacking drawers above shoulder height entirely. You’ll never see what’s in them, and you’ll strain your shoulder every time you try.
- Face heights: 5" (small items), 8" (folded shirts), 12" (bulky folds).
- Depth: 18" minimum for folded clothes, up to 24" for double rows.
- Internal loss: subtract 1.5" to 2" from any face height to estimate real usable space.
- Golden zone: keep daily-use drawers between knee and shoulder height, capped around 48".
- Width: keep most drawers at 24 inches, since wider boxes are prone to bowing under load unless reinforced.
If you want a drawer wider than 24 to 30 inches, plan on a center divider or reinforced runners. A single unsupported 36 inch drawer front loaded with folded jeans will sag at the middle within a year or two, no matter how nice the finish looks on installation day.
Which Materials Hold Up Best in a Closet?
Material choice determines whether your drawers still glide smoothly in ten years or start dragging and sagging within two.
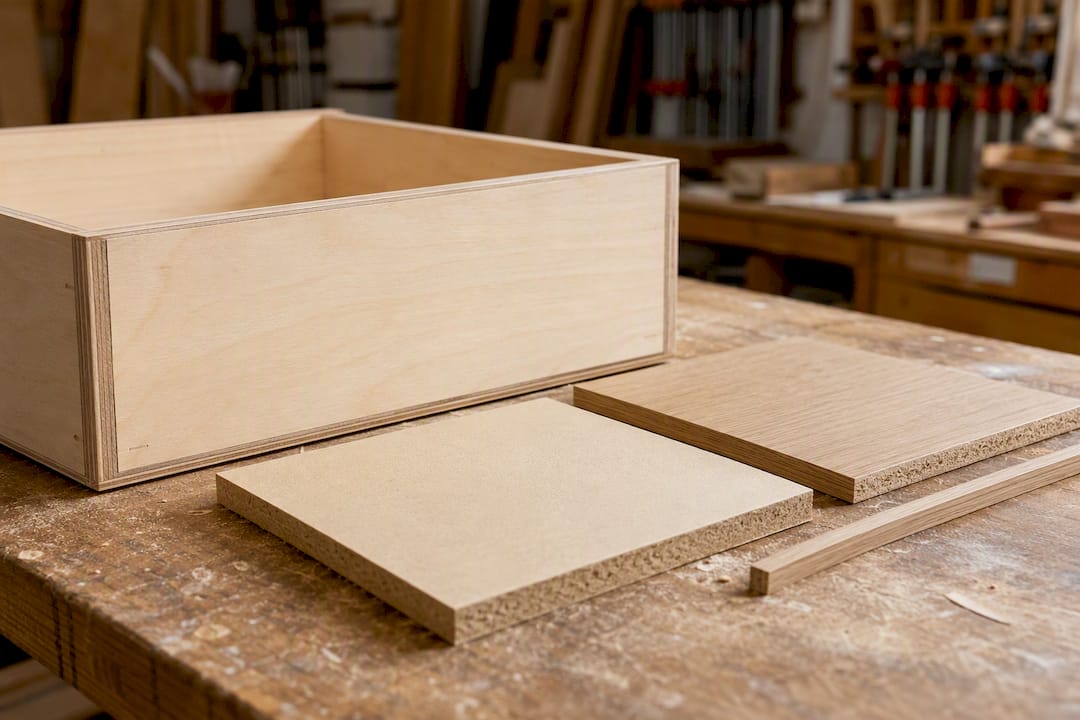
Melamine and particleboard dominate the budget end of the market, and for good reason: they’re affordable, come pre-finished in consistent colors, and install quickly. The tradeoff is structural. Particleboard cores can sag under sustained heavy loads, particularly in wide drawers or ones holding dense folded items like jeans and towels day after day. Screws also hold less securely in particleboard than in denser materials, which matters most at the drawer’s hardware mounting points.
Plywood and veneer step up in strength without a dramatic price jump. Plywood resists sagging far better than particleboard because its layered grain structure distributes load more evenly, and it holds screws considerably better, which matters for slide mounting and drawer box joinery. Veneer over plywood also takes a more convincing wood-grain finish than melamine’s printed surface.
Solid wood is the top tier for durability and appearance, and it’s what most full custom carpentry work is built from. It costs more per board foot and takes longer to finish properly, but it will outlast the other two options by decades and can be refinished rather than replaced when it eventually shows wear.
- Melamine/particleboard: cheapest, consistent finish, weakest under sustained heavy load.
- Plywood/veneer: stronger, holds screws well, good middle ground for most budgets.
- Solid wood: highest cost, longest lifespan, refinishable rather than disposable.
The smartest money move isn’t picking one material for the whole project. Spend where stress concentrates, a plywood drawer box with quality slides, and economize where it’s purely cosmetic, like a paintable MDF drawer front instead of solid wood veneer. Edge banding matters more than people expect, too. Unfinished particleboard edges absorb moisture and chip easily, while a properly applied edge band protects the core and gives a cleaner sightline. If you’re matching an existing closet system or nearby cabinetry, bring a sample or photo to your material selection, since finish mismatches are one of the most common regrets homeowners report after a DIY install.
DIY, Modular, or Custom: What Will It Actually Cost?
Money and time move together on closet drawer projects, and the honest answer is that both scale up fast once you leave stock sizes behind.
- DIY wire or basic modular systems run roughly $150 to $600 for materials, and a motivated weekend builder can plan, order, and install one in a single weekend to a week.
- Modular walk-in kits, self-installed typically land between $600 and $2,500, with lead time driven mostly by how long the panels take to ship, usually one to three weeks from order to finished install.
- Professionally installed custom reach-in closets generally cost $1,000 to $3,000, with a typical timeline of a consult, a measure visit, and two to four weeks for build and install.
- Full custom walk-in systems run $2,500 to $10,000 or more, especially once you add soft-close hardware, built-in lighting, or an island. Expect four to eight weeks from first consult to finished install, depending on shop backlog.
Pro Tip: Add up quoted lead times before you commit to a DIY route on a tight deadline. A modular kit ordered today might not ship for two weeks, and if you’re closing on a move or hosting a holiday, that gap can matter more than the dollar savings.
DIY makes sense if you already own, or are comfortable renting, a table saw, a pocket-hole jig, a router for edge work, and enough clamps to hold a drawer box square while glue sets. If you’re stopping to look up how to square a cabinet carcass or you don’t have a flat surface to assemble on, that’s usually the signal to call a carpenter instead of pushing through.
Run through this quick checklist before deciding:
- Is the closet opening square, or does it have angled walls or a sloped ceiling?
- Do you need the finish to match existing trim or cabinetry?
- Do you have wall access, or will furniture and flooring need protecting during work?
- Can you realistically finish the project in your available weekends, or does it need to be done in a fixed window?
Two or more “no” answers usually mean the custom route saves you money in the long run, even at a higher sticker price, because redoing a botched DIY install costs more than getting it right once.
How Do You Plan and Measure for New Drawers?
Getting the drawer count and sizing right before you order anything is the single best way to avoid returning panels or ripping out a finished install.
- Take inventory first. Pull everything currently in the closet and sort it into folded stacks by category: T-shirts, sweaters, jeans, socks. Measure the height of an average stack of five to six folded items in each category, since that number tells you which face height you actually need.
- Measure the opening precisely. Record width, depth, and ceiling height at multiple points, not just once, since older homes routinely have walls that are out of square by an inch or more over an 8-foot run.
- Locate the studs. Use a stud finder and mark every stud location across the back wall and any side walls you’ll be anchoring into, since this determines where your drawer bank can safely sit.
- Note fixed obstacles. Mark door swing clearance, baseboard height, outlets, and any HVAC returns that can’t be covered.
- Build a cardboard mockup. Cut cardboard or foam board to your planned face heights and tape them to the wall at their intended positions. This step catches problems, like a pull that will hit a door frame or a top drawer that sits above comfortable reach, before a single board is cut.
- Plan drawers alongside hanging and shelving. Decide which zones need rod space for hanging shirts and dresses, which need open shelving for shoes or bins, and let the drawer bank fill the remaining footprint rather than forcing drawers into a layout better suited to hanging storage.
A basic DIY closet tower typically uses two 4×8 sheets of 3/4 inch plywood along with paired drawer slides and pocket-hole screws, which gives you a real sense of material scope before you start pricing lumber. If your measurements show you need more than four or five drawers stacked in one bank, that’s usually the point where splitting the layout into two modular sections, rather than one tall unit, makes both building and installing dramatically easier.
What Installation Rules Keep Built-In Drawers From Failing?
Most drawer bank failures trace back to one of three things: the unit wasn’t anchored to framing, the slides weren’t rated for the load, or nobody left room to actually pull the drawer open.
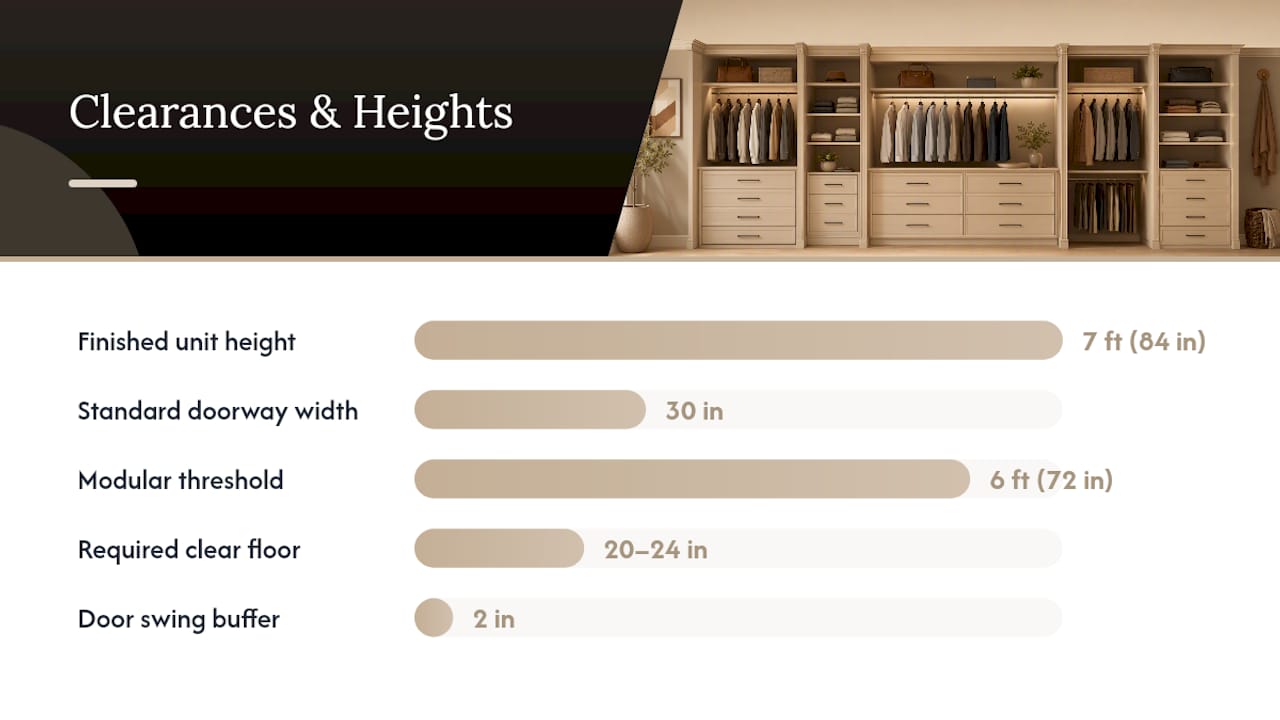
Professional carpenters rarely build a large drawer bank as a single monolithic piece. Instead, they construct it in modular sections, a base drawer module and a separate upper shelf or rod module, and join them together once both pieces are inside the closet. This matters more than it sounds like it should. A finished 7-foot-tall unit often won’t clear a standard 30-inch bedroom doorway, so building smaller and assembling on-site isn’t just a convenience, it’s frequently the only way the unit gets into the room at all.
Anchoring is where DIY installs most often go wrong. Drywall anchors alone cannot support the weight of loaded drawers, especially once you’re storing folded denim or towels. Every drawer bank needs to be screwed into studs or blocking, and taller units should also be fastened at the top, either into a ceiling joist or through a cleat secured to wall studs, to prevent tipping.
Slide selection changes both function and feel. Side-mount slides are the budget standard and work fine for most closet applications, but they leave a visible track along the drawer box sides. Undermount slides hide beneath the drawer for a cleaner look and often include built-in soft-close, though they cost more and require more precise installation tolerances. Whichever you choose, insist on full-extension hardware. Drawers that only open two-thirds of the way defeat the purpose of organized storage, since you’ll never see what’s pushed to the back.
- Build in modules, then join sections in place, especially for closets over 6 feet tall.
- Anchor to studs or blocking at both the back wall and the top of the unit.
- Choose full-extension slides rated for the actual weight of folded clothing, not just the drawer’s empty weight.
- Leave 20 to 24 inches of clear floor space in front of any drawer bank so it can fully extend.
- Account for door swings and any nearby furniture before finalizing the unit’s position.
Pro Tip: If you’re installing across from a closet door that swings inward, measure the door’s full swing arc, not just its resting position, before you finalize drawer placement. A drawer bank positioned two inches too close will clip the door every time someone opens it.
Finishing details are what separate a “cabinet in a closet” from something that reads as genuinely built-in. Matching trim around the perimeter, adding a toe-kick at the base rather than leaving exposed legs, and keeping consistent reveal gaps between every drawer face all contribute to that finished look, and they cost far less in materials than most people assume.
What Hardware and Joinery Details Matter Most?
Hardware is where a drawer bank either feels solid every day or announces itself as a budget shortcut every time you touch it.
Pulls and knobs should be sized to the drawer face, roughly a 3 to 4 inch pull for a standard drawer front, and centered both vertically and horizontally unless you’re intentionally offsetting for a design reason. Keep spacing consistent across the entire bank; even a quarter-inch misalignment between rows is visible from across the room.
Soft-close, full-extension slides cost more upfront but earn their price in daily use, especially in closets used by kids or anyone in a hurry each morning. Look for slides rated to handle a fully loaded drawer’s weight with margin to spare, not just its empty weight.
- Pulls: size to drawer width, keep spacing and centering consistent bank-wide.
- Slides: prioritize full-extension and soft-close for daily-use drawers, standard extension for rarely opened storage.
- Joinery: dovetail construction for drawer boxes built to last decades; reinforced butt joints with glue and screws are acceptable for budget builds expected to see lighter use.
- Trim: match reveal gaps and toe-kick height to the rest of the closet system for a cohesive built-in look.
Dovetail joints resist the pulling force of daily opening and closing far longer than a simple butt joint, which is why furniture-grade closet systems still use them despite the extra shop time. A well-glued and screwed butt joint holds up fine for lighter-use drawers, but skip it entirely on any drawer that will carry real weight for years.
What Mistakes Should You Avoid With Built-In Drawers?
Nearly every failed built-in drawer project traces back to one of a handful of repeated errors, and every one of them is preventable at the planning stage.
- Building drawers too wide: anything past 24 to 30 inches without reinforcement will bow under a loaded stack of clothes within a year or two.
- Skipping stud anchoring: drywall anchors alone will eventually pull loose under repeated drawer use, especially on tall units.
- Ignoring clearance: a drawer bank installed too close to a door or baseboard trim can’t open fully, defeating its purpose.
- Mismatched face heights: stacking uniform drawer sizes instead of matching heights to contents wastes usable storage space.
Basic maintenance is simple and rarely gets done: wipe slide tracks clean of dust and lint every few months, retighten any loose mounting screws you notice, and check that drawer faces stay aligned as the seasons change wood and hardware slightly. If a drawer starts dragging, sagging at the front, or pulling away from its slides entirely, that’s your signal to bring in a professional rather than keep forcing it open.
What Do Professional Carpenters Do Differently on Built-In Drawer Projects?
Carpenters who build closet drawers for a living lean on a handful of habits that rarely show up in DIY tutorials. Building in modules and joining sections inside the closet, rather than trying to wrestle a finished unit through a doorway, solves the access problem before it becomes one, particularly on narrow bedroom doors common in older Central Illinois homes.
Material choice is where experience shows most clearly. A plywood-core drawer box with a paintable MDF or veneer front delivers most of solid wood’s durability at a fraction of the cost, and proper edge banding on every exposed edge prevents the moisture damage that eventually ruins a budget particleboard build.
A quick semi-custom kit solves plenty of standard reach-in closets fine. Full custom work earns its place in walk-ins with angled ceilings, mismatched trim, or a homeowner set on matching cabinetry elsewhere in the house, cases where a stock panel size simply won’t do the job right.
What’s the Real Lesson Behind All This Drawer Math?
Most articles on this topic treat sizing charts as the finish line, when they’re really just the starting point. The measurements matter, but the advice that actually saves homeowners money and frustration is knowing when to stop trusting a standard chart and start accounting for your specific closet’s quirks, an out-of-square wall, a door that swings the wrong way, a load of folded jeans heavier than any spec sheet assumes.
Conventional DIY guides also underplay how much anchoring and slide quality determine whether a project lasts five years or fifteen. A beautiful drawer front on a particleboard box with drywall anchors is a problem waiting to happen, not a finished project.
If you’re weighing DIY against hiring, prioritize honest self-assessment over ambition. Owning a table saw doesn’t mean you’re ready to square a cabinet carcass in a sloped closet. The homeowners who end up happiest either commit fully to the DIY skill-building or hire it out early, before a half-finished modular kit turns into a bigger repair job than the original project.
— Wood
Ready to Build Your Custom Closet Drawers?
If you’ve measured your closet and realized a stock kit won’t handle your angled ceiling, mismatched trim, or a load of folded sweaters heavier than any panel system was built for, that’s exactly the gap Woodmadeillinois fills. Unlike a big-box modular kit, every drawer bank is designed around your actual opening, not a catalog of standard sizes, and built using plywood-core construction with proper stud anchoring from the start.

The process starts with a design consultation, followed by an in-home measure, a firm quote, and modular construction built in sections so it fits through your doorway without a hitch. Most reach-in projects move from consult to finished install within a few weeks, and with over 100 years of combined carpentry experience across the team, Wood Made Illinois has handled the sloped ceilings and out-of-square walls that trip up standard kits. If your closet needs more than shelving alone, our custom shelving work pairs naturally with a drawer bank for a complete built-in system.
Ready to see what fits your space? Request a consultation with our trusted local carpentry experts and get a real quote based on your actual closet, not a stock template.
Where to Learn More About Closet Drawer Planning
For deeper reading on the numbers behind this guide, the Dimensions.com closet depth reference breaks down standard closet and drawer measurements in detail. For build-your-own plans and material lists, WoodshopDiaries’ modular closet cabinet guide walks through a real construction sequence. Homeowners comparing professionally installed options may also find One Day Doors & Closets’ custom closet examples useful for seeing finished layouts before committing to a design.
Sources
- Dimensions
- Closet Drawers: Sizes, Layouts & What to Put Where
- Built-In Closet System: Design, Materials & Cost Guide