Yes, sash cords are replaceable, and most homeowners with basic tools can restore a double-hung window to smooth, balanced operation in an afternoon. This is not specialty work reserved for craftsmen alone. It is a mechanical fix, one that rewards patience and precision more than raw skill.
DIY sash cord replacement makes sense when the sash box, pulleys, and weights are intact and the wood around the jamb shows no rot. It stops making sense when you find crumbling wood, a missing weight, or a pulley wheel that won’t spin freely, because those problems compound quickly under a saw or chisel in inexperienced hands. Here’s what a successful repair looks like when you’re done:
- Both sashes glide up and down with light finger pressure, no jerking or catching.
- A raised sash holds its position on its own, without a prop stick.
- The sash sits flush and square in its frame, with no visible tilt or gap.
- You hear no rattling or knocking from inside the weight pocket.
TL;DR:
- Sash cords are best replaced with waxed cotton in 8mm diameter, as synthetic ropes tend to stretch, slip, and squeal over time on older pulley wheels.
- Confirm fraying, tilt, or rattling sounds before removing stop beads, and ensure both cords are measured accurately with a 2–3 inch slack for knots to prevent misalignment.
- When the sash drops or won’t stay open, adjusting cord length or adding weight can fix the issue, but worn pulleys or missing hardware require replacement before adjustment.
- Avoid proceeding with rot or damaged pulleys; these conditions often require professional repair involving frame restoration and hardware replacement.
- Proper maintenance, including annual lubrication and debris removal, extends sash cord lifespan to several decades, with costs typically under $50 for all necessary materials.
Table of Contents
- What Is Sash Cord Replacement and How Does It Differ From General Sash Repair?
- What Tools and Materials Do You Need for Sash Cord Replacement?
- How Do You Replace Sash Cords Step by Step?
- How Do You Fix a Sash That Won’t Balance After Replacement?
- How Long Do Sash Cords Last and What Do They Cost?
- When Should You Call a Professional Instead?
- Why Wood Made Illinois Understands Sash Windows
- Key Takeaways
- Get Sash and Window Help From Wood Made Illinois
- Sources
What Is Sash Cord Replacement and How Does It Differ From General Sash Repair?
Sash cord replacement means removing the frayed or snapped rope inside a double-hung window’s weight pocket and installing new cord that connects the sash to its counterweight. It is a subset of broader window sash repair, which can also include reglazing, replacing rotted wood, or swapping worn pulleys. If your sash moves fine but the cord has failed, cord replacement alone solves it. If the sash itself is loose, cracked, or the frame has decayed, cord work is just the first item on a longer repair list.
Signs your sash cords need attention
A sash window operates on a simple counterweight system: cast iron or lead weights hidden inside the jamb balance the weight of the glass and frame, connected by cord running over pulleys. When that cord frays or snaps, the whole system stops working the way it should. Here’s what to watch for:
- The sash slams shut the moment you let go, or drops a few inches on its own.
- It won’t stay open even propped, sliding back down within seconds.
- You see frayed strands poking out near the pulley when the window is raised.
- A rattling or popping sound comes from inside the jamb when you raise or lower the sash, usually a sign a weight has come loose or a cord snapped and the weight dropped.
- One side sits higher than the other, giving the sash a visible tilt when closed.
You can confirm most of this without removing anything. Raise the sash halfway and look into the pulley groove on each side. A cord riding smoothly sits centered; a fraying one often shows white or gray fibers bunching at the edge. Then put your ear near the jamb and cycle the sash up and down slowly. A clean system is nearly silent. A knock or thud means a weight is either disconnected or banging against the side of the pocket.
Pro Tip: Before removing any stop beads, wedge a shim or a couple of wood scraps under each corner of the sash to hold it in place. Cords fail without warning, and a sash with a broken cord on one side can drop suddenly the moment you take pressure off it, which is a fast way to crack glass or pinch fingers.
If you find fraying on one cord, check all four in that sash opening (two per side, upper and lower). Cords age at similar rates when installed together, so one failure is usually a preview of what’s coming next on its neighbors.
What Tools and Materials Do You Need for Sash Cord Replacement?
Buy waxed cotton sash cord, not synthetic rope, and buy it in the correct diameter for your pulleys. Standard domestic sash cord runs about 8mm in diameter, though older homes with heavier sashes sometimes need a slightly thicker cord to handle the load without excessive stretch, according to guidance from DIYdata’s sash cord instructions. Waxed cotton holds its length under tension and runs quietly over cast iron pulley wheels, which is exactly what a century-old sash system was engineered for.
Synthetic rope is tempting because it’s cheap and available at any hardware store, but avoid it. Nylon and polypropylene stretch under sustained load, which throws off your careful length measurements within a season, and they tend to slip or squeal on older pulley wheels not designed for a slick synthetic surface. Cotton remains the trade preference for a reason: it grips the pulley, holds tension, and ages predictably.
Here’s what to gather before you start:
- Waxed cotton sash cord (enough for four lengths per sash opening, typically 8 to 10 feet each depending on window height)
- A flat bar or thin putty knife for removing stop beads without splitting the wood
- A hammer and a handful of small finish nails or brass tacks for securing cord to the sash
- A weighted messenger line (a length of string with a few nuts or a small lead “mouse” tied to the end)
- Wood glue or spare pins if the stop beads are old and brittle
- Silicone spray for the pulleys and channels once reassembly is done
Optional but genuinely useful: a spare pulley wheel or two, since it’s common to find one seized or cracked once you open the pocket, and a shop vacuum for clearing decades of debris out of the weight cavity before you start feeding new cord through.
Material costs stay low. A full set of four cords for one window typically runs for a modest amount, with the messenger line, nails, and lubricant adding only a little more. That’s the appeal of this repair: the parts are cheap, and the real investment is your time and attention to detail.
How Do You Replace Sash Cords Step by Step?
The job breaks into three phases: getting the sash out and the weight pocket open, removing the old hardware and running new cord, and reassembling with the length set correctly on both sides. Restorers who do this professionally follow roughly the same order every time, which is what makes the process teachable rather than a matter of guesswork, as outlined in Build-Construct’s sash cord procedure.
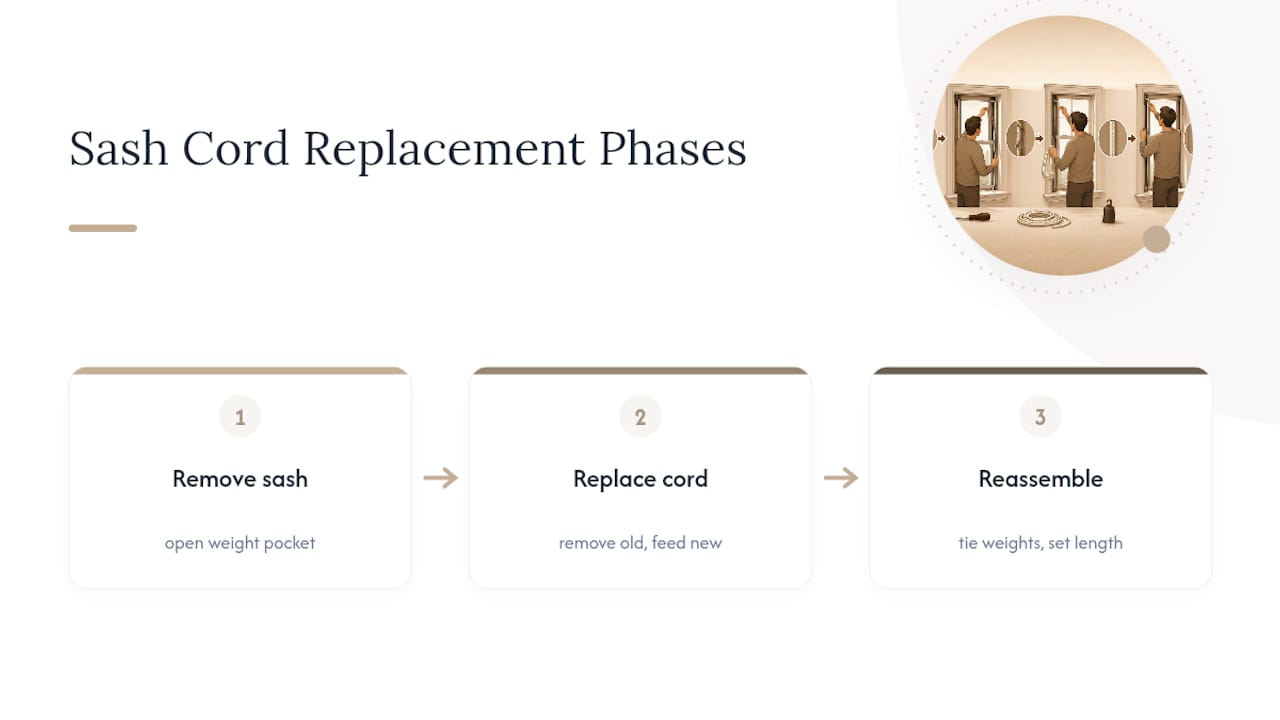
Work one sash opening at a time. Trying to disassemble both the upper and lower sash simultaneously multiplies the chances of a mix-up, and there’s no time saved by rushing it.
Overview of the sequence
- Remove the interior stop bead to free the lower sash.
- Lift the sash out and set it somewhere safe, padded against the glass.
- Open the weight pocket access panel (or remove the parting bead to reach the upper sash and its pocket).
- Pull out the old cord and the weight, and inspect the pulley.
- Feed a messenger line over the pulley and down into the pocket.
- Tie the new cord to the messenger, then pull it up and over the pulley.
- Attach the new cord to the weight and let it settle to the bottom of the pocket.
- Set the cord’s length against the sash while it’s held in the closed position.
- Nail the cord to the sash edge, then repeat on the opposite side.
- Reinstall the stop bead, test the motion, and adjust if one side runs differently than the other.
Removing the sash and reaching the weight pocket
Start with the interior stop bead, the thin strip of wood running vertically along the inside edge of the frame. Slide a flat bar behind it near the top, and gently pry outward in small increments, working down the length rather than levering hard at one spot. Old paint often bonds these beads to the frame, so score along the paint line with a utility knife first if it resists.
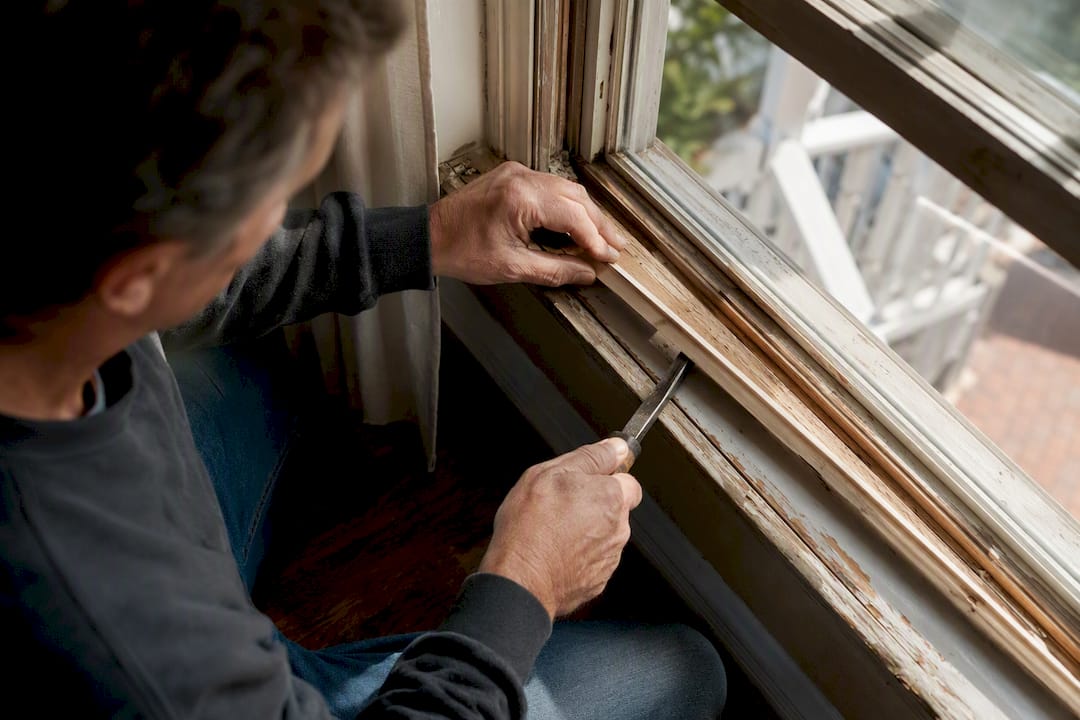
With the stop bead off on both sides, the lower sash lifts free. Support it, don’t let it hang by whatever cord remains, since a partially frayed cord can give way the instant weight shifts. Set the sash flat on a padded surface, glass side up, well away from foot traffic.
Behind the sash, you’ll see the weight pocket, sometimes covered by a small removable panel near the bottom of the jamb, sometimes accessible only by removing the parting bead (the thin strip separating the upper and lower sash tracks) if you’re working on the upper sash. Pop the panel or bead free the same way you removed the stop bead, working slowly to avoid cracking old, dry wood.
Reach in and locate the weight. If the old cord is still attached, cut it near the pulley and lower the weight down by hand rather than letting it drop, since a free-falling cast iron weight inside a wall cavity can crack plaster or, worse, get stuck at an odd angle that’s a nightmare to retrieve later.
Clearing out the old cord and inspecting the pulley
Pull whatever remains of the old cord out through the pulley slot. This is also your chance to check the pulley wheel itself. Spin it with a finger. It should rotate freely and quietly. If it’s frozen with old paint or rust, or the wheel is cracked, replace it now while everything’s already open. Trying to run smooth new cord over a seized pulley defeats the purpose of the whole repair.
Vacuum or brush out the accumulated debris inside the pocket: dead insects, paint chips, decades of dust. A clean pocket lets the weight travel without snagging, and it gives you a clear view of the pocket’s floor so you can judge how much cord slack the weight actually needs.
Feeding the new cord with a messenger line
This next part trips up a lot of first-timers, but the trick is simpler than it looks. Tie a small weight (a few nuts, a washer stack, or a purpose-made lead “mouse”) to a length of light string, and feed it over the pulley wheel. Gravity does the work. Let the messenger drop down through the pocket until it reaches the bottom, a technique confirmed across multiple restoration guides, including This Old House’s sash cord instructions.
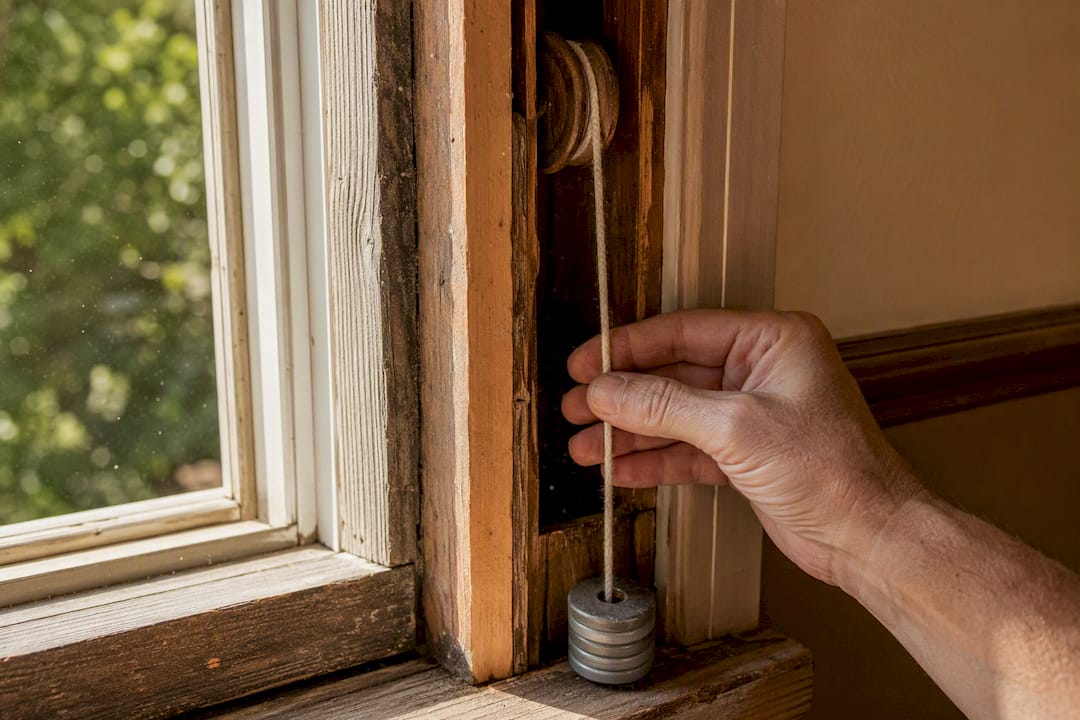
Once the messenger weight has fallen through, reach into the pocket (or fish it out through the access panel) and retrieve the string. Tie your new sash cord to the free end of the messenger string, then pull the string back up and over the pulley from the top. The new cord follows right behind it, riding smoothly over the wheel exactly as the original did decades ago.
If the messenger string keeps snagging on the way down, it’s usually old paint buildup narrowing the pulley slot. A few passes with a thin screwdriver or a rasp to clear the channel almost always solves it.
Tying the cord to the weight
With the new cord pulled through and hanging down into the pocket, tie it to the top of the weight. A simple bowline knot works well here: it’s secure under load, doesn’t slip, and doesn’t jam permanently the way an overhand knot can when it’s been under tension for years. Some restorers prefer a figure-eight loop threaded through the weight’s eye instead, which is equally reliable.
Whichever knot you choose, keep it consistent on all four cords in the same window. A mismatched knot style on one side rarely causes a functional problem, but it does make future length adjustments harder to predict.
Let the weight hang freely once it’s tied, and check that it doesn’t scrape against the side of the pocket or another weight sharing the same cavity (common in older double-hung windows where both sashes’ weights live side by side).
Setting the cord length correctly
This is the step that determines whether your repair actually balances the sash or leaves you fighting it for years. With the weight resting at the bottom of the pocket and the sash held in its fully closed position, pull the cord up over the pulley until it’s snug, then mark exactly where the cord meets the sash’s cord groove.
Add a small allowance beyond that mark, roughly 2 to 3 inches, to account for the bulk of the knot or the nail you’ll drive through it, a tolerance recommended in Build-Construct’s step-by-step guide. Cut the cord there. Too little allowance and the knot pulls tight against the pulley before the sash fully closes; too much and the sash won’t seat flush at the top.
The single biggest cause of a lopsided, hard-to-close sash after a DIY repair is inconsistent length between the left and right cord. Measure both sides against the same reference point, sash fully closed, and don’t eyeball it. A few minutes of careful marking here saves you from reopening the whole job next weekend.
| Measurement Point | What to Check | Target Result |
|---|---|---|
| Weight position | Weight hangs freely at pocket bottom, no scraping | Full range of motion without binding |
| Cord length, closed sash | Cord reaches sash groove with 2 to 3 inches allowance | Consistent length on left and right cord |
| Knot placement | Bowline or figure-eight, seated in sash cord groove | Sash edge sits flush, no visible bulge |
| Side-to-side balance | Compare left and right cord marks before cutting | Sash hangs level, no tilt when raised |
Attaching the cord to the sash and reassembling
Feed the trimmed cord end into the groove routed along the side edge of the sash, and secure it with a small finish nail or brass tack driven at an angle so it bites into the wood without splitting it. Drive the nail head slightly below the surface of the cord groove so it doesn’t catch on the jamb track when the sash slides.
Repeat every step, messenger, tie, length, nail, on the opposite side of the same sash before moving on. Once both cords are set, lift the sash back into its track and let it settle. Reinstall the parting bead if you removed it, then slide the sash up and down a few times, watching for any drag or tilt.
If everything went right, the sash should now hold its position at any height without a prop, glide with light pressure, and sit flush and square when closed. Reinstall the interior stop bead last, positioning it close enough to guide the sash smoothly but not so tight it creates friction.
Pro Tip: Test the balance before you nail the stop bead permanently back in place. If the sash still doesn’t hold, it’s far easier to pull the sash back out and adjust cord length now than after everything’s buttoned up and painted over.
How Do You Fix a Sash That Won’t Balance After Replacement?
Most post-repair problems trace back to one of four causes: cord length, weight mismatch, friction, or a pulley that needs replacing rather than adjusting. None require pulling the whole sash apart again.
| Problem | Likely Cause | Fix |
|---|---|---|
| Sash drops slowly on its own | Cord slightly too long, or weight too light for the glass | Shorten cord by half an inch on each side, or add weight |
| Sash won’t close fully at the top | Cord cut too short | Remove sash, re-tie with more length allowance |
| Squeaking when raising or lowering | Dry pulley wheel or dirty track | Clean channel, apply silicone spray to pulley and groove |
| Sash binds or drags partway | Paint buildup ridges in the track | Sand or scrape paint ridges, then re-lubricate |
| One side rises faster than the other | Uneven cord length between left and right | Re-check both marks against the same closed-sash reference |
When cord adjustment alone doesn’t solve a drop, add weight instead:
- Drill a small hole in the top of the existing weight and pour in molten lead, letting it cool before rehanging.
- Thread a few flat steel washers onto the cord above the weight as a quicker, if less elegant, alternative.
- Add weight incrementally and retest after each addition. Overloading a weight can strain the pulley wheel and shorten its life, a caution echoed in DIYdata’s rebalancing notes.
A pulley wheel that’s cracked, seized with rust, or missing entirely can’t be adjusted around. If cleaning and lubricant don’t free it, replace the whole wheel assembly before you reinstall the sash, since a bad pulley will fray your brand-new cord within months.
How Long Do Sash Cords Last and What Do They Cost?
Waxed cotton sash cord, properly installed and occasionally maintained, commonly lasts several decades, according to restoration data compiled by The Craftsman Blog. That’s a generational timeline. Most homeowners who replace cords today won’t touch that window again in their lifetime.
A short maintenance routine keeps that lifespan on track:
- Once a year, spray the pulley wheels and cord grooves with silicone lubricant to cut friction.
- Visually check exposed cord near the pulley for fraying, especially in windows that get heavy daily use.
- Keep the tracks clean of paint chips and dust, since grit accelerates wear on both the cord and the pulley bearing.
Material costs stay modest: a complete four-cord set for one double-hung window generally runs under $50, with nails, messenger line, and lubricant adding just a few dollars more. Professional labor costs vary far more widely, since a pro’s quote depends on how many windows need work, how accessible the pockets are, whether the wood around the jamb needs repair first, and regional labor rates.
Buy sash cord from a specialty hardware supplier or a restoration-focused retailer rather than a generic big-box rope aisle. Check two specs before buying: diameter (match your existing pulley slot, typically 8mm for most residential sash windows) and whether it’s waxed. Unwaxed cotton wears faster and doesn’t glide as smoothly over an old cast iron wheel.
When Should You Call a Professional Instead?
Some sash problems go past what a cord swap can fix, and pushing forward anyway risks damaging wood that’s often a century old and no longer easy to replace in kind.
Call a specialist if you find any of the following:
- Soft, crumbling, or discolored wood around the jamb or sill, a sign of rot that needs repair before any cord will hold properly.
- A weight that’s missing entirely, or a pocket you can’t access without removing trim that risks cracking.
- A pulley box that’s decayed or pulling away from the frame.
- Several windows in the same house needing work at once, which often points to a broader moisture or maintenance issue worth having assessed.
- A large, heavy, or historically significant sash where a mistake means an expensive custom replacement rather than a $10 pane of glass.
A professional repair typically checks and replaces weights and pulleys as needed, repairs or reglazes the sash itself, and addresses any rot in the surrounding frame, work that goes well beyond wood window restoration cord swapping alone. Before you call, take clear photos of the pocket, the sash, and any visible damage, and measure the sash’s height and width. That gives a contractor everything needed to give you an accurate quote without a first visit spent just diagnosing.
Why Wood Made Illinois Understands Sash Windows
Wood Made Illinois brings over 100 combined years of carpentry experience to window and sash work across Central Illinois, and that depth matters most when a “simple” cord replacement turns up something more serious once the stop bead comes off.
Jobs we routinely handle that go beyond a DIY cord swap:
- Pulley and weight replacement when the original hardware is missing, cracked, or undersized for a reglazed sash.
- Structural window sash repair where rot has compromised the joint between the sash and its stiles.
- Custom fitting for older homes where standard replacement parts no longer match the original dimensions.
We treat every sash window as a piece of the house’s original character worth preserving, not a candidate for wholesale replacement. When a homeowner calls after discovering rot mid-repair, or a weight pocket that’s been sealed shut for decades, we assess the whole opening, not just the cord, and give a straight answer about what’s actually needed.
A note on preservation and craftsmanship
There’s a reason we push homeowners toward repair over replacement whenever the original sash is sound: a well-built double-hung window from decades past was made with old-growth wood that modern vinyl replacements simply can’t match for character or longevity, as explained in how new interior doors improve energy efficiency in older Portland homes. Fixing the cord instead of tearing out the whole window keeps that history intact, and it usually costs a fraction of what a full replacement window runs.
Give the steps above a try if your window’s frame and pulleys are in good shape. If you uncover rot, a seized pulley beyond cleaning, or a sash that feels too fragile to handle confidently, that’s the moment to bring in a specialist rather than push further.
— Wood
Key Takeaways
A properly measured sash cord replacement, done with waxed cotton cord and matched lengths on both sides, restores decades of smooth, balanced window operation.
| Point | Details |
|---|---|
| Diagnose before disassembly | Check for fraying, tilt, and rattling sounds at the pocket before removing stop beads. |
| Use waxed cotton cord | Choose roughly 8mm waxed cotton over synthetic rope for grip and long-term stretch resistance. |
| Match lengths precisely | Mark cord length with the sash closed and the weight resting, adding 2 to 3 inches for knot bulk. |
| Maintain annually | Lubricate pulleys yearly and inspect exposed cord to protect a lifespan that can last for many decades. |
| Call a pro for rot or missing weights | Wood Made Illinois handles sash restoration and pulley replacement when damage goes beyond a cord swap. |
Get Sash and Window Help From Wood Made Illinois
If your sash cord repair turned up rot, a missing weight, or a pulley that won’t spin no matter how much you clean it, you’re past the point where a $50 cord kit solves the problem. Wood Made Illinois is the alternative to guessing your way through a historic window repair. Our team brings over 100 combined years of carpentry experience to sash and frame work across Central Illinois, at a fraction of the cost and disruption of a full window replacement.

We handle everything from pulley and weight replacement to structural sash repair and full wood window restoration, the kind of work that keeps an original window’s character intact rather than swapping it for a vinyl unit that won’t match the house. If you’d rather preserve what’s original and get it done right the first time, request a quote through our trusted local carpentry experts page and tell us what you found when you opened the pocket. Bring photos and your window’s dimensions, and we’ll give you a straight assessment of what it actually needs.
Sources
- How To: Replace Broken Sash Cords – The Craftsman Blog
- How to Replace Broken Sash Cords and Restore Double-Hung Window Operation
- To Replace Window Sash Cords – This Old House
- Replacing sash window cords – DIYdata