Restoring wooden windows is worth it in most cases where the sash, frame, and sill are still structurally sound. A capable DIYer with basic carpentry tools, patience, and lead-safe habits can typically handle sashes with surface rot or failed glazing themselves. If more than a third of a rail is soft, the frame has pulled from the masonry, or the home has occupants especially vulnerable to lead dust, call a professional instead.
TL;DR:
- If more than a third of a window rail is soft or the frame has pulled from masonry, professional restoration becomes necessary.
- Deep structural rot, frame separation from masonry, or multiple windows needing extensive work usually justify hiring specialists over DIY efforts.
- Proper lead-safe practices, including containment and PPE, are critical for homes built before 1978 to prevent lead dust exposure.
- A full restoration process involves careful disassembly, epoxy consolidation, reglazing, priming, and painting, with significant time and material considerations.
- Restored wooden windows can match replacement energy performance and preserve historic profiles, but they require patience and detailed craftsmanship.
Table of Contents
- What Does Wooden Window Restoration Actually Involve?
- Tools, Materials, and PPE to Gather Before You Start
- Assess Your Windows: Quick Inspection Checklist and Decision Rules
- Step-by-Step Restoration Workflow (Prep to Reassembly)
- Wood Repair Techniques: Epoxy Consolidation, Splice Repairs, and Profile Replication
- Glazing and Glass Handling: Steam, Putty Technique, and Cure Timing
- Lead-Safe Work Practices: EPA RRP Basics and Containment Steps
- Weatherproofing and Energy Upgrades Compatible With Restored Wood Windows
- Timeline and Cost Expectations for DIY Restoration vs. Hiring a Pro
- Field-Tested Tips From Wood Made Illinois
- Why Preserving Original Wooden Windows Matters
- How Woodmadeillinois Can Help With Historic Window Restoration
- Sources
- FAQ
What Does Wooden Window Restoration Actually Involve?
Wooden window restoration is the process of disassembling a sash, repairing or consolidating decayed wood, replacing failed glazing putty, and reapplying primer and paint so the original window performs like new. It differs from wood window refurbishment, which sometimes just means cosmetic cleanup, and from full replacement, which discards the historic sash entirely. The National Park Service treats restoration as the preferred path for most old wooden windows, noting that even sashes with significant rot are often viable candidates for repair through consolidation and patching rather than removal.
That framing matters because a lot of homeowners assume rot equals replacement. It usually doesn’t. The techniques covered here, epoxy consolidation, steam-assisted glazing removal, lead-safe containment, come from documented preservation practice, not guesswork. Here’s what you need before the first scraper touches the sash.
Tools, Materials, and PPE to Gather Before You Start
Good restoration work starts on the workbench, not the window. Gathering the right kit up front saves multiple trips to the hardware store mid-project and keeps dust contained from the first cut.
Hand tools you’ll actually use:
- A stiff putty knife and a hook-style glazing chisel for removing old glazing compound
- A 5-in-1 tool for scraping paint and cleaning sash grooves
- A sash chisel or thin pry bar for lifting stops and parting beads without splitting them
- A wood chisel set and mallet for cutting out rotted sections
- A caulking gun for bedding compound and glazing putty
Power tools and rental options: A random orbital sander with variable speed handles most surface prep. A heat gun (set low, never open flame) or a rented wallpaper steamer works for softening old glazing putty. Many tool rental counters carry HEPA-filtered vacuums and negative-air fans by the day, which is often cheaper than buying them for a one-time project.
Consumables checklist:
- Glazing putty (linseed oil based for traditional profiles)
- Glazing points (diamond or triangle style)
- Two-part epoxy consolidant and epoxy filler paste
- Oil-based or acrylic exterior primer rated for wood
- Exterior-grade paint matched to your trim color
- Compression or brush-pile weatherstripping
PPE specifics matter more than most guides admit. Use a NIOSH-approved P100 respirator, not a paper dust mask, whenever sanding painted wood. Nitrile gloves protect against epoxy resins, and safety glasses are non-negotiable when chiseling near glass. A HEPA-filter shop vacuum should run continuously during sanding to catch fine paint dust before it settles.
Set up your workstation on a drop cloth in a garage or covered porch, away from foot traffic, with plastic sheeting taped along the perimeter.
Pro Tip: Build a simple sash easel from two sawhorses and a scrap 2×4 crossbar. Working the sash vertically, instead of flat on a table, lets gravity help you tool putty at the correct angle and keeps you from leaning on wet epoxy repairs.
Assess Your Windows: Quick Inspection Checklist and Decision Rules
Before you commit a weekend to any single window, walk the house and grade every sash. This is where most DIY projects succeed or stall, because not every window needs the same level of intervention.
- Check the paint film. Cracking and peeling paint alone is a light-maintenance job. Paint that’s alligatored down to bare wood on a horizontal surface suggests moisture has been getting in for a while.
- Press-test the glazing putty. If it’s dry, cracked, and pulling away from the glass, water has probably been wicking behind it into the sash rail.
- Inspect the glass. Note any cracks, missing panes, or glazing that’s already fallen out; you’ll need to handle these panes with extra care during removal.
- Probe for rot with an awl or screwdriver. Sound wood resists the point. If it sinks in easily along more than a third of a rail’s length, you’re looking at a structural repair, not a cosmetic one.
- Check the joints. Wiggle the sash corners. Loose mortise-and-tenon joints can usually be reglued and clamped; a sash that’s racked out of square may need a splice repair.
- Test operation. Painted-shut sashes, broken sash cords, and failed counterweights are common and fixable, but they add time to your estimate.
The decision threshold is straightforward: shallow surface decay, cracked glazing, and sticking sashes are DIY territory. Deep structural rot spanning a full rail, a frame separated from the masonry opening, or more than a handful of windows needing full restoration at once often tips the balance toward hiring out, simply on time and equipment grounds.
Before removing anything, label every part. Number each sash with painter’s tape or a pencil mark on an edge that won’t show, photograph its position in the opening, and bag any glazing points or hardware by window. Annual light maintenance, cleaning weep holes, touching up caulk, catching failed glazing early, prevents most of this heavier work from ever being necessary.
Step-by-Step Restoration Workflow (Prep to Reassembly)
This is the full sequence, from first cut to final coat. Work through it sash by sash, or batch similar steps across several windows to save time.
1. Prep the work area and test for lead
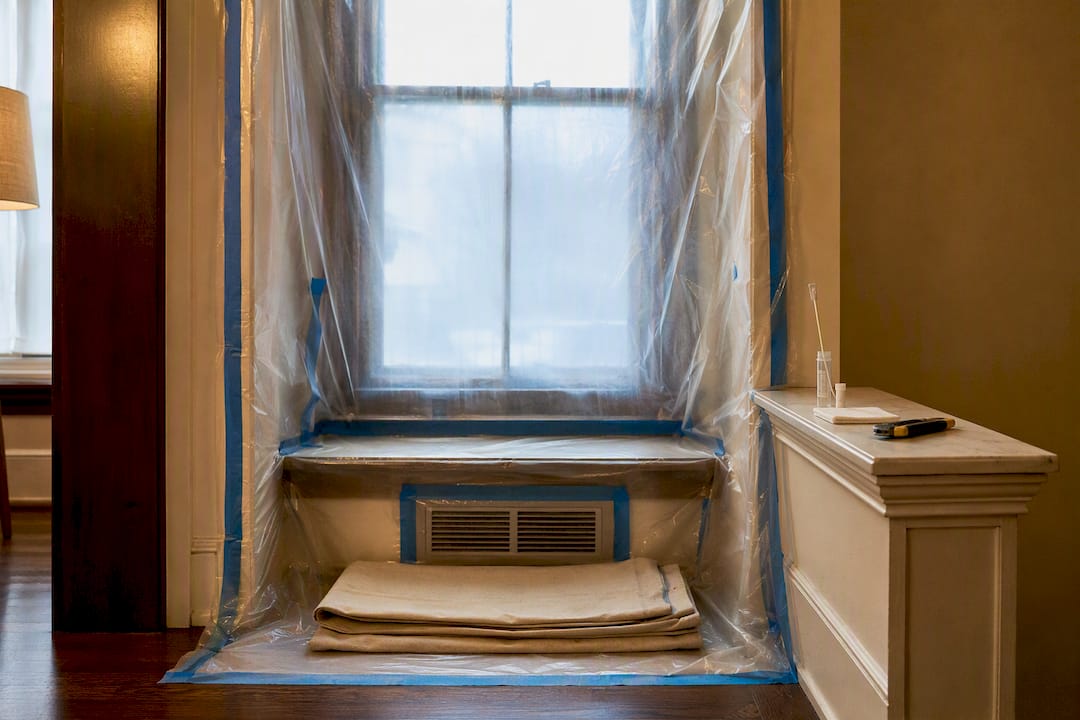
If your home was built before 1978, assume the paint contains lead unless a test confirms otherwise. A simple lead test swab from a hardware store gives a quick read, but professional lab testing is more reliable if you’re uncertain. Tape plastic sheeting over the interior and exterior work zones, seal off HVAC vents in the room, and lay a drop cloth directly below the window. Photograph the sash in place before touching it.
2. Remove the sash safely
Start with the interior stop, the thin strip of wood holding the lower sash in place. Score any paint seal with a utility knife first so you don’t tear the surrounding trim. Pry the stop free gently, working from one end toward the other, then set it aside labeled by location. Detach the sash cords from the sash (or note pulley positions if yours uses spring balances), and lift the sash free. Remove the parting bead to access the upper sash the same way. Label every sash immediately: “Living Room, Lower, Interior Face.”
3. Remove the glazing and glass
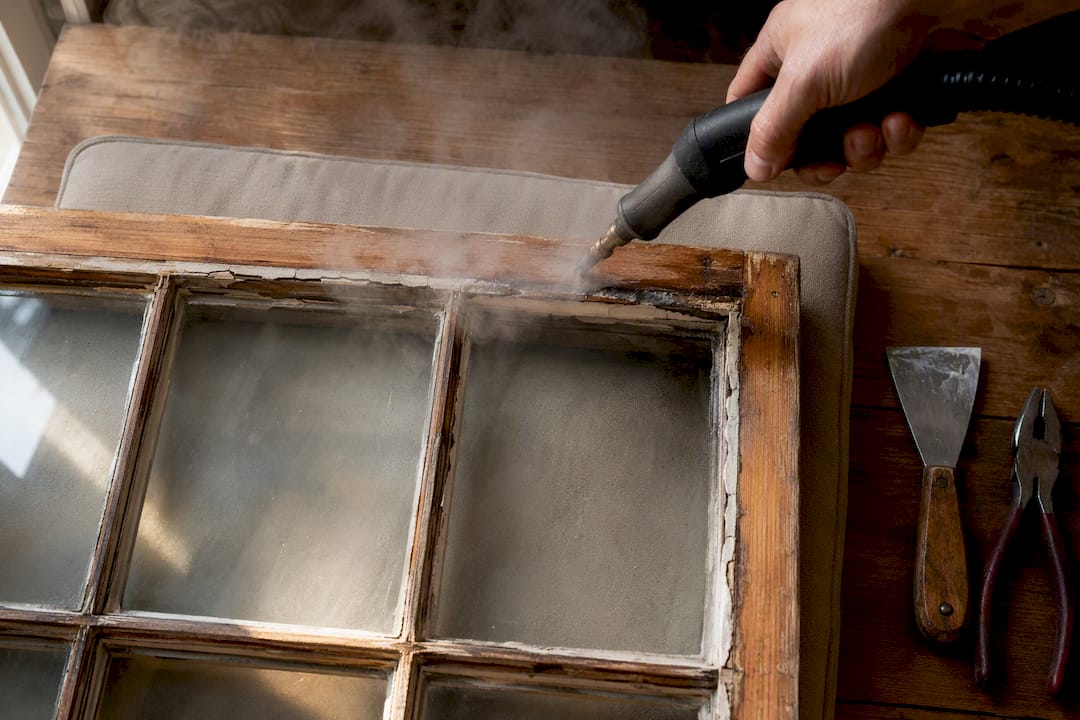
Old linseed putty softens well with gentle, indirect heat or a steam box, a sealed enclosure that channels steam from a wallpaper steamer or kettle across the putty line. Keep the heat gun moving and never let glass get hot to the touch in one spot; sudden temperature swings crack panes. Once softened, work the putty knife under the compound and lift it away in strips. Pull the glazing points with pliers and set them aside; you’ll replace most of them anyway. Support the pane with one hand as the last of the putty releases, and set it face up on a padded surface, marked with its orientation and sash location. If a pane is already cracked, wear cut-resistant gloves and work from the edges inward, never applying pressure to the center of a compromised pane.
4. Strip and let the wood dry
Once the sash is glass-free, strip old paint down to bare wood only where you’ve identified problem areas; sound painted wood elsewhere doesn’t need full stripping. A heat gun and scraper combination, worked slowly, lifts paint without excessive dust. If the wood tested wet or the sash sat in a damp opening, let it dry indoors for several days before repair. Epoxy will not bond properly to wood holding excess moisture, and trapped moisture behind a repair is one of the more common causes of early failure.
5. Repair with epoxy consolidation
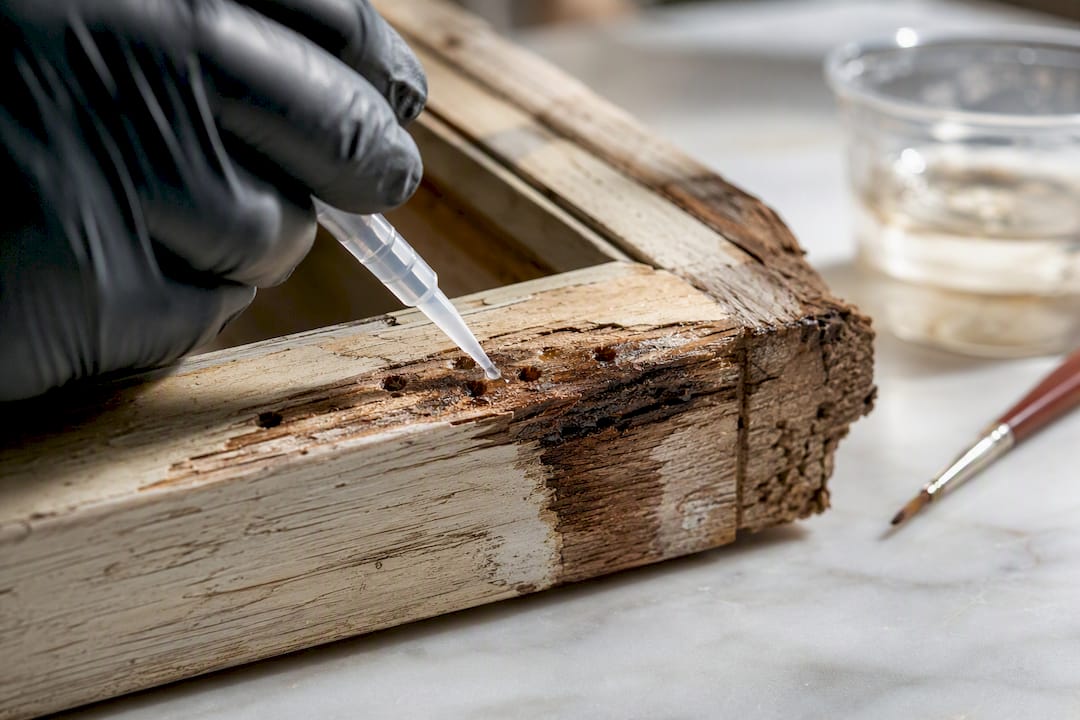
For soft or punky wood that’s still structurally present, drill a series of small holes into the decayed area and flood it with liquid epoxy consolidant until the wood looks saturated but isn’t puddling on the surface. Preservation carpenters favor two-part epoxy systems over traditional wood fillers because they penetrate deeper and cure into a material at least as hard as the surrounding wood, a technique detailed in National Park Service technical guidance on reinforcing deteriorated sashes. Once the consolidant cures, usually overnight, build up missing profile with epoxy filler paste, slightly overfilling the void, then let it cure fully (typically 24 hours) before sanding it flush to match the original molding profile.
6. Re-glaze the sash
Run a thin bead of caulk or oil-based glazing compound into the rabbet, the groove that holds the glass, before setting the pane. This bedding layer keeps water from wicking underneath. Press the glass in gently and evenly, then push in glazing points every four to six inches to hold it in place. Roll a rope of glazing putty along the edge and tool it at roughly a 45-degree angle with a putty knife, sloped to shed water away from the glass rather than pooling against it.
7. Prime and paint
Let the glazing putty skin over, usually three to seven days depending on humidity and temperature, before priming. Painting too soon is one of the most common DIY mistakes; wet putty under paint wrinkles and cracks within a season. Use an oil-based primer for the best bond to both wood and glazing putty, extending the paint slightly onto the glass to seal that edge against moisture. Two coats of quality exterior paint, with proper dry time between coats, will outlast a single heavy coat by years.
8. Reinstall the sash
Rehang the sash on its cords or balances, replace the parting bead and interior stop, and test operation before calling it finished. Add weatherstripping now, while the sash is accessible, rather than as an afterthought.
Pro Tip: Batch identical steps across every sash in the house before moving to the next stage. Strip all of them, then consolidate all of them, then glaze all of them. You’ll get faster with each repetition, and your epoxy and putty won’t sit half-used between sessions.
Wood Repair Techniques: Epoxy Consolidation, Splice Repairs, and Profile Replication
Not every rotted section calls for the same fix, and picking the wrong one is how DIY repairs fail early. Two-part epoxy consolidation systems work by soaking into punky, fibrous wood with a low-viscosity liquid resin that hardens the cell structure from the inside, then pairing that with a thicker epoxy paste to rebuild missing material. Technical references on window repair consistently recommend performing this work in place on the frame rather than removing it, since in-situ repair avoids collateral damage to surrounding trim and moves faster across multiple windows.
Deciding between an epoxy fill and a splice repair, cutting out a damaged section and gluing in fresh wood, comes down to how much material is missing:
- Use epoxy consolidation and filler when decay is scattered or shallow, generally affecting less than a third of a rail’s cross-section.
- Use a splice or Dutchman repair when an entire corner, sill nose, or rail end has rotted through, since epoxy alone can’t replace load-bearing structural depth.
- Combine both methods on longer rails: splice in solid wood for the worst section, then consolidate the softer wood adjacent to it.
For profile replication, hand-sculpting epoxy filler with a putty knife works fine for simple ogee and bead profiles common on older double-hung sashes. More elaborate molding profiles benefit from a simple silicone or wood mold pulled from an intact matching section elsewhere on the same window. Sand progressively, starting around 100 grit to shape and finishing around 220 grit before priming, and always sand with the grain to avoid scratches that telegraph through paint.
Moisture management deserves its own line item. Never seal a repair with epoxy or paint over wood that hasn’t fully dried, and avoid mixing incompatible materials, oil-based glazing putty over acrylic caulk, for instance, since different cure rates and flexibility can crack a fresh repair within a single season.
Glazing and Glass Handling: Steam, Putty Technique, and Cure Timing
Removing old glazing without cracking century-old glass takes patience more than strength. A steam box, essentially a sealed hood that directs steam from a wallpaper steamer along the putty line, softens linseed oil putty evenly without the scorch risk of a heat gun held too close. Fine Homebuilding’s documented sash-restoration process uses exactly this steam-box approach paired with epoxy consolidation for a reason: even heating avoids the thermal shock that causes glass to crack mid-removal.
Before you pull a single pane, mark its orientation with a dot of grease pencil in a corner, and note which sash and opening it came from. Old glass often has slight waves or bubbles unique to its original position, and reinstalling it elsewhere can leave a visible mismatch.
Reglazing sequence:
- Lay a bedding bead of glazing compound in the rabbet before the glass goes in, never set glass onto bare wood.
- Set the pane, then press glazing points into the wood every four to six inches around the perimeter to lock it in place.
- Roll and apply glazing putty, tooling it at a consistent slope so water sheds away from the glass rather than sitting against it.
- Trim excess putty flush with the sash edge for a clean paint line.
Timing governs the finish quality. Glazing putty typically skins over within three to seven days but can take two to four weeks to fully cure depending on thickness and weather. Painting before the skin forms traps moisture and guarantees cracking; most restoration guides recommend waiting at least a week in moderate conditions before priming.
Lead-Safe Work Practices: EPA RRP Basics and Containment Steps
If your house was built before 1978, treat every layer of paint on that window as lead-containing until a test proves otherwise. This isn’t optional caution: paint disturbance work in older homes falls under EPA lead-safe work practice requirements, which call for containment, low-dust removal methods, and HEPA cleanup on any project disturbing painted surfaces.
Containment basics for a DIY job:
- Seal the work area with plastic sheeting, taped at floor and wall junctions, extending several feet beyond the window opening.
- Wet-sand or use a sander with a HEPA dust-collection shroud instead of dry sanding whenever possible.
- Run a HEPA vacuum continuously in the work zone and wipe surfaces with a wet cloth before removing containment.
- Bag paint chips and sanding dust in heavy plastic, sealed, and dispose of according to local hazardous waste rules.
Wear your P100 respirator for the entire sanding and scraping process, not just the dustiest parts, and change clothes before moving through the rest of the house.
Homes built before 1978 make up a substantial share of the U.S. housing stock, which is exactly why the EPA’s Renovation, Repair, and Painting guidance treats window work as a priority category for lead-safe practices.
A certified RRP contractor is the right call when the project covers many windows across an occupied home, when young children or pregnant residents live there, or when interior sanding volume is high enough that containment becomes difficult to manage reliably on your own.
Weatherproofing and Energy Upgrades Compatible With Restored Wood Windows
A restored sash performs only as well as the seal around it. Compression weatherstripping, a spring bronze or vinyl strip set into the sash channel, closes the gaps that let air slip past a double-hung window at the meeting rail and side channels. Install it along the sash’s full contact length, not just the corners, for the tightest seal.
Storm windows add a second layer of insulating air space, and the choice between interior and exterior storms matters more than most homeowners realize:
- Exterior storms protect the primary sash from weather and are less visible from inside, but require more maintenance access.
- Interior storms are easier to install and remove seasonally, though poor ventilation between the storm and the primary sash can trap moisture against the glass, leading to condensation or wood rot if installed without weep gaps.
- Either option should include a small ventilation path so moisture can escape rather than collect.
Add a sash lock at the meeting rail once repairs are finished; beyond security, cinching the sashes together pulls the meeting rail seal tight and cuts drafts noticeably.
Combined, a well-sealed restored sash and a compatible storm window can match the energy performance of many replacement windows, according to preservation technical briefs, without sacrificing the original glass and profiles that gave the house its character in the first place. For a broader look at retrofit options that improve a building’s overall energy performance, additional guidance on energy upgrades covers related envelope improvements worth considering alongside window work.
Timeline and Cost Expectations for DIY Restoration vs. Hiring a Pro
Budgeting time honestly up front prevents the half-finished window sitting in the garage all winter. A light repair, cleaning, reglazing, spot painting, runs roughly 2 to 6 hours per sash for someone working through their first few windows. A full restoration involving epoxy consolidation, complete strip, and profile rebuilding typically takes 8 to 20 or more hours per sash, especially the first time through the sequence.
Material costs to plan around:
- Epoxy consolidant and filler kits, enough for several sashes
- Glazing putty and points, inexpensive per window but add up across a full house
- Primer and paint, budget for two coats of each
- Weatherstripping material sized to your sash channels
Complexity and scale are the real cost drivers, not the individual technique. A single sash with light rot is a manageable weekend project. A dozen windows with structural decay, or any frame issue tied into masonry, shifts the math toward hiring out once you count your own hourly value against a contractor’s efficiency and equipment.
Batching helps enormously: strip every sash in the house before moving to consolidation, then consolidate every sash before moving to glazing. Buying consumables in bulk and running one long lead-safe containment setup instead of several short ones also trims cost and time per window.
Field-Tested Tips From Wood Made Illinois
Restoring window sashes is detail work, and the details are where most DIY projects either come together or fall apart. Experienced carpenters bring extensive combined carpentry expertise to historic home projects, and a few habits from that shop floor consistently separate a durable repair from a repeat job.
A simple sash easel, built from scrap lumber, keeps a sash upright and steady while you scrape, sand, and tool putty, protecting delicate molding profiles from the dents a flat tabletop tends to cause. A consistent labeling system, sash location, face, and orientation marked before disassembly, prevents the frustrating scramble of matching parts back to their openings days later.
The most common pitfalls are avoidable: sanding through a profile’s crisp edges instead of following its curve, applying epoxy filler before the consolidant has fully cured, and painting over glazing putty before it skins over. Each shortcut saves an hour and costs a redo. Homeowners tackling their first wood window restoration project do best working slowly through one sash completely before starting the next.
Why Preserving Original Wooden Windows Matters
Old growth lumber used in windows built decades or a century ago carries embodied energy that a replacement unit can’t replicate, tighter grain, denser wood, and a manufacturing footprint that’s already spent. Repairing what exists conserves that resource rather than sending it to a landfill for a vinyl substitute. Original wooden windows also carry profiles, wavy glass, and proportions specific to when a house was built, details a stock replacement flattens out.
Done correctly, with proper consolidation and routine maintenance afterward, a restored sash can perform for decades more. The trade-off for that longevity is patience during the repair itself. Preservation work rewards care over speed, and a well-tooled glazing line or a properly cured epoxy patch will outlast a rushed one by years.
— Wood
How Woodmadeillinois Can Help With Historic Window Restoration
Some restoration jobs are built for a weekend and a pot of coffee. Others involve a dozen sashes, masonry frames pulling away from the opening, or rot deep enough that DIY tools won’t cut it safely, and that’s where Woodmadeillinois becomes the practical alternative to tearing out original windows entirely. Rather than replacing character sashes with stock vinyl units, our team handles historic window restoration, sash repair, reglazing, and finish painting on-site across Central Illinois homes.

Consider calling in Woodmadeillinois when you’re facing extensive structural rot across multiple windows, a frame separated from its masonry opening, or simply a project timeline that doesn’t fit your schedule. If glass is already broken or a pane cracked during a DIY attempt, our window glass repair work handles that safely without risking further damage to the sash. Requesting an estimate is straightforward: send a few clear photos of each window, note approximate age of the home, and flag any visible rot or broken panes so we can scope the work accurately. Reach out through our main service page to start that conversation and get a project timeline that fits your home.
Sources
- Wood windows — National Park Service
- Repairing wood windows — Ohio History Connection / Preservation Brief excerpts
- Restore a wood window sash — Fine Homebuilding
FAQ
Is It Worth Restoring Old Wood Windows?
Yes, in most cases, since preservation guidance shows even significantly decayed sashes are often good candidates for repair through consolidation rather than replacement. Restored sashes paired with weatherstripping and storm windows can match the energy performance of many replacement units while keeping original glass and profiles intact.
How Much Does It Cost to Restore Wooden Windows?
Cost depends heavily on whether you DIY or hire out, and material costs alone (epoxy kits, glazing putty, primer, and paint) are modest compared to full replacement pricing. Project-specific estimates are provided after reviewing photos and condition details, since pricing varies by the extent of rot and number of windows involved.
How Do You Restore Old Wooden Windows Yourself?
The general sequence is containment and lead testing, removing the sash and labeling parts, stripping paint from problem areas, consolidating decayed wood with two-part epoxy, reglazing with fresh putty, then priming and painting once the putty skins over. Each stage has specific wait times, particularly epoxy cure and putty skin formation, that shouldn’t be rushed.
How Much Does It Cost to Restore a Single Old Window?
A light repair on one sash, cleaning, reglazing, and spot paint, typically runs 2 to 6 hours of labor if doing it yourself, while a full restoration with epoxy consolidation can run 8 to 20 or more hours. Material costs per sash are generally low, but labor time is the larger factor whether you DIY or hire a professional.
When Should I Hire a Professional Instead of DIYing?
Hire a professional when rot extends through a large portion of a rail, when the frame has separated from surrounding masonry, or when the project spans many windows in an occupied home with lead-paint concerns. Larger or structurally complex jobs are often handled by professionals, alongside straightforward sash repair and reglazing work.