A phased home renovation workflow is the difference between a project that builds steadily toward a finished home and one that unravels into expensive rework and contractor confusion. The core principle is straightforward: break a large remodel into independent, sequenced stages, each with its own defined scope, timeline, and budget, so that every phase hands off cleanly to the next. Done right, this approach controls costs, protects your living space during construction, and keeps coordination among trades from collapsing into chaos.
Why does sequencing matter so much? Because the order of work is not a preference. It is a dependency chain. Structural repairs must precede systems work; systems work must precede finishes. Reversing that order means tearing out what you just paid for.
Key advantages of a phased approach:
- Prevents scope creep by treating each phase as a discrete, bounded project
- Allows budget reassessment between phases rather than committing all capital upfront
- Reduces psychological fatigue by building in natural recovery intervals
- Enables families to remain in the home with manageable disruption
- Creates clear milestones that keep contractors and homeowners aligned
Table of Contents
- How to plan your phased home renovation workflow
- Creating realistic timelines and budgets for phased renovations
- Common mistakes that derail phased renovation projects
- 1. Starting with cosmetic finishes first
- 2. Skipping rough-ins during open-wall phases
- 3. Pulling a single permit for a multi-year project
- 4. Ignoring inflation in later-phase budgets
- 5. Letting scope creep go undocumented
- 6. No master plan guiding individual phases
- 7. Underestimating living disruption
- Expert guidance from Woodmadeillinois for phased renovations
- Woodmadeillinois brings your phased renovation to life
- Key Takeaways
How to plan your phased home renovation workflow
Effective planning starts before a single permit is filed. The first task is a detailed scope document for each phase, one that defines exactly what is included, what is explicitly excluded, and what the completion criteria look like. Without that document, “while we’re at it” conversations become expensive commitments.
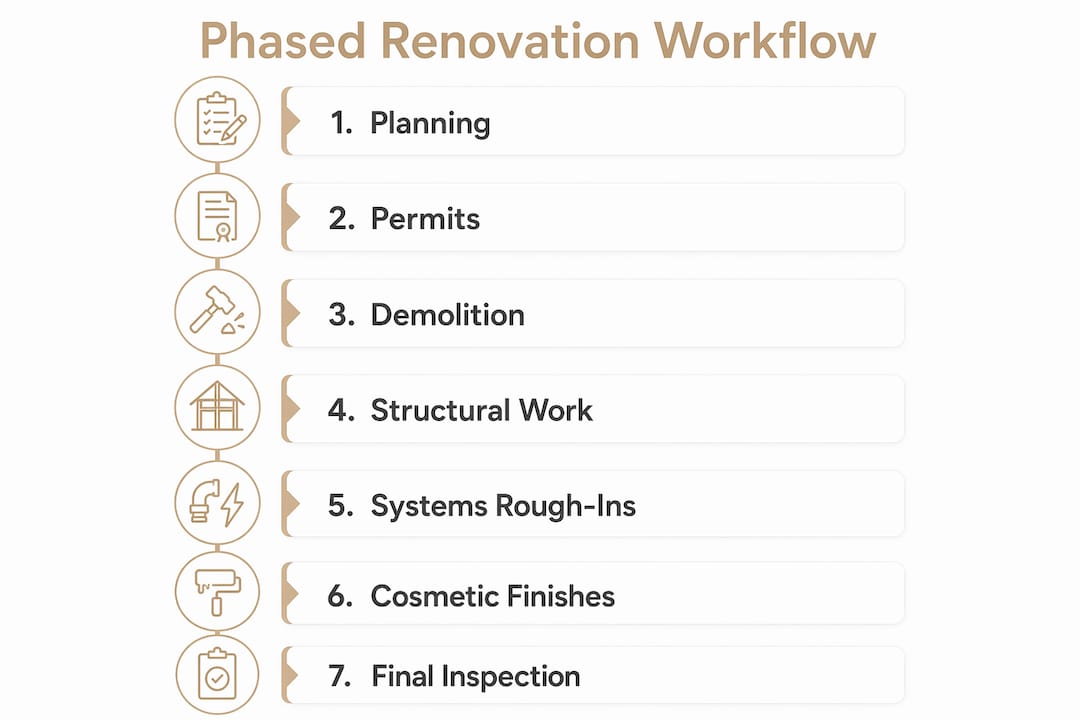
Sequencing follows a strict inside-out, structural-to-cosmetic order. Demolition comes first, then structural framing changes, then rough-in trades (HVAC ducts first because they are the bulkiest, then plumbing, then electrical), then inspections, then insulation, then drywall, then finishes. Flooring and paint are always last. Skipping ahead on cosmetics is the single most common cause of rework.
Permits deserve their own planning track. Building permits typically expire within 6–12 months of issuance, so a multi-year renovation requires separate permits pulled for each phase as it approaches. Notify your local building department of the long-term plan early; they can guide inspection sequencing so completed phases are legally signed off before the next begins.
For contractor coordination, a decisions and approvals log prevents the “I never agreed to that” conversation. Every tile selection, fixture finish, and material substitution gets recorded with a date and the name of whoever approved it. Weekly milestone check-ins, not daily micromanagement, keep trades accountable without burning goodwill.
Documentation checklist for each phase:
- Written scope with inclusions and exclusions
- Permit application and inspection schedule
- Contractor and subcontractor contact list with assigned tasks
- Material lead-time tracker (cabinetry commonly runs several weeks; windows, longer periods)
- Decisions log with dates and approvals
- Change control record for any scope additions
Pro Tip: Treat each phase as a separate mini-project with its own completion celebration. Acknowledging a finished phase, even informally, sustains motivation and signals a clear boundary before the next stage begins.
Creating realistic timelines and budgets for phased renovations
Timelines built forward from a start date almost always fail. Build yours backward from your target completion date, accounting for permit processing windows, material lead times, and inspection scheduling. That backward pass forces you to confront constraints before they become crises.
Recovery gaps of 6–8 weeks between major phases give families time to live in the completed space, reassess the budget, and make decisions for the next stage without fatigue. Shorter gaps of 2–4 weeks work for smaller-scope phases. Longer gaps of 3–6 months may be necessary when budget rebuilding requires extended saving periods, and that is preferable to financial stress.
On budget, phasing adds 5–15% in material costs due to inflation and repeated contractor mobilization, but it saves 30–50% on financing costs compared to funding a single large loan. For home interior upgrades that save money, that financing offset is often the deciding factor.
A standard contingency reserve of 10–20% of each phase’s budget is industry practice. Older homes or phases involving structural unknowns warrant the higher end of that range. Tie progress payments to passed inspections and completed milestones, never to a contractor’s estimate of “almost done.”
Budget framework per phase:
- Hard costs: materials and labor
- Soft costs: permits, design fees, temporary accommodation if needed
- Inflation multiplier for phases scheduled 12 or more months out
- Mobilization allowance for each contractor return visit
- Contingency: 10–20% of phase total, held in a separate account
Common mistakes that derail phased renovation projects
1. Starting with cosmetic finishes first
Painting walls and installing new flooring before structural and systems work is complete almost guarantees rework. A new kitchen floor pulled up to reach wiring that should have been roughed in first is a textbook example of costly sequencing errors. Always go structural first.
2. Skipping rough-ins during open-wall phases
When walls are open, that is the only affordable moment to run future infrastructure. Running a new electrical circuit through open walls costs a fraction of what it costs through finished walls. Skipping rough-in planning during a basement finishing phase, for instance, can turn a $1,500 addition into a $5,000–$8,000 retrofit later.
3. Pulling a single permit for a multi-year project
Permits expire. A renovation spanning three or more years requires separate permits for each phase, coordinated with the local building department. Misunderstanding permit timelines is one of the most common compliance failures in long-term phased work.
4. Ignoring inflation in later-phase budgets
Material costs rise each year. A phase budgeted in 2026 dollars and executed two years later will cost more. Build an annual inflation multiplier into every phase that is more than 12 months out, and re-bid if a contractor’s quote has expired after six months.
5. Letting scope creep go undocumented
Verbal “while we’re at it” additions are where budgets collapse. A documented change control process evaluates every addition for cost and schedule impact before it becomes a commitment. The habit of written confirmation before proceeding is the most effective scope control available.
6. No master plan guiding individual phases
Individual phase decisions made without a master plan create conflicts downstream. An exterior gas line not stubbed out during Phase 1 means breaking up a finished patio in Phase 4. Hire an architect or designer to create the master plan before any phase begins, even if execution is years away. For guidance on avoiding these traps, renovation mistakes to avoid is a useful reference.
7. Underestimating living disruption
A kitchen and bathroom remodel in the same phase means weeks without normal cooking or bathing. Plan temporary kitchen setups, consider short-term rentals for high-impact phases, and schedule major disruptions around school calendars and family commitments. Disruption that is planned for is disruption that is survived.
Expert guidance from Woodmadeillinois for phased renovations
With over 100 years of combined carpentry experience across Central Illinois, Woodmadeillinois approaches phased renovations with a discipline that goes beyond finish work. The team’s consistent recommendation: plan all electrical, plumbing, and HVAC routing during the earliest open-wall phases. Infrastructure planned early costs 60–70% less than the same work retrofitted through finished walls.
Custom carpentry and aesthetic installations belong in the final phases. Built-in shelving, custom cabinetry, barnwood accent walls, and pallet wood features are vulnerable to damage from subsequent trades. Installing them last protects the investment and maximizes visual impact at project completion. For exterior phases, coordinating windows, doors, and exterior style early in the master plan prevents mismatched aesthetics between phases.
Pro Tip: Before closing walls in any phase, ask your carpentry consultant: “What should we rough in now that would be expensive to add later?” A good answer typically yields $500–$2,000 in additions that prevent $3,000–$10,000 in future retrofits.
Additional recommendations from Woodmadeillinois’s team:
- Maintain a single shared documentation folder accessible to all trades
- Define “phase complete” in writing before mobilizing for the next stage
- Use local Central Illinois contractors familiar with regional permitting timelines
- Hold final payment until the punch list is resolved, inspections are passed, and lien waivers are secured
Woodmadeillinois brings your phased renovation to life
Phased renovations reward homeowners who plan the finish work as carefully as the foundation. Woodmadeillinois offers exactly that kind of forward-thinking partnership for Central Illinois homes and businesses. Where most contractors focus on a single trade, the Woodmadeillinois team brings over a century of combined carpentry expertise to the design consultation before a single wall opens, helping clients anticipate rough-in needs, avoid design conflicts between phases, and specify custom installations that fit the final vision from day one.

The result is a renovation where the custom shelving, built-in cabinetry, or barnwood feature wall you envisioned in Phase 1 actually fits the space as built in Phase 4, without costly adjustments. Whether you are planning a home office, a kitchen, or a full interior transformation, the trusted local carpentry experts at Woodmadeillinois can walk through your phased plan and identify exactly where custom carpentry adds the most lasting value. Reach out for a personalized design consultation and get your phased renovation workflow on solid footing before the first permit is filed.
Key Takeaways
A well-structured phased home renovation workflow prevents rework, controls costs, and keeps every stage of your project on track through strict sequencing, documented scope, and planned recovery periods.
| Point | Details |
|---|---|
| Sequence is a dependency chain | Always complete structural and systems work before any cosmetic finishes to avoid tearing out completed work. |
| Budget for phasing costs | Phasing adds 5–15% in material costs due to inflation and repeated contractor mobilization, but it saves 30–50% on financing costs compared to funding a single large loan. |
| Contingency is non-optional | Reserve 10–20% of each phase’s budget as a contingency for surprises; the higher end is advisable for older homes or when structural unknowns are involved. |
| Rough-ins save thousands | Running infrastructure through open walls costs 60–70% less than retrofitting through finished surfaces later. |
| Woodmadeillinois adds phase-one value | Consulting Woodmadeillinois before walls open helps Central Illinois homeowners plan custom carpentry that fits every future phase. |